ENGLISH EN
DESCRIPTION
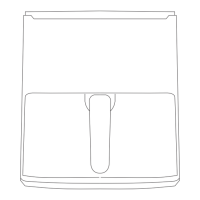
A Thermostat
B Operation indicating light
C Heating indicating light
D Timer
E Frying basket
F Outer bowl
G Basket open button
H Basket handle
I Air outlet
J Power cable and plug
• If the model of your appliance does not have
the accessories described above, they can
also be bought separately from the Technical
Assistance Service.
USE AND CARE:
• Fully extend the appliance’s power cable be-
fore each use.
• Do not use the appliance if the parts or acces-
• Do not use the appliance if the accessories
attached to it are defective. Replace them im-
mediately.
• Do not use the appliance when empty.
• Do not use the appliance if the timer switch
does not work properly.
• Do not move the appliance while in use.
• To keep the non-stick treatment in good condi-
tion, do not use metal or pointed utensils on it.
• Do not force the appliance’s work capacity.
• Respect the MAX level.
• Disconnect the appliance from the mains when
not in use and before undertaking any cleaning
task.
• Store this appliance out of reach of children
and/or persons with physical, sensory or redu-
ced mental or lack of experience and knowle-
dge.
• Do not store or transport the appliance if it is
still hot.
• Never leave the appliance connected and una-
ttended if is in use. This saves energy and pro-
longs the life of the appliance.
• Use only utensils appropriate to support high
temperatures.
• Turn the thermostat control to the minimum
(MIN) setting. This does not mean that the is
switched off permanently.
• As a reference, in the annexed table you will
-
rature and time for several meals.
INSTRUCTIONS FOR USE
BEFORE USE:
• Make sure that the entire product’s packaging
has been removed.
•
the parts that will come into contact with food in
the manner described in the cleaning section.
•
emits a slight plastic odor.
USE:
• Unroll the cable completely before plugging it
in.
• Connect the appliance to the mains.
• Take the bowl (F) out of the fryer carefully.
• Note: Do not use the bowl without the basket
in it.
• Note: manipulate the bowl using the basket
and its basket handle. Don’t touch the bowl
when it’s hot.
• Put the ingredients you want to fry inside the
basket (E)
• Introduce the bowl inside the fryer.
• Choose the needed temperature using the
thermostat (A).
• Once you’ve done it, choose the right cooking
time with the Timer (D) and the appliance will
start to work.
• The green power pilot light (B) and the red
heating pilot light (C) will switch on.
• During the process of frying, the red hea-
ting pilot light (C) will switch on intermittently,
showing when the appliance is heating.
• Note: have in mind that if the appliance is cool
you should add 3 minutes to the cooking time.
• Note: if you want to shake the ingredients, pull
the bowl out of the appliance by the handle and
shake it.