HVL-F46RM 5-031-736-01(1) HVL-F46RM 5-031-736-01(1) HVL-F46RM 5-031-736-01(1) HVL-F46RM 5-031-736-01(1)
電気製品は、安全のための注意事項を守らないと、
人身への危害や火災などの財産への損害を与える
ことがあります。
本書には、事故を防ぐための重要な注意事項と製品の取り扱いかたを
示しています。
本書をよくお読みのうえ、製品を安全にお使いください。お読みに
なったあとは、いつでも見られるところに必ず保管してください。
本機のマニュアルについて
本機の使いかたについて詳しくは、
ヘルプガイド(Web取扱説明書)をご覧
ください。
ヘルプガイド(Web取扱説明書)
http://rd1.sony.net/help/ilc/1730/ja/
取り扱い上のご注意
本機はマルチインターフェースシュー搭載のソニー製レンズ交換式
デジタルカメラおよびソニー製デジタルスチルカメラとの組み合わ
せでご使用いただけます。
お使いになるカメラのソフトウェアを、必ず最新のバージョンにアッ
プデートしてから本機をお使いください。
•本機に接続可能なカメラについては、以下の
サイトでご確認ください。
https://www.sony.net/dics/f46rm/
•本取扱説明書とあわせて、お使いのカメラの取扱説明書もご確認く
ださい。
•火災、感電の原因となることがありますので以下にご注意ください。
‒ 分解や改造をしない
‒ ぬれた手で使用しない
‒ 内部に水や異物(金属類や燃えやすい物など)を入れない
‒ 水滴のかかる場所など湿気の多い場所やほこり、油煙、湯気の多い
場所では使わない
•本機を他社製品と組み合わせて使用した際の性能や、それによって
生じた事故、故障につきましては保証いたしかねますので、あらか
じめご了承ください。
•破損や不具合の原因となる場合がありますので以下にご注意くだ
さい。
‒ 本機は精密機器のため、落としたり、たたいたり、強い衝撃を与え
ない
‒ 端子部を直接手で触らない
‒ 高温多湿の場所での使用、保存を避ける
‒ 屋外使用するときは、雨や海水にぬれないようにする
•内部点検や修理は相談窓口にご依頼ください。
•落としたり、液体がかかったりしないように丁寧に扱ってください。
•本機は防じん、防滴性に配慮して設計されていますが、防水性能は備
えていません。雨中での使用時は、本機に雨がかからないようにして
ください。
•フラッシュの発光部表面の汚れは取り除いてください。表面の汚れ
が発光による熱で発煙したり、焦げる場合があります。汚れ・ゴミが
ある場合は柔らかい布などで清掃してください。
•本製品(付属品を含む)は磁石を使用しているため、ペースメーカー、
水頭症治療用圧可変式シャントなどの医療機器に影響を与える恐
れがあります。本製品をこれらの医療機器をご使用の方に近づけな
いでください。これらの医療機器を使用されている場合、本製品のご
使用前に担当医師にご相談ください。
下記の注意事項を守らないと、火災・
感電により死亡や大けがの原因となり
ます。
発光部を人の目に近づけて発光させない
強力な光は目をいためる恐れがあります。
落下などで、外装ケースなどが破損したときは、
絶対に露出部分に触れない
感電の原因となることがあります。
自動車などの運転中にフラッシュを操作したり、
運転者に向けてフラッシュを発光させない
交通事故の原因となることがあります。
万一、使用中に高熱、焦げ臭い、煙が出るなど
の異常を感じたら、すみやかに電池を抜き、使
用を中止する
放置すると火災や火傷の原因となります。
電池の外装チューブがはがれたり、傷がついて
いる電池は絶対に使用しない
漏液・発熱・破裂の原因となることがあります。
下記の注意事項を守らないと、けがを
したり周辺の家財に損害を与えたりす
ることがあります。
発光部を皮膚や物で覆ったまま発光させない
発光のとき、発光部が大変熱くなり、火傷の恐れがあり
ます。
漏液、発熱、発火、破裂、誤飲による
大けがややけど、火災などを避けるため、
下記の注意事項をお守りください。
•電池は指定された種類のみと交換してください。破裂、火災、けがの
原因となります。
•使用済みの電池は、指示に従って廃棄してください。
ニッケル水素電池はリサイクルできます。不要
になったニッケル水素電池は、金属部をビニール
テープなどで絶縁してリサイクル協力店へお持ち
ください。
充電式電池の回収・リサイクルおよびリサイクル
協力店については
一般社団法人JBRCホームページ
http://www.jbrc.com/を参照してください。
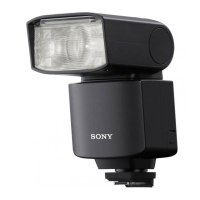
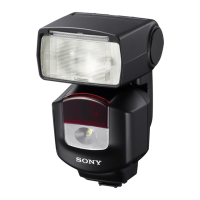
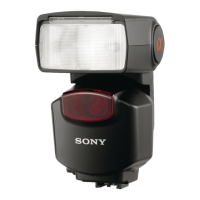
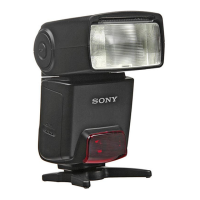
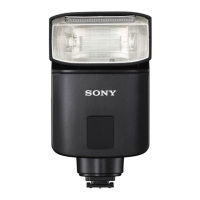
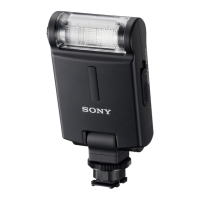
各部名称
1 キャッチライトシート
2 内蔵ワイドパネル
3 フラッシュ発光部
4 マルチ/マイクロUSB端子
5 マルチインターフェースフッ
ト
6 ミニスタンド
7 三脚取り付け穴
8 上下方向バウンス角度表示
9 LINKランプ
10液晶表示部
11 電池室ふた
12 リリースボタン
13 ロックレバー
14 防じん・防滴カバー
15 中央ボタン
16 MENUボタン
17 電源スイッチ
「LOCK」にすると、コントロー
ルホイールなどの設定ボタン
が無効になります。意図しない
誤操作を防ぐことができます。
18 コントロールホイール
19 Fnボタン
20TESTボタン
21 十字キー
電池を入れる
以下のいずれかの電池を使用します。
•単3形アルカリ乾電池4本
•単3形ニッケル水素電池(Ni-MH)4本
1
電 池 室 の 表 示( )にしたがって電池を入れ
る 。( は乾電池の向きを示しています。)
ご注意
•ニッケル水素電池は、必ず指定の充電器で完全に充電してからお使
いください。
•リチウム乾電池は性能を十分に発揮できないことがあるため、ご使
用にならないでください。
カメラに本機を取り付ける
1
本機の電源スイッチを「OFF」にする。
2
リリースボタンを押しながら、「LOCK」方向の
反 対 へ 回 す(
)。
3
本機の端子保護キャップと、カメラのシュー
キャップをそれぞれ取りはずす。
•カメラの内蔵フラッシュが上がっている場合は、下げてください。
4
マルチインターフェースフットを、カメラのマ
ルチインターフェースシューに差し込む(
)。
•しっかりと固定されるまで、矢印方向に差し込んでください。
5
ロックレバーを「LOCK」方向に右端までしっか
り 回 し(
)、本機を確実に固定する。
取りはずしかた
本機の電源を切った後、リリースボタンを押しながら、「LOCK」方向の
反対へ回し、本機を手前にスライドさせます。
ご注意
•本機のご使用後は、マルチインターフェースフットに端子保護
キャップを取り付けて保護してください。
TTLフラッシュ撮影をする
本機の機能や設定について詳しくは、ヘルプガイドをご覧ください。
1
本機の電源スイッチを「ON」にする(
)。
•電源を入れると、フラッシュの充電が始まります。TESTボタン(
)
がオレンジに点灯したら充電完了です。
2
MODEボタン(
)を押し、コントロールホイー
ルを回転させて、[TTL]を選択する。
3
カメラのシャッターボタンを押し込んで撮影
する。
•+/-ボタンを押し、調光補正設定画面から調光補正(発光量調
整 )が で き ま す 。
ワイヤレスフラッシュ撮影をする
(電波式ワイヤレス)
ワイヤレスフラッシュ撮影をするには、本機以外にもう1台、電波式ワ
イヤレス対応のフラッシュを用意してペアリングを行う必要があり
ます。詳しくは、ヘルプガイドをご覧ください。
主な仕様
外形寸法(約) 69.4mm×114.7mm×88.9mm
(幅/高さ/奥行き)
質量(約)
3 0 8 g( 電 池 含 ま ず )
電源電圧 DC6V
推奨電池 単3形アルカリ乾電池4本
単3形ニッケル水素電池4本
同梱物 フラッシュ(1)、端子保護キャップ(装着済み)(1)、
防じん・防滴カバー(装着済み)(1)、
ミ ニ ス タ ン ド ( 1 )、ケ ー ス ( 1 )、印 刷 物 一 式
仕様および外観は、改良のため予告なく変更することがありますが、
ご了承ください。
MultiInterfaceShoe(マルチインターフェースシュー)は
ソニーグループ株式会社の商標です。
保証書とアフターサービス
保証書
•この製品には保証書が添付されていますので、お買い上げの際、お受
け取りください。
•所定事項の記入および記載内容をお確かめのうえ、大切に保管して
ください。
•保証期間は、お買い上げ日より1年間です。
アフターサービス
調子が悪いときはまずチェックを
ヘルプガイドなどを参考にして故障かどうかお調べください。
それでも具合の悪いときは
ソニーの相談窓口にご相談ください。
保証期間中の修理は
保証書の記載内容に基づいて修理させていただきます。詳しくは保証
書をご覧ください。
保証期間経過後の修理は
修理によって機能が維持できる場合は、ご要望により有料修理させて
いただきます。
部品の保有期間について
当社では本機の補修用性能部品(製品の機能を維持するために必要な
部品)を、製造打ち切り後最低7年間保有しています。ただし、故障の状
況その他の事情により、修理に代えて製品交換をする場合があります
のでご了承ください。保有期間が経過したあとも、故障箇所によって
は修理可能の場合がありますので、お買い上げ店か、ソニーの相談窓
口にご相談ください。
ご相談になるときは次のことをお知らせください。
•型名:HVL-F46RM
•故障の状態:できるだけ詳しく
•お買い上げ年月日
To remove the flash unit from the camera
Turn off the power of the flash unit first. Press and hold the
release button, rotate the lock lever away from “LOCK,” and then
slide the unit out of the Multi Interface shoe.
Note
• Once you removed the flash unit from the camera, be sure to
attach the connector protect cap to the Multi Interface foot to
protect its terminal.
TTL flash photography
For details about the functions and settings of the flash unit, refer
to the Help Guide.
1 Turn the power switch on the flash unit to
“ON.” (
)
• When you turn on the power to this flash unit, the flash unit
starts charging up itself. When the flash unit is fully charged
up, the TEST button (
) lights in orange.
2 Press the MODE button (
) and rotate the
control wheel to select [TTL].
3
Press the shutter button on the camera to
take a photo.
• You can press the +/- button to change the flash
compensation (adjust the flash power level) on the screen
for setting the flash compensation.
Wireless flash photography
(with radio wireless
communications)
To perform radio wireless flash photography with the flash
unit, you need another flash unit that supports radio wireless
communications in addition to this flash unit and must pair them
both together. For details, refer to the Help Guide.
Specifications
Dimensions
(Approx.)
69.4 mm × 114.7 mm × 88.9 mm
(2 3/4 in. × 4 5/8 in. × 3 1/2 in.) (W/H/D)
Mass (Approx.) 308 g (10.9 oz) (excluding the batteries)
Power
requirements
DC 6 V
Recommended
batteries
Four LR6 (AA-size) alkaline batteries
Four AA-size rechargeable nickel-metal hydride
batteries
Included items Flash unit (1), Connector protect cap (attached) (1),
Dust and moisture resistant cover (attached) (1),
Mini-stand (1), Case (1),
Set of printed documentation
Design and specifications are subject to change without notice.
“Multi Interface Shoe” is a trademark of Sony Group Corporation.
À propos du manuel de ce produit
Pour plus d'informations sur
l'utilisation du produit, reportez-
vous au «Guide d’aide» (manuel en
ligne).
« Guide d'aide » (Manuel en ligne)
http://rd1.sony.net/help/ilc/1730/h_zz/
N’exposez pas les piles à une chaleur excessive, notamment aux
rayons directs du soleil, à une flamme, etc.
ATTENTION
• Remplacez la pile uniquement par une pile correspondant au
type spécifié. Sinon vous risquez de provoquer des brûlures, un
incendie ou des blessures.
• Mettez les piles au rebut conformément aux instructions.
Remarques sur l’emploi
Cette unité flash peut être utilisée avec les appareils photo à
objectif interchangeable Sony ou les appareils photo numériques
Sony pourvus d’une griffe multi-interface classique.
Mettez à jour le logiciel de votre appareil photo avant utilisation.
• Pour savoir les modèles d’appareil photo
compatibles avec cet appareil, consultez
l’adresse de site internet suivante :
https://www.sony.net/dics/f46rm/
• Reportez-vous au mode d’emploi de cette unité flash et à celui
de votre appareil photo.
• Pour éviter tout risque d'incendie ou d'électrocution, observez
les points suivants :
– Ne démontez ni ne modifiez pas cet accessoire.
– N'utilisez pas cet accessoire avec les mains mouillées.
– Ne faites pas pénétrer de l'eau ou des corps étrangers (métal,
matières inflammables, etc.) à l'intérieur de cet accessoire.
– N'utilisez pas cet accessoire dans un endroit exposé à des
éclaboussements d'eau, un taux d'humidité élevé, des
poussières, des émanations d'huile et la vapeur.
• L’utilisation de cet appareil avec des produits d’autres fabricants
risque de nuire à ses performances, entraînant des accidents ou
des dysfonctionnements.
• Pour éviter tout risque d'endommagement ou de
dysfonctionnement, observez les points suivants :
– Cet accessoire est un dispositif de précision. Ne le laissez pas
tomber ou ne le heurtez pas ; évitez également qu'il subisse
un choc physique violent.
– Ne touchez pas les contacts électriques de cet accessoire à
mains nues.
– N'utilisez ni ne rangez pas cet accessoire à un endroit exposé
à des températures ou un taux d'humidité élevés.
– Lors de l'utilisation de cet accessoire à l'extérieur, évitez toute
exposition à la pluie ou l'eau de mer.
• Pour réaliser une réparation ou inspection à l'intérieur de cet
accessoire, contactez le distributeur Sony ou le centre de service
Sony agréé le plus proche.
• Manipulez cet appareil avec précaution pour éviter tout risque
de chute ou exposition à un liquide.
• Cet appareil est conçu pour résister à la poussière et
à l’humidité, mais il n’est pas étanche à l’eau ni aux
éclaboussures. Par temps pluvieux, veillez à ce que le produit ne
se mouille pas.
• Gardez le tube à éclairs propre. La surface d’un tube à éclairs
sale risque de causer une surchauffe, entraînant l’émanation
de fumées ou des brûlures. Pour nettoyer le tube à éclairs,
essuyez-le avec un chiffon doux, etc.
• Ce produit (y compris les accessoires) comporte un ou des
aimants qui peuvent perturber les stimulateurs cardiaques,
les valves de dérivation programmables pour le traitement
de l’hydrocéphalie ou d’autres appareils médicaux. Ne placez
pas ce produit près de personnes utilisant ce type d’appareil
médical. Consultez votre médecin avant d’utiliser ce produit si
vous utilisez ce type d’appareil médical.
Identification des éléments
1 Feuille de réflexion
2 Adaptateur grand angle
intégré
3 Tube à éclairs
4 Multi/micro connecteur USB
5 Sabot multi-interface
6 Mini-support
7 Douille de trépied
8 Indicateur d’orientation
(angle vertical)
9 Témoin LINK
10 Écran LCD
11 Volet-couvercle du
compartiment des piles
12 Bouton de libération
13 Bouton de verrouillage
14 Couvercle antihumidité et
antipoussière
15 Bouton central
16 Bouton MENU
17 Interrupteur d’alimentation
En sélectionnant « LOCK »,
vous pouvez désactiver la
molette de commande et les
touches de l’unité flash pour
éviter l’exécution involontaire
d’une commande.
18 Molette de commande
19 Touche Fn
20 Touche TEST
21 Touches direction
Mise en place des piles
Vous pouvez installer dans l’unité flash les piles suivantes:
• Quatre piles alcalines (AA)
• Quatre piles nickel-métal hydrure (Ni-MH) rechargeables (AA)
1 Insérez les piles dans le compartiment des
piles comme illustré ( ).
(
indique le sens des piles.)
Remarque
• Avant d’installer les piles nickelmétal hydrure rechargeables,
assurez-vous de les charger complètement à l’aide du chargeur
de piles indiqué.
• N’utilisez pas de piles au lithium dans cette unité flash, elles ne
permettent pas à l’unité flash d’optimiser ses performances.
Pose de l’unité flash sur un
appareil photo
1 Placez l’interrupteur d’alimentation de
l’unité flash sur «OFF».
2
Appuyez sur le bouton de libération
et maintenez-le enfoncé puis placez le
bouton de verrouillage hors de la position
«LOCK». (
)
3
Retirez le capuchon de protection
de connecteur de l'unité flash; et la
protection de la griffe de l’appareil photo.
• Si le flash intégré de l’appareil photo se déclenche, rentrez-
le.
4 Introduisez le sabot multi-interface de
l’unité flash dans la griffe multi-interface
de l’appareil photo. (
)
• Assurez-vous de pousser le sabot dans le sens de la flèche
jusqu’à ce qu’il soit bien fixé.
5 Tournez à fond le bouton de verrouillage
vers «LOCK» (
) pour fixer correctement
l’unité flash sur l’appareil photo.
Dépose de l’unité flash de l’appareil photo
Mettez d’abord l’unité flash hors tension. Appuyez sur le bouton
de libération et maintenez-le enfoncé, placez le bouton de
verrouillage hors de la position «LOCK», puis retirez l’unité de la
griffe multi-interface.
Remarque
• Une fois l’unité flash déposée de l’appareil photo, assurez-vous
d’installer le capuchon de protection de connecteur sur le sabot
multi-interface pour protéger sa borne.
Prise de vue avec flash TTL
Pour plus d’informations sur les fonctions et les paramètres de
l’unité flash, reportez-vous au Guide d’aide.
1 Placez l’interrupteur d’alimentation de
l’unité flash sur «ON». (
)
• La charge de l’unité flash commence dès sa mise sous
tension. Dès que la charge de l’unité flash est terminée, la
touche TEST (
) s’allume en orange.
2 Appuyez sur la touche MODE (
), puis
tournez la molette de commande pour
sélectionner [TTL].
3
Appuyez sur le déclencheur de l’appareil
photo pour prendre une photo.
• Vous pouvez appuyer sur la touche +/- pour modifier la
correction d'exposition au flash (réglage de la puissance du
flash) à l'écran.
Prise de vue avec un flash
sans fil (communications
radio sans fil)
Pour les prises de vue à flash radio sans fil avec l’unité flash,
vous devez utiliser une autre unité flash qui prend en charge les
communications radio sans fil qui doit être jumelée avec cette
unité flash. Pour plus d’informations, reportez-vous au Guide
d’aide.
Spécifications
Dimensions
(environ)
69,4 mm × 114,7 mm × 88,9 mm
(2 3/4 po. × 4 5/8 po. × 3 1/2 po.) (L/H/P)
Poids (environ) 308 g (10,9 oz) (sans les piles)
Alimentation 6 V CC
Piles
recommandées
Quatre piles alcalines type LR6 (type AA)
Quatre piles au nickel-métal hydrure
rechargeables type AA
Articles inclus Unité flash (1),
Capuchon de protection de connecteur (fixé) (1),
Couvercle antihumidité et antipoussière (fixé) (1),
Mini-support (1), Étui (1),
Jeu de documents imprimés
La conception et les spécifications peuvent être modifiées sans
préavis.
« Multi Interface Shoe » est une marque commerciale de
Sony Group Corporation.
Acerca del manual para este producto
Para los detalles sobre la utilización
del producto, consulte la “Guía de
ayuda” (manual en la web).
“Guía de ayuda” (manual en la
web)
http://rd1.sony.net/help/ilc/1730/h_zz/
No exponga las pilas a fuentes de calor excesivo, como la luz
solar directa, el fuego o similares.
PRECAUCIÓN
• Sustituya la batería únicamente con la del tipo especificado.
De lo contrario, es posible que se produzca una explosión,un
incendio o heridas.
• Deseche las baterías usadas de acuerdo con las instrucciones.
Notas sobre la utilización
Esta unidad de flash puede utilizarse en combinación con
cámaras digitales de objetivo intercambiable Sony o cámaras
fotográficas digitales Sony que posean una zapata de interfaz
múltiple convencional.
Actualice el software de su cámara a la versión más reciente
antes de utilizar.
• Para los modelos de cámara compatibles con
esta unidad, visite el sitio web en:
https://www.sony.net/dics/f46rm/
• Consulte el manual de instrucciones de esta unidad y refiérase
al manual de instrucciones de su cámara.
• Para evitar riesgos, como un incendio o una descarga eléctrica,
observe lo siguiente:
– No desarme ni modifique esta unidad.
– No utilice esta unidad con las manos húmedas.
– No permita la entrada de agua ni materias extrañas (metal,
sustancias inflamables, etc.) en esta unidad.
– No utilice esta unidad en un lugar sujeto a salpicaduras de
agua, alta humedad, polvo, humos de aceite, y vapor.
• El uso de esta unidad con productos de otros fabricantes
puede afectar a su rendimiento, provocando accidentes o mal
funcionamiento.
• Para evitar el riesgo de daños o un mal funcionamiento,
observe lo siguiente:
– Esta unidad es un equipo de precisión. No deje caer la unidad,
no la golpee, ni la someta a un fuerte impacto físico.
– No toque los contactos eléctricos de esta unidad con las
manos desnudas.
– No utilice ni almacene esta unidad en un lugar sujeto a altas
temperaturas y humedad.
– Cuando utilice esta unidad al aire libre, evite exponerla a la
lluvia o al agua de mar.
• Para la inspección y reparación interior de esta unidad, póngase
en contacto con su distribuidor Sony o con el servicio técnico
local autorizado por Sony.
• Manipule esta unidad con cuidado para evitar el riesgo de que
se caiga o se exponga a líquidos.
• Esta unidad ha sido diseñada para ser resistente al polvo y
a la humedad, pero no es a prueba de agua o a prueba de
salpicaduras. Cuando utilice la unidad en condiciones lluviosas,
no deje que la unidad se moje.
• Mantenga el tubo de flash limpio. La superficie sucia del tubo
de flash puede causar la acumulación de calor, resultando en
humo o quemaduras. Para limpiar el tubo de flash, frótelo con
un paño suave, etc.
• Este producto (incluyendo los accesorios) tiene un imán (o
imanes) que puede interferir con marcapasos, válvulas de
derivación programables para el tratamiento de la hidrocefalia,
o con otros aparatos médicos. No ponga el producto cerca de
personas que utilicen dichos aparatos médicos. Consulte con su
médico antes de utilizar este producto si utiliza cualquiera de
dichos aparatos médicos.
Identificación de los
componentes
1 Lámina de rebote
2 Panel panorámico
incorporado
3 Tubo de flash
4 Terminal multi/micro USB
5 Pata de interfaz múltiple
6 Minisoporte
7 Orificio para montaje de
trípode
8 Indicador de rebote (ángulo
superior/inferior)
9 Luz LINK
10 Panel LCD
11 Puerta del compartimiento
para las pilas
12 Botón de liberación
13 Palanca de bloqueo
14 Cubierta resistente al polvo y
la humedad
15 Botón central
16 Botón MENU
17 Interruptor de alimentación
Seleccionando “LOCK”, podrá
inhabilitar la rueda de control
y los botones de la unidad de
flash para evitar operaciones
involuntarias.
18 Rueda de control
19 Botón Fn (función)
20 Botón TEST
21 Botones de dirección
Inserción de las pilas/
baterías
La unidad de flash puede acomodar cualquiera de los juegos
siguientes:
• Cuatro pilas alcalinas de tamaño AA
• Cuatro baterías de hidruro de níquel-metal (Ni-MH)
1 Inserte las baterías en el compartimento
de baterías como se muestra en la
ilustración (
).
(
indica la dirección de las pilas.)
Nota
• Antes de utilizar las baterías de hidruro de níquel-metal,
asegúrese de cargarlas con el cargador de baterías
especificado.
• No utilice baterías de iones de litio en esta unidad de flash ya
que podrían evitar que la unidad de flash brindase el máximo
rendimiento.
Montaje de la unidad de
flash en una cámara
1 Ponga el interruptor de alimentación de la
unidad de flash en “OFF”.
2
Mantenga presionado el botón de
liberación y gire la palanca de bloqueo
alejándola de “LOCK”. (
)
3
Retire la tapa protectora de conector de la
unidad de flash; y la tapa de la zapata de
la cámara.
• Si el flash incorporado de la cámara emerge, bájelo.
4 Inserte la pata de interfaz múltiple de la
unidad de flash en la zapata de interfaz
múltiple de la cámara. (
)
• Asegúrese de empujar la pata en la dirección de la flecha
hasta que dicha pata quede asegurada.
5 Gire la palanca de bloqueo hacia “LOCK”
hasta que se detenga en el extremo
derecho (
) para asegurar la unidad de
flash a la cámara.
About the manual for this product
For details on using the product,
refer to the “Help Guide” (web
manual).
“Help Guide” (Web manual)
http://rd1.sony.net/help/ilc/1730/h_zz/
Do not expose the batteries to excessive heat such as sunshine,
fire or the like.
CAUTION
• Replace the battery with the specified type only. Otherwise,
burst, fire or injury may result.
• Dispose of used batteries according to the instructions.
For Customers in the U.S.A.
For question regarding your product or for the Sony Service
Center nearest you, call 1-800-222-SONY (7669) .
Supplier’s Declaration of Conformity
Trade Name : SONY
Model : HVL-F46RM
Responsible Party : Sony Electronics Inc.
Address : 16535 Via Esprillo, San Diego, CA 92127 U.S.A.
Telephone Number : 858-942-2230
This device complies with part 15 of the FCC rules. Operation is
subject to the following two conditions: (1) This device may not
cause harmful interference, and (2) This device must accept any
interference received, including interference that may cause
undesired operation.
Notes on use
This flash unit can be used in combination with Sony
Interchangeable Lens Digital Cameras or Sony Digital Still
Cameras that has a conventional Multi Interface Shoe.
Update the software of your camera to the latest version before
use.
• For camera models compatible with this unit,
visit the website at:
https://www.sony.net/dics/f46rm/
• See the operating instructions of this unit and refer to the
operating instructions of your camera.
• To avoid the risk of a fire or an electric shock, observe the
following:
– Do not disassemble or alter this unit.
– Do not use this unit with wet hands.
– Do not allow ingress of water or foreign matters (metal,
flammable substances, etc.) to this unit.
– Do not use this unit in a place subject to water splashes, high
humidity, dust, oil fumes, and steam.
• Using this unit with products from other manufacturers may
affect its performance, leading to accidents or malfunction.
• To avoid the risk of damage or a malfunction, observe the
following:
– This unit is precision equipment. Do not drop the unit, hit it, or
subject it to a strong physical impact.
– Do not touch the electrical contacts on this unit with bare
hands.
– Do not use or store this unit in a place subject to high
temperatures and humidity.
– When using this unit outdoors, keep the unit from exposure to
rain or seawater.
• For interior inspection and repair of this unit, contact your Sony
dealer or local authorized Sony service facility.
• Handle this unit with care to avoid the risk of dropping it or
letting it exposed to liquid.
• This unit is designed to be dust and moisture-resistant, but is
not waterproof or splash-proof. When you use the unit in rainy
conditions, do not let the unit get wet.
• Keep the flashlamp clean. The soiled flashlamp surface may
cause heat buildup, resulting in smoke or scorches. To clean the
flashlamp, wipe it with a soft cloth, etc.
• This product (including accessories) has magnet(s) which may
interfere with pacemakers, programmable shunt valves for
hydrocephalus treatment, or other medical devices. Do not
place this product close to persons who use such medical
devices. Consult your doctor before using this product if you use
any such medical device.
Identifying the parts
1 Bounce sheet
2 Built-in wide panel
3 Flashlamp
4 Multi/Micro USB terminal
5 Multi Interface foot
6 Mini-stand
7 Tripod attachment hole
8 Bounce indicator (upper/
lower angle)
9 LINK lamp
10 LCD panel
11 Battery chamber door
12 Release button
13 Lock lever
14 Dust and moisture resistant
cover
15 Center button
16 MENU button
17 Power switch
By selecting “LOCK,” you can
disable the control wheel
and the buttons on the flash
unit to prevent unintentional
operations.
18 Control wheel
19 Fn button
20 TEST button
21 Direction buttons
Inserting batteries
The flash unit can accommodate either set of the following:
• Four AA-size alkaline batteries
• Four AA-size rechargeable nickel-metal hydride (Ni-MH)
batteries
1 Insert the batteries into the battery
chamber as illustrated ( ).
(
indicate the direction of the
batteries.)
Note
• Before you use the rechargeable nickel-metal hydride batteries,
be sure to fully charge the batteries with the specified battery
charger.
• Do not use lithium-ion batteries in this flash unit as they may
prevent the flash unit from delivering full performance.
Attaching the flash unit to a
camera
1 Turn the power switch on the flash unit to
“OFF.”
2
Press and hold the release button and
rotate the lock lever away from “LOCK.” (
)
3
Remove the connector protect cap from
the flash unit; and the shoe cap from the
camera.
• If the built-in flash on the camera is popped up, put it down.
4 Insert the Multi Interface foot of the flash
unit into the Multi Interface shoe on the
camera. (
)
• Be sure to push in the foot in the direction of the arrow until
the foot is secured.
5 Rotate the lock lever toward “LOCK” until
it stops at the right end (
) to secure the
flash unit on the camera.
(Continúa en la página posterior)
3
2
18
19
20
17
16
15
9
10
11
4
5
6
7
12
14
13
1
8
21
HVL-F46RM
© 2021 Sony Corporation
Printed in China
5-031-736-01(1)
スタートガイド/Startup Guide/Guide de
démarrage/Guía de inicio/
入门指南
/入門指南/
시작 설명서/
フラッシュ
Flash
闪光灯