MZ-R55 manual Page 9 of 20
http://www.hip.atr.co.jp/~eaw/minidisc/mzr55_user_manual/manual.htm 2/9/99
positions as the
source.
...when recording is
paused.
...when recording is
paused.
You can erase
recording.
Recorded
sound level
Same as the source Adjusted automatically.
You can also adjust it
manually.
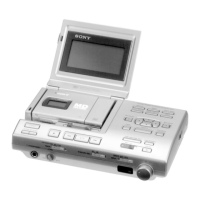
Recording with digital input
(optical cable required)
Use an optical cable (POC-5B or POC-5AB, not supplied) to hook up a digital source such as a CD or
DAT. The source sound will be sent and recorded as a digital signal.
1
Connect the LINE IN (OPTICAL) jack of the recorder to the optical digital output jack of the
source with an optical cable (not supplied).
The recorder switches to digital input automatically.
2
Connect the power source.
To use on AC power, see "Recording an MD right away!" To use on other power sources, see
"Power sources".
3
Insert a recordable MD.
Slide the OPEN switch to open the lid, insert a recordable MD, and close the lid.
4
Press and slide the REC switch to the right.
"REC" lights up and recording starts.
5
Play the sound source.
To stop recording, press
.
Synchro-recording from a digital source
You can easily dub a digital source on an MD by using the SYNCHRO REC switch. Before synchro-
recording, be sure to make digital connection and insert a recordable MD.
 Loading...