Precaution
The nameplate is located on the rear of the remote control.
If you need to check it, detach the belt.
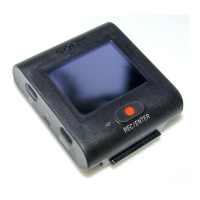
Parts and controls
Terminal section
(on/standby) button
CHG (Charge) lamp
LCD screen
UP/DOWN button
REC/ENTER button
REC/Wi-Fi lamp
MENU button
•To reset the remote control, press the MENU button, the REC/ENTER button and
the DOWN button simultaneously.
Screen Display
Wi-Fi connection setting
Bluetooth connection status
GPS receiving status of a
camera
Clock time
Battery level of a camera
Battery level of the remote
control
Button Hold function ON/OFF
Operation guide
Live-View display
Owner’s Record
The model and serial numbers are located on the bottom. Record the
serial number in the space provided below. Refer to these numbers
whenever you call your Sony dealer regarding this product.
Model No. RM-LVR3
Serial No.
© 2016 Sony Corporation Printed in China
http://www.sony.net/
Zoom ratio
Angle
SteadyShot setting
Image quality (Frame rate)
Movie format
Recordable time/Recording
time
Shooting mode
Audio recording ON/OFF
Warning of camera's
temperature increase
Note
•The display varies depending on which camera is connected.
Charging the remote control
1
Check that the power of the remote control is OFF.
2
Attach the remote control to the cradle (supplied).
Note
•If the terminal section of the remote control is wet or dirty, wipe away the
moisture or dust before attaching.
3
Connect the cradle to an activated computer with the micro
USB cable (supplied).
Lights in amber
while charging
Micro USB cable
The CHG (Charge) lamp turns off when charging is completed.
Notes
•You can charge the remote control even if it is not completely discharged. Also,
even if the remote control is not fully charged, you can use the partial charge
capacity of the battery pack as is.
•When the power of the remote control is on, it is supplied with power but not
charged.
•When the remote control is fully charged, the CHG (Charge) lamp turns off
immediately.
Setting the date and time/area
1
Press the (on/standby) button to turn on the remote
control.
When the remote control is turned on for the first time, the date
and time/area setting screen is displayed.
2
Set the date and time/area.
Press the UP button or DOWN button to select the desired item,
then press the REC/ENTER button to execute. The date and time/
area setting screen switches in the following order.
Area setting Date format
Daylight saving time
(summer time)
setting
Year-Month-Day
setting
Date & time/area
setting
confirmationClock time setting
Press the REC/ENTER button in the date & time/area setting
confirmation screen to confirm the desired item, then the Wi-Fi
standby screen will be displayed.
Hints
•Regions are defined by the time difference between Greenwich Mean Time
(GMT) and the standard time of your home. For details on the time difference,
refer to "The list of time differences for world capitals" in the “Help Guide” (web
manual).
•To set the date and time again, press the MENU button of the remote control to
select
(Date & time setting)/ (Area setting)/ (Daylight saving
time (summer time) setting) from
(Remote control settings).
Connecting the remote control to a camera
This manual describes how to connect the remote control to a single
camera.
For details about how to connect the remote control to multiple
cameras, refer to the “Help Guide” (web manual).
For details about how to operate a camera, refer to the operating
instructions of the camera.
1
Turn on the remote control.
When activating the remote control, the Wi-Fi standby screen will
be displayed.
2
Turn on the camera, then check the camera settings.
Check that a Wi-Fi mark is displayed on the display panel of the
camera.
3
Select a camera you want to connect to the remote control,
then press the REC/ENTER button.
4
Register the remote control to the camera.
When is displayed on the display panel of a camera, select
[OK], then press the REC/ENTER button of a camera.
Note
•If
is not displayed on the display panel of a camera, restart a
camera and try again from step 2.
The connection to the camera is complete when the LCD screen on
the remote control switches to the Live-View screen.
Note
•If the connection to a camera is not completed, the signal traffic may be
heavy. In this case, move to another location and try again.
Switching shooting modes
1
Press the MENU button to select (Shooting mode), then
press the REC/ENTER button.
2
Press the UP button or DOWN button to select the shooting
mode, then press the REC/ENTER button.
The shooting mode icon will be displayed on the bottom left of the
display.
Shooting
On shooting movies
For details on the following operations, refer to the “Help Guide” (web
manual) or the operating instructions of the camera.
•Still images
•Time-lapse capture
•Loop recording
1
Press the REC/ENTER button to start recording.
The REC/Wi-Fi lamp turns from blue to red.
2
Press the REC/ENTER button again to stop recording.
The REC/Wi-Fi lamp turns from red to blue.
Setting the camera
1
Press the MENU button to select (Shooting settings),
then press the REC/ENTER button.
2
Press the UP button or DOWN button to select the shooting
item, then press the REC/ENTER button.
Icons Setting items
Image quality setting
Movie format
Time-lapse capture
image size
Loop recording time
Still image mode
switching
Still image shooting
interval
Self-timer
Time-lapse shooting
interval
Time-lapse shot
number
SteadyShot (Movie)
Icons Setting items
SteadyShot (Still)
Angle setting
Zoom setting
Flip
AE shift
Time-lapse AE mode
Scene
White balance
Color mode
Audio recording setting
Wind noise reduction
For details about setting items, refer to the “Help Guide” (web
manual).
http://rd1.sony.net/help/cam/1650/h_zz/
Note
•Which items can be set depends on the shooting mode.
Setting the remote control
Turning the camera on/off along with the
power of the remote control
When the remote control is turned on/off, the corresponding camera is
also turned on/off.
To set this function to OFF, press the MENU button on the camera, then
press the UP button or DOWN button to select (Camera Settings)
(Bluetooth remote controller power setting) .
Automatically turning off the LCD screen
display while shooting
To reduce the battery consumption, the LCD screen display
automatically turns off while shooting.
To set this function to OFF, press the MENU button, then press the UP
button or DOWN button to select (Remote control settings)
(Auto monitor off while shooting) .
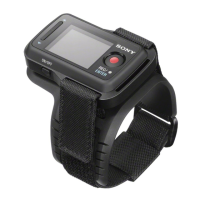
Attaching the remote control
Please attach and use the remote control in the bundled accessory.
Attaching the remote control to the belt
Align the protruding portion of the remote control with the concave
portion of the belt, while pulling the release lever on the rear of the
belt toward the opposite side with your finger.
Make sure that the remote control is set into the belt, then remove
your finger from the release lever.
•The release lever returns to the original position and the remote control is
attached to the belt.
Attaching the belt to your arm
Pass the one end of the belt through the hole on the other end of the
belt, and fasten the belt with . Then slide to hold the belt securely.
Attaching the remote control to the
Mount Adaptor
Align the protruding portion of the remote control with the concave
portion of the Mount Adaptor, while pulling the release lever toward
the opposite side with your finger.
Make sure that the remote control is set into the Mount Adaptor,
then remove your finger from the release lever.
•The release lever returns to the original position and the remote control is
attached to the Mount Adaptor.
4-586-869-12(1)
Live-View Remote
Startup Guide
RM-LVR3
This manual describes the basic operations of the Live-View Remote
RM-LVR3.
Before use, it is necessary to connect to a camera via Wi-Fi as
described in this manual.
For details, refer to the “Help Guide” (web manual).
http://rd1.sony.net/help/cam/1650/h_zz/