quency
ccnlrol
for stereo high-pass audio from
Ihe
Front
SATEl!JTE
OUT
(white).
When
2W/3W
is
set
to
3W,
ihis
coni~oi
(same
frequencies)
sek
the
starting
CrmJoyer
point for
stereo
audio from the Front
MID
OUT (oqw).
The ending
cro-r
point is automatically set
as
o
symmetrical value
determined by the
sstting
made
on the
TWEElER
FREQ
control.
SATEUlTE/MlD
LEVEL: Continuously-variable output level control for
adjusting the
stereo
level from the Front SATELLITE/MID OUT
jacks.
Power Indicator
Red LED lights when power is on.
APPLlCATlONS
The
SvX4
can
be
used in either
2.~9
or
3-way
system designs,
OS
shown in
Figures
3
and
4.
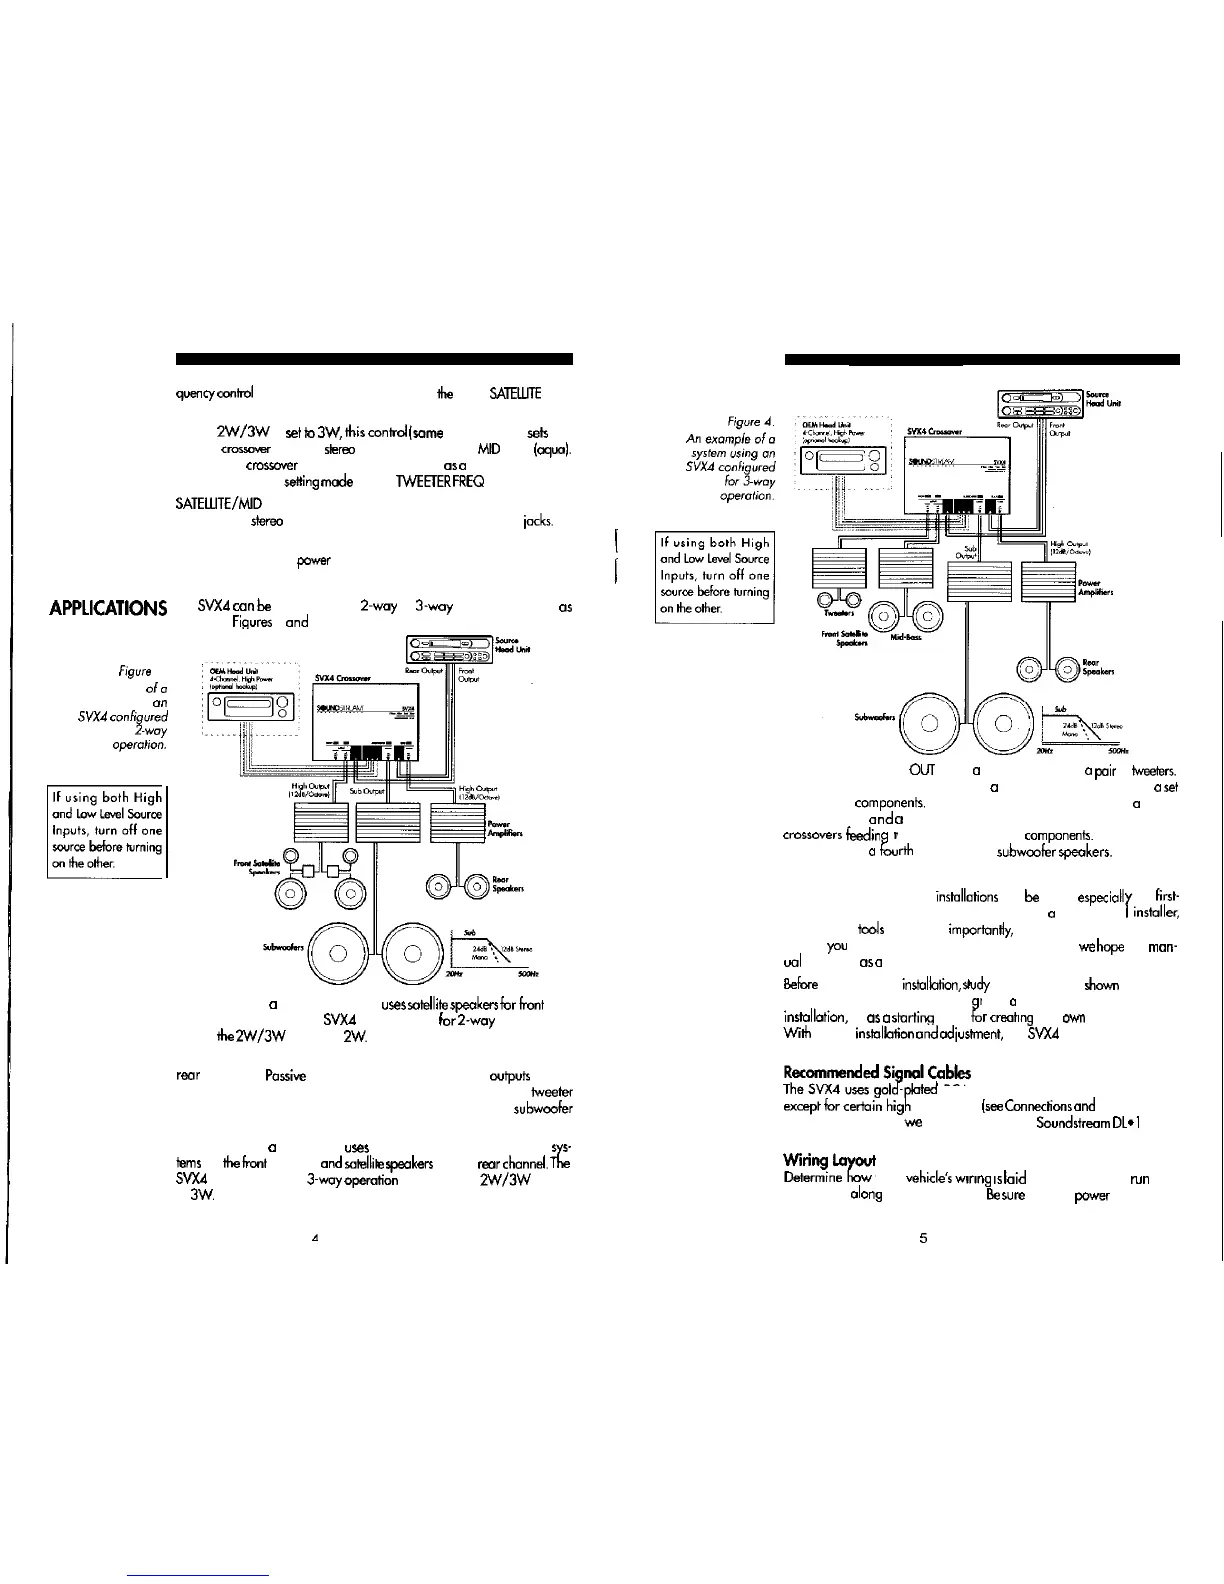
Figure
3.
An example
ofo
system using
on
5VX4
conhgured
for
2.way
operotron.
Figure 3 shows
(I
basic system that
uses
sat&e
speakws
for
hont
and
rear sound staging. The
SVX~
is configured
fur
~-way
operation by
sliding
the
2~13~
switch to
2~.
Audio signals from Front and Rear HIGH PASS OUT drive front ond
rear amplifiers.
Passive
crossovers on each amplifier’s
wtpuh
further
divide the amplified signals to the satellites’ mid-range and
tie&r
speakers. The SUB OUT channel drives on amplifier and
subwoofer
speakers.
Figure 4 shows
a
design that
user
separate tweeter and mid-buss syv
terns
for
Ihe
frcnt
channel
and
soklfik
lpeokers
for the
rear
channd.
The
SVX4
is configured for 3.~0~
operation
by sliding the
2W/3W
switch
to
3w.
d
INSTALLATION
The Front TWEETER
OUT
drives
CI
front amplifier and
a
tzair
of
hveeten.
The Front HIGH PASS OUT drives
CI
second front amplifier and
a
set
of mid-boss
componenk.
The Rear HIGH PASS OUT drives
a
(third)
rear amplifier
and
o
pair of satellite speakers containing passive
cm~sovers
feedin
channel drives
c1
tweeters and mid-buss
componenh.
The SUB OUT
IL
rth
amplifier ond
subwcofer
Fkers.
Automotive sound system
installations
can
ix
tricky,
especial1
for
first-
timers. For this reason, we recommend using
o
professiona
r.
installer,
who has the
tools
and, more
importandy,
the experience to do the job
right. If
you
decide to install the equipment yourself,
we
hope
this
mon-
ua
will serve
01
(I
helpful guide.
Befwe
attempting on
i&&ion,
tidy
the applications
shown
in Figures
3 and 4. Use either proven deri
inst&tion,
or
as
0
starting
point
n as
a
“blueprint” for your system
i
r
creating
your
own
custom system.
With
proper instolbtion
and
odjushnent,
the
SVX4
will reward you with
reliable operation and optimum performance.
oted
RCA type jocks for all audio connections,
level inputs
(see
Connections
and
Controls). For
best signal transfer,
we
recommend using
Soundstream
DL*l
Audio
Cable, Streamline Audio Cable, or on equivalent premium cable.
M%Y
Determme
ow your
vehule’s
wmng
15
lold
out, ond plan to
nm
your
new wiring
along
the same routes.
me
sure
to keep
power
wires away
5



 To Next Page
 Loading...