© 2015 Jöllenbeck GmbH. All rights reserved. SPEEDLINK, the SPEEDLINK word mark and
the SPEEDLINK swoosh are registered trademarks of Jöllenbeck GmbH.
* Microsoft, Windows, Windows XP, Windows Vista, Vista are registered trademarks of
Microsoft Corporation in the United States and other countries. Mac and Mac OS are
registered trademarks of Apple Inc. All trademarks are the property of their respective
owner. Jöllenbeck GmbH shall not be made liable for any errors that may appear in this
manual. Information contained herein is subject to change without prior notice. Please
keep this information for later reference.
JÖLLENBECK GmbH, Kreuzberg 2, 27404 Weertzen, GERMANY
TECHNICAL SUPPORT
EN
Having technical problems with this product? Get in touch with our Support team – the
quickest way is via our website: www.speedlink.com
DE
Bei technischen Schwierigkeiten mit diesem Produkt wenden Sie sich bitte an unseren
Support, den Sie am schnellsten über unsere Webseite www.speedlink.com erreichen.
FR
En cas de dicultés techniques concernant ce produit, veuillez vous adresser à notre
service d’assistance technique. Le moyen le plus rapide consiste à le contacter par le
biais de notre site Web www.speedlink.com
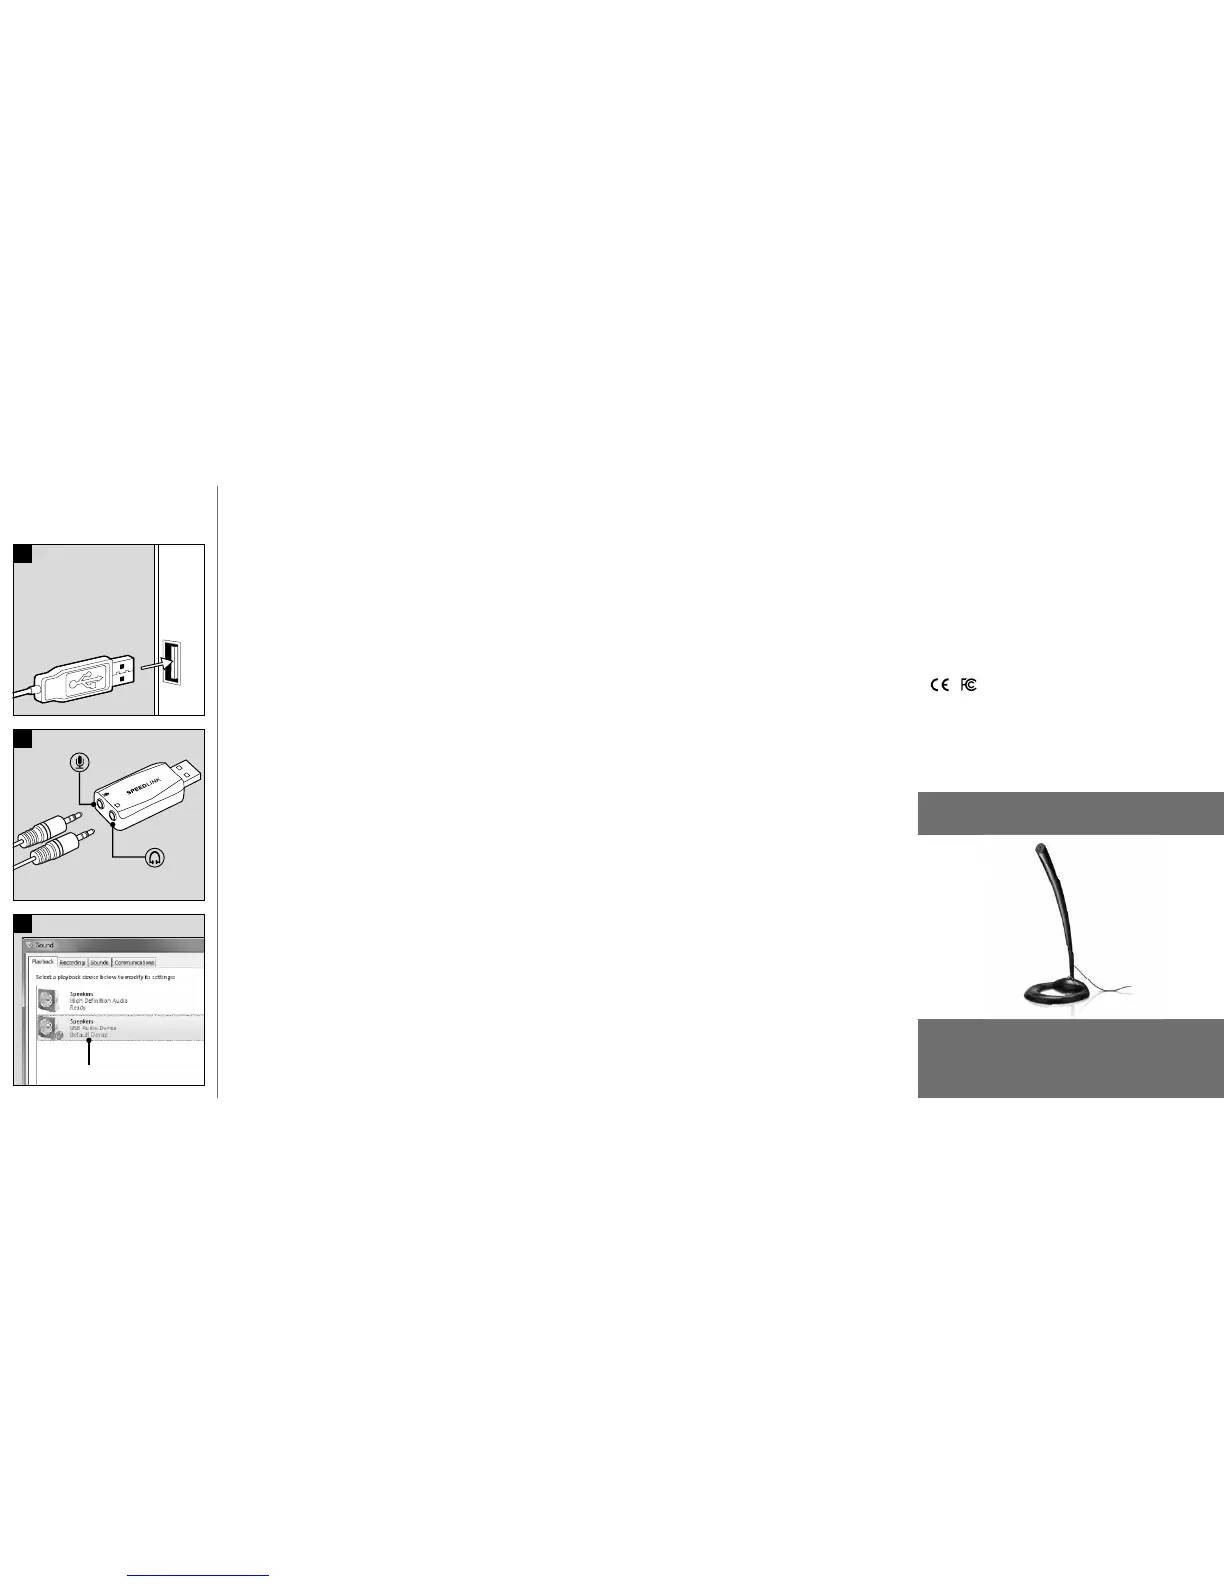
EN
1. Plug the sound card into any free USB
port on your PC or Mac*. The operating
system will automatically configure the
device.
2. Plug your headphones or speakers into
the sound card’s green socket, and
your microphone into the pink socket.
3. Set the USB sound card as the
default device for audio playback and
recording. Under Windows* Vista/7/8,
you’ll find the relevant menu in the
Control Panel under ‘Hardware and
Sound’/‘Sound’ (see illustration);
under Windows* XP, the menu is called
‘Sounds and Audio Devices’/‘Audio’.
Under Mac OS* X, the menu can be
found in the System Preferences option
under ‘Hardware’/‘Sound’.
DE
1. Schließen Sie die Soundkarte an eine
freie USB-Schnittstelle Ihres PCs
oder Macs* an. Das Betriebssystem
konfiguriert das Gerät automatisch.
2. Verbinden Sie Ihren Kopfhörer oder
Lautsprecher mit der grünen Buchse
der Soundkarte und Ihr Mikrofon mit
der rosafarbenen Buchse.
3. Wählen Sie die USB-Soundkarte als
Standardgerät für Wiedergabe und
Aufnahme aus. Unter Windows*
Vista/7/8 finden Sie das entsprechende
Menü in der Systemsteuerung unter
„Hardware und Sound“/„Sound“ (siehe
Abbildung), unter Windows* XP heißt
der Eintrag „Sounds und Audiogeräte“
/„Audio“. Unter Mac OS* X findet sich
das Menü in den Systemeinstellungen
unter „Hardware“ /„Sound“.
FR
1. Raccordez la carte son à un port
USB libre de votre PC ou de votre
Mac*. Le système d‘exploitation
configure automatiquement le nouveau
périphérique.
2. Reliez votre casque ou vos enceintes
à la prise verte de la carte son et votre
microphone à la prise rose.
3. Sélectionnez la carte son USB comme
périphérique par défaut pour la lecture
et l‘enregistrement. Dans Windows*
Vista/7/8, vous trouverez le menu
correspondant dans le Panneau de
configuration à la rubrique « Matériel
et audio »/« Son » (voir illustration) ;
dans Windows* XP, cette catégorie
est intitulée « Sons et périphériques
audio » /« Audio ». Dans Mac OS* X, le
menu en question se trouve dans les
Préférences système à la rubrique «
Matériel » /« Son ».
ES
1. Conecta la tarjeta de sonido a un
puerto USB libre de tu ordenador o
Mac*. El sistema operativo detecta
automáticamente el dispositivo y lo
configura.
2. Enchufa tus auriculares o altavoces
a la entrada verde de la tarjeta y el
micrófono a la entrada de color rosa.
3. Selecciona la tarjeta USB como
dispositivo estándar para la
reproducción y grabación. En
Windows* Vista/7/8 el menú se
encuentra en el panel de control en
„Hardware y Sonido“/“Sonido“ (ver
fig.), en Windows* XP el nombre
correspondiente es „Dispositivos
de sonido y audio“/“Audio“. En
Mac OS* X el menú se encuentra
en Configuraciones del sistema,
„Hardware“/“Sonido“.
RU
1. Подсоедините звуковую карту к
свободному USB-порту ПК или
Macs*. Операционная система
автоматически сконфигурирует
устройство.
2. Соедините наушники или колонки с
зеленым выходом звуковой карты, а
микрофон с розовым выходом.
3. Выберите звуковую карту USB в
качестве стандартного устройства
для воспроизведения и записи. Под
Windows* Vista/7/8 соответствующее
меню находится в панели
управления „Устройства и звуки“/
„Звуки“ (см. рисунок), под Windows*
XP раздел называется „Звуки и
аудиоустройства“ /„Аудио“. Под Mac
OS* X меню находится в системных
настройках в разделе „Устройства“ /
„Звуки“.
IT
1. Collegare la scheda audio a una
porta USB libera del PC o del Mac*.
Il sistema operativo configura
automaticamente il dispositivo.
2. Collegare le cue o gli altoparlanti
alla presa verde della scheda audio e il
microfono alla presa rosa.
3. Impostare la scheda audio USB come
dispositivo standard per riproduzione
e registrazione. Sotto Windows*
Vista/7/8 trovate il menu relativo nel
pannello di controllo sotto „Hardware
e suoni“/“Suoni“ (vedi illustrazione),
sotto Windows* XP si chiama „Suoni e
periferiche audio“ /“Audio“. Sotto Mac
OS* X il menu si trova nelle Preferenze
di Sistema sotto „Hardware“ /“Suono“.
NL
1. Sluit de geluidskaart aan op een
vrije USB-poort van de computer
of de Mac*. Het besturingssysteem
configureert de kaart automatisch.
2. Sluit de hoofdtelefoon of luidspreker
aan op de groene utgang van de
geluidskaart en de microfoon op de
roze ingang.
3. Selecteer de USB-geluidskaart als
standaardapparaat voor weergave en
opVigo van geluid. Onder Windows*
Vista/7/8 klikt u daartoe in het
Configuratiescherm op „Hardware en
geluiden“/„Geluiden“ (zie afbeelding),
onder Windows* XP op „Geluiden en
audioapparaten“ /„Audio“. Onder Mac
OS* X kunt u de instelling opgeven bij
de systeeminstellingen, bij „Hardware“
/„Sound“.
PL
1. Podłącz kartę dźwiękową do wolnego
złącza USB komputera PC lub Mac*.
System operacyjny automatycznie
skonfiguruje urządzenie.
2. Podłącz słuchawki lub głośnik do
zielonego gniazda karty dźwiękowej, a
mikrofon - do różowego gniazda.
3. Wybierz kartę dźwiękową USB
jako standardowe urządzenie do
odtwarzania i nagrywania.W Windows*
Vista/7/8 znajdziesz odpowiednie
menu w Panelu sterowania w sekcji
„Sprzęt i dźwięk“/„Dźwięk“ (patrz
rysunek), w Windows* XP wpis ma
nazwę „Dźwięki i urządzenia audio“
/„Audio“. W systemie Mac OS* X
menu znajduje się w ustawieniach
systemowych w sekcji „Sprzęt“ /
„Dźwięk“.
TR
1. Ses kartını bilgisayarınızın veya Mac*
bilgisayarınızın boş bir USB arabirimine
takın. İşletim sistemi cihazı otomatik
olarak yapılandırır.
2. Kulaklığınızı veya hoparlörünüzü
ses kartının yeşil yuvasıyla ve
mikrofonunuzu pembe renkli yuvayla
birleştirin.
3. Oynatma ve kayıt için USB ses kartını
tanımlı aygıt olarak seçin. Windows*
Vista/7/8 altında ilgili menüyü denetim
masasında „Donanım ve Ses“/“Ses“
(bkz. şekil), Windows* XP altında
ise girdinin adı „Ses Efekti ve Ses
Aygıtları“ /“Ses“ dir. Mac OS* X altında
menü denetim masasında „Donanım“
/“Ses“ altında bulunmaktadır.
VIGO
SL-8850-BK-01
VIADUS Design Desktop Microphone
The perfect microphone for the desktop – the VIADUS Design Desktop Microphone oers
elegant design and great functionality. It delivers an impressive performance with its
high sound quality and always ensures the best possible sound reproduction. The flexible
microphone adjusts to suit the scenario, the stable stand provides a secure stand.
GET TO KNOW IT:
 Loading...