EasyManua.ls Logo

Spire Payments SPc5 - User Manual

Spire Payments SPc5
4 pages
Print Icon
To Next Page IconTo Next Page
Loading...
Contenido de la caja:
SPc5
Countertop Terminal
Quick Reference Guide
ENGLISH
What you have received:
Terminal and
paper roll
Plug top
power supply
(region specific)
Phone cable
(optional)
Network cable
(optional)
Terminal y
rollo de papel
Fuente de
alimentación
Cable telefónico
(opcional)
Cable de datos
(opcional)
Step 1. Terminal connections
Place the terminal face down on a flat surface,
push the two tabs upwards and remove the rear
cover. (fig. 1)
Remove the cable tidy. (fig. 2)
Thread the black power supply cable to the right
of the cable tidy recess and insert the plug into the
rear of the terminal. (fig. 3)
Thread the telephone cable through the cable
tidy recess and insert the plug into the socket
identified with the blue LINE label.
Alternatively if you are connecting the terminal to
an Internet connection point, thread the network
cable to the left of the cable tidy recess and insert
the plug into the socket identified with LAN.
Refit the cable tidy and rear cover until you hear a
click. (fig. 4)
A merchant copy of the receipt will be printed. Tear
off and retain for your records.
Confirm display prompts to print the customer
receipt. (If contactless transaction, only a merchant
copy will print.)
Once printing is complete, tear off receipt and pass
to customer.
Step 5. Other transaction types
Please refer to the User Manual or visit www.
spirepayments.com for further information on
performing all transaction types and reading card
data by Swipe, Keyed and Contactless. Alternatively
contact your technical help desk for assistance.
Step 6. End of day/shift change
procedures
It is essential to perform specic processes at the
end of a working day, and possibly between shifts
for internal records. Please refer to the User Manual
or visit www.spirepayments.com for further details.
Alternatively contact your technical help desk for
assistance.
PABX/Prefix digit(s)
If the phone line you intend to use needs a PABX/
prefix digit(s) in order to dial out, your terminal will
need to be configured for this. Please read the User
Manual provided by your bank or payment service
provider for more information or call the helpdesk
for assistance.
DHCP (relevant if you are using a
network connection)
Your terminal will be pre-configured for use on
standard networks featuring DHCP (automatic
allocation of IP address). In the unlikely event that
Ensure the contactless card has been placed at a
distance of 0 to 4 cm from the terminal display.
Ensure the magnetic stripe card has swiped in the
correct orientation.
Test with another card of the same type.
Caution and Safety Instructions
Do not attempt to disassemble, service or repair
any part.
Do not use if damaged or the terminal shows signs
of tampering.
Only use the supplied power adapter with an
electrical outlet of the correct rating.
To avoid the potential hazard of electrical shock
do not use in wet environments or during an
electrical storm.
Do not use in proximity of potentially flammable
gases or substances.
Ensure cables used do not cause a trip hazard or
risk the device being dropped on to a hard surface.
Do not expose to excessive heat or cold. Only
operate between 0 °C and 40 °C.
Before cleaning, disconnect from the electrical
outlet. Use only a dry or dampened soft cloth.
Do not immerse, use liquids, sprays or aerosol
cleaners. Clean all spillages quickly.
Dispose any part in an environmentally sound
manner and in accordance with local laws.
Spire Payments will not be held liable for any
damage resulting from user operation that does
not comply with the guidance stated.
Frequency bands and power
Maximum radio-frequency power transmitted in
the frequency bands in which this radio equipment
Connect the telephone cable to the telephone
socket, and the network cable (if required) to your
Internet connection point.
Step 2. Paper roll installation
With the terminal facing up, gently pull upwards
on the lever located in the middle of the printer
door. (fig. 5)
Discard any packing material from the paper roll.
Fit the roll as shown in the diagram. The correct
orientation of the paper is critical. (fig. 6)
Pull 10 cm of paper until it protrudes from the top
of the terminal.
Ensure the printer roller is installed.
Close the printer door until a click is heard.
Remove the excess paper by pulling down and
tearing along the serrated edge. (fig. 7)
Step 3. Turning on the terminal
Connect power supply to a nearby electrical outlet.
Hold down the power button (located on the right
of the menu buttons) until the display illuminates
and the terminal beeps. (fig. 8)
Remove the protective film from the display if
present.
Step 4. Sale transaction
Enter the transaction amount into the terminal
when prompted.
Insert the customers Chip Card into the card slot
in the terminal with chip facing upwards.
Pass the terminal to the customer for PIN entry.
The terminal will automatically contact the
acquirer and approve/decline the transaction.
your network does not have this feature, please call
the helpdesk for assistance.
Troubleshooting
In the unlikely event you experience issues with
this product, please follow the relevant procedure
detailed below. If this does not resolve the issue,
please visit www.spirepayments.com or your solution
provider for further assistance.
No display on terminal
Check terminal is switched on.
Check connection between terminal, power supply
and mains supply.
Poor printing performance
Check the printer door is closed fully.
Ensure an approved paper roll is installed correctly.
Ensure the printer roller is placed correctly. If it has
been accidentally removed, please put it back to
its original position.
Communication problems
Ensure the communication cable is connected
correctly.
If your terminal is connected via the telephone
line, use a telephone to ensure there is a dial tone
on the telephone line.
Reset the terminal by powering off and on.
If your terminal is connected via an Internet
connection, ensure the Internet connection is
operational.
If connecting to a broadband phone line, ensure the
terminal is connected to the link through a DSL filter.
Cannot read cards
Ensure the Chip Card has been inserted in the
correct orientation.
Paso 1. Conexionado del terminal
Coloque el terminal boca abajo sobre una
superficie plana, pulse las dos pestañas hacia
arriba y extraiga la tapa posterior. (fig. 1)
Deslice y extraiga la cubierta protectora de cables.
(fig. 2)
Encamine el cable de alimentación por el canal
situado en la parte derecha de la cubierta
protectora de cables e inserte el conector en la
parte trasera del terminal. (fig. 3)
Coloque y conecte el cable telefónico en el
conector identificado en color azul como “LINE.
Si se va a conectar el terminal a un punto de
acceso a Internet, encamine el cable de red por el
ESPAÑOL
fig. 4fig. 3
fig. 2fig. 1
fig. 5 fig. 6
fig. 7 fig. 8
operates is below the limit values specified in the
corresponding Harmonized Standards.
The frequency bands and power limits applicable
to this radio equipment are: GSM900: 35 dBm,
GSM1800: 32 dBm, Wi-Fi 2.4G: 20 dBm, NFC
13.56 MHz: 60 dBuA/m at 10 m.
©2015–2017 Spire Payments Holdings S.à.r.l.
All rights reserved. All information is subject to
change without notice and Spire Payments does not
warrant the informations accuracy or correctness.
Spire Payments and the Spire Payments logo are
trademarks, service marks or registered trademarks
or service marks of Spire Payments Holdings S.à.r.l. All
other trademarks are the property of their respective
owners. Any Spire Payments software described in this
document is subject to a Software License Agreement.
Please refer to the Software License Agreement for
information regarding the terms of use.
EU Compliance Statement • Hereby, Spire Payments
Holdings S.à.r.l. declares that the radio equipment
type SPc5 is in compliance with Directive 2014/53/EU
and Directive 2011/65/EU.
The full text of the EU declaration of conformity is
available at the following internet address www.
spirepayments.com/library.
PCI PTS • The PCI Notice and Installation Guidance is
available online at www.spirepayments.com/library.
Spire Payments Holdings S.à.r.l.
70 route d’Esch
L-1470 Luxembourg
canal situado en la parte izquierda de la cubierta
pasa cables e inserte el cable en el conector
identificado como LAN.
Inserte en la guía la cubierta pasa cables, y coloque
la tapa posterior en su sitio hasta escuchar un
clic. (fig. 4)
Conecte el cable telefónico a la roseta telefónica
y, si es necesario, el cable de datos al punto de
acceso a Internet.
Paso 2. Instalación del rollo de papel
Con el terminal boca arriba, tire suavemente de la
palanca situada en la parte central de la tapa de la
impresora. (fig. 5)
Retire el material de embalaje del rollo de papel.
Coloque el rollo como se muestra en el dibujo. Es
muy importante que el papel esté correctamente
orientado. (fig. 6)
Tire del papel hasta que sobresalga unos 10 cm
por la parte superior del terminal.
Antes de cerrar la tapa de la impresora,
asegúrese de que el rodillo de la impresora está
correctamente instalado.
Cierre la tapa de la impresora hasta que oiga un
clic.
Retire el papel sobrante tirando de él hacia abajo y
ayudándose del borde dentado. (fig. 7)
Paso 3. Encendido del Terminal
Conecte la fuente de alimentación a la red
eléctrica.
Pulse la tecla de encendido (situada a la derecha
de las teclas de menú) hasta que se encienda la
pantalla. (fig. 8)
Retire la película protectora de la pantalla, si
todavía está adherida.
Question and Answer IconNeed help?

Do you have a question about the Spire Payments SPc5 and is the answer not in the manual?

Summary

Terminal Connections

Paper Roll Installation

Turning On The Terminal

Sale Transaction

Other Transaction Types

End Of Day Shift Change Procedures

PABX Prefix Digit Configuration

DHCP Network Configuration

Troubleshooting

No Display On Terminal

Troubleshoot issues related to the terminal display not turning on or showing any output.

Poor Printing Performance

Address problems with the terminal's printer not printing correctly or at all.

Communication Problems

Resolve issues with the terminal's ability to connect and communicate.

Cannot Read Cards

Diagnose and fix problems when the terminal fails to read inserted or tapped cards.

Caution and Safety Instructions

General Safety Precautions

Adhere to general safety guidelines including not disassembling, using damaged units, or exposing to wet environments.

Operating Environment

Avoid use in proximity of flammable gases, ensure cables don't create trip hazards, and operate between 0°C and 40°C.

Cleaning Instructions

Disconnect power before cleaning with a dry or dampened soft cloth; do not use liquids or aerosols.

Disposal

Dispose of parts in an environmentally sound manner according to local laws.

Frequency Bands and Power

Compliance Statements

EU Compliance

Declaration of conformity for radio equipment type SPc5 according to EU directives.

PCI PTS Compliance

Information on PCI Notice and Installation Guidance availability.

Overview

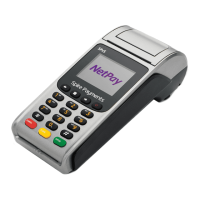
The Spire Payments SPc5 is a countertop terminal designed for processing various types of transactions, offering a user-friendly interface and robust connectivity options. This quick reference guide provides essential information for setting up, operating, and maintaining the device.

Function Description:

The SPc5 serves as a point-of-sale terminal capable of handling sales transactions, processing chip cards, and facilitating PIN entry. It is designed to communicate with an acquirer to approve or decline transactions automatically. Beyond basic sales, the terminal supports other transaction types, which are detailed in the comprehensive User Manual available online. It also incorporates end-of-day and shift change procedures, crucial for internal record-keeping and financial reconciliation. The device is equipped with a thermal printer for generating merchant and customer receipts, ensuring a physical record of each transaction. For connectivity, it supports both telephone line (PABX/prefix digit compatible) and network connections (DHCP enabled), offering flexibility in deployment environments. The terminal is designed to be pre-configured for standard networks, simplifying setup for most users.

Usage Features:

Setting up the SPc5 terminal involves a series of straightforward steps. To begin, the terminal should be placed face down on a flat surface, allowing access to the rear cover by pushing two tabs upwards. Once the cover is removed, the cable tidy needs to be detached. The black power supply cable is then threaded to the right of the cable tidy recess and plugged into the rear of the terminal. For telephone line connectivity, the telephone cable is threaded through the cable tidy recess and inserted into the socket marked with a blue LINE label. Alternatively, for an Internet connection, the network cable is threaded to the left of the cable tidy recess and inserted into the LAN-identified socket. After all necessary cables are connected, the cable tidy and rear cover are refitted until a 'click' is heard, confirming secure closure. The telephone cable and network cable (if required) are then connected to their respective sockets at the Internet connection point.

Paper roll installation is equally simple. With the terminal facing up, the lever in the middle of the printer door is gently pulled upwards to open it. Any packing material from the new paper roll should be discarded. The roll is then fitted as shown in the diagram, with correct orientation being critical for proper printing. Approximately 10 cm of paper should be pulled out until it protrudes from the top of the terminal. It is important to ensure the printer roller is correctly installed. The printer door is then closed until a 'click' is heard. Excess paper is removed by pulling down and tearing along the serrated edge.

Turning on the terminal involves connecting the power supply to a nearby electrical outlet. The power button, located on the right of the menu buttons, is held down until the display illuminates and the terminal beeps. Any protective film on the display should be removed at this point.

For a sale transaction, the transaction amount is entered when prompted. The customer's Chip Card is inserted into the card slot with the chip facing upwards. The terminal is then passed to the customer for PIN entry. The terminal will automatically contact the acquirer to approve or decline the transaction. A merchant copy of the receipt will be printed, which should be torn off and retained for records. The display will prompt to print the customer receipt; for contactless transactions, only a merchant copy will print. Once printing is complete, the receipt is torn off and passed to the customer.

The SPc5 also supports contactless card transactions, requiring the card to be placed within 0 to 4 cm of the terminal display. Magnetic stripe cards are swiped in the correct orientation.

Maintenance Features:

The terminal is designed for ease of maintenance, with specific guidelines for cleaning and troubleshooting. Before cleaning, the terminal must be disconnected from the electrical outlet. Only a dry or dampened soft cloth should be used for cleaning. Liquids, sprays, or aerosol cleaners should never be used, and the terminal should not be immersed in any liquid. Any spillages should be cleaned quickly.

Troubleshooting guidance is provided for common issues. If the display is not working, users should check if the terminal is switched on and verify the connection between the terminal, power supply, and mains supply. For poor printing performance, ensure the printer door is fully closed, an approved paper roll is installed correctly, and the printer roller is properly placed. If the roller has been accidentally removed, it should be put back into its original position.

Communication problems can be addressed by ensuring the communication cable is correctly connected. If using a telephone line, a separate telephone can be used to check for a dial tone. Resetting the terminal by powering it off and on can often resolve issues. For Internet connections, verify that the Internet connection is operational. If connecting to a broadband phone line, ensure the terminal is connected through a DSL filter. If cards cannot be read, confirm that the Chip Card is inserted in the correct orientation, the contactless card is placed correctly, and the magnetic stripe card is swiped in the correct orientation. Testing with another card of the same type can also help diagnose card reading issues.

The SPc5 is designed with safety in mind. Users are cautioned not to disassemble, service, or repair any part of the terminal. It should not be used if damaged or if there are signs of tampering. Only the supplied power adapter with an electrical outlet of the correct rating should be used. To avoid electrical shock, the terminal should not be used in wet environments or during an electrical storm. It should also not be used near potentially flammable gases or substances. Cables should be routed to prevent trip hazards or the device from being dropped. The terminal should not be exposed to excessive heat or cold, operating only between 0 °C and 40 °C. Any part of the terminal should be disposed of in an environmentally sound manner and in accordance with local laws. Spire Payments will not be held liable for damage resulting from user operation that does not comply with the stated guidance.

Spire Payments SPc5 Specifications

General IconGeneral
ModelSPc5
Display Resolution320 x 240 pixels
Operating SystemLinux-based
Device TypePayment Terminal
Payment MethodsNFC
ConnectivityWi-Fi, Bluetooth
SecurityPCI PTS 5.x
BatteryLi-ion
Power SupplyBattery