8 9
o CONTINOUS (continuous measurement
– function only available in model SBS-
CT-123: press the probe against the tested
surface, do not remove the probe)
» GROUP MODE (save Mode selection):
o DIRECT (save measurements to temporary
memory. Once the device temporary memory
is full, measurements will be overwritten; all
measurement data saved under this mode will
be lost after the device has been switched o)
o GENERAL1
o GENERAL2
o GENERAL3
o GENERAL4 (for all options from General1 to
General4: measurements saved to permanent
memory. Once the memory is full, the device
will continue to make measurements, but
these will not be saved or included in statistics
and „“ will be shown of the display. The
measurements will remain in the device even
after it has been switched o)
Attention: Each save mode has its own alarm and
calibration limits.
» PROBE MODE (material selection) (relates only to the
SBS - CT- 123, SBS-CT- 123E models):
o AUTO (automatic: in this mode the meter
will automatically detect the type of tested
materials)
o MAGNETIC (ferromagnetic materials)
o EDDY CURRENT (other materials)
» UNIT SETTINGS (measurement unit selection):
o μm
o mils
o mm
» SPEED (measurement speed selection):
o NORMAL
o FAST
» LANGUAGE (language selection):
o ENGLISH
o GERMAN
o RUSSIAN
o CHINESE
» AUTO POWEROFF (activate/deactivate auto power
o):
o DISABLE (inactive)
o ENABLE (active)
• LIMIT (tested material thickness limit):
» SETTINGS:
o HIGH LIMIT (tested material maximum
thickness limit)
o LOW LIMIT (tested material minimum
thickness limit)
» CLEAR (deleting pre-set limits)
• CALIBRATION:
» POINT CAL (recommended calibration for error
margin of ±1-2%+1μm):
o DISABLE(inactive)
o ENABLE(active)
o CLEAR MAGNETIC (delete calibration data for
ferromagnetic materials)
o CLEAR EDDY (delete calibration data for non-
ferromagnetic materials) (relates only to the
SBS - CT- 123, SBS-CT- 123E models)
» ZERO CAL (recommended calibration for error
margin of ±2%+1μm):
o CLEAR MAGNETIC (delete calibration data for
ferromagnetic materials)
o CLEAR EDDY (delete calibration data for non-
ferromagnetic materials) (relates only to the
SBS - CT- 123, SBS-CT- 123E models)
» CLEAR ALL (delete calibration settings)
Device calibration
Deleting previous calibration settings:
1. Enter menu mode (press left button), select
„Calibration: option. Conrm (press left button).
2. Select „Clear All“ option. Conrm (press left button).
3. A dialogue window will appear. Conrm (press left
button).
Zero calibration:
1. Press and hold the zero calibration button (SBS-
CT-123/SBS-CT-123 PRO: No. 12, model SBS-CT-
123E: No. 14) until an acoustic signal sounds and
„ZERO“ is shown on the display.
2. Measure the same location on the included, non-
coated calibration plate a number of times. After
the initial measurement, perform the subsequent
measurements by press the probe against the plate
upon hearing a single acoustic signal;
3. To complete calibration press the calibration button
(SBS-CT-123 / SBS-CT-123 PRO: No. 12, model SBS-
CT-123E: No. 14). The device will exit calibration
mode.
Multi-point calibration:
1. Press the calibration button (10) (model SBS-CT-123/
SBS-CT-123 PRO) or enter the menu by pressing
the left button () – > Select „Calibration“ using the
up/down buttons, conrm using left button – >
select „Point Cal“, conrm using left button – >
select Enable (active), conrm using left button – >
press right button until a main screen with the sign
CALIBRATION appears on the display. (model SBS-
CT-123E);
2. Place the calibration lm on the uncoated calibration
plate (thickness indicators are shown on the lm).
3. Press the probe against the plate with the lm, raise
after the acoustic signal sounds, the reading will be
displayed.
4. Press either up or down buttons. The current
calibration point will be shown on the display, „Ptn
X“, „X“ will ash
5. Use up/down buttons to increase / decrease reading
value until the display shows the same value as
shown on the calibration lm. Use left button to
conrm.
6. Use the probe to perform subsequent measurements
for calibration lms of dierent thickness. Repeat
steps described in points 3-5.
7. To exit calibration mode, press the calibration button
(10) (model SBS-CT-123 / SBS-CT-123 PRO) or enter
the menu by pressing the left button () – > Select
„Calibration“ using the up/down buttons, conrm
using left button – > select „Point Cal“, conrm using
left button – > select Disable (inactive), conrm using
left button (model SBS-CT-123E);
Data upload
To upload data from the device onto a computer, install the
device driver and the EasyCoating programme found on
the CD included with the device. Then connect the device to
a computer via a USB port. The device has to be on during
data download.
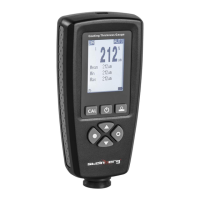
4. current measurement
5. measurement statistics
6. automatic power o light
7. USB connection light
8. measurement unit (μm, mm, mils)
9. battery strength light
10. calibration button: enter/exit calibration mode
(single press)
11. On/O button: device on/device o (single press)
12. ZERO calibration button: back to measurement mode
from menu mode (single press); zero calibration (see
below); reset (see below)
13. Up button: move up in MENU, increase numerical
value, cancel last measurement (single press)
14. Down button: move down in MENU, decrease
numerical value, refresh display (single press)
15. Left button: enter menu mode from measurement
mode; conrm instructions from bottom left corner
in menu mode (single press)
16. Right button: rotate screen; background illumination
on/o in measurement mode (press and hold);
conrm instructions from bottom right corner in
menu mode (single press)
17. probe
18. V groove
19. calibration lm
20. calibration plate
21. battery cover
22. type of material: F – ferromagnetic; N – not
ferromagnetic (relates only to the SBS - CT- 123)
23. USB interface
SBS-CT-123E
1. Current write mode:
DIR – Direct mode selected
GENn(n=1-4) – General mode selected
2. upper and lower limit alarm
3. measurement mode:
AUTO
MAG
EDDY
4. current measurement
5. measurement statistics
6. automatic power o light
7. USB connection light
8. measurement unit (μm, mm, mils)
9. battery strength light
10. On/O button: device on/device o (single press);
reset (see below);
11. Up button: move up in MENU, increase numerical
value, cancel last measurement (single press);
12. Down button: move down in MENU, decrease
numerical value, reset (see below);
13. Left button: enter menu mode from measurement
mode; conrm instructions from bottom left corner
in menu mode (single press);
14. Right button: rotate screen; background illumination
on/o in measurement mode (press and hold);
conrm instructions from bottom right corner in
menu mode (single press);
15. probe
16. V groove
17. calibration lm
18. calibration plate
19. battery cover
20. type of material:
F – ferromagnetic; N – not ferromagnetic
21. USB interface
2.2 Preparing for use
Battery installation
Remove the screws and cover. Insert batteries in accordance
with the markings and signs on the device. Screw the cover
back on.
To change batteries, make sure the device is o.
2.3 Device use
Turning the meter on and o
Press the POWER button to turn the device on/o. The
device will also power o automatically if latent for 3
minutes (if the Auto PowerO function is activated).
First use
When switched on for the rst time, the device will enter
factory settings mode, i.e.: „Measure Mode“. Calibrate the
device before rst use (see Calibration section below).
Measurements
Do perform a measurement, place the probe against the
tested surface. Once the acoustic signal sounds, read o
the measured value.
ATTENTION! When switching the device on make sure it is
at least 5cm away from any metal items!
ATTENTION! Measurements of porous surfaces may
generate faulty readings!
ATTENTION! After switching the device on in DIR mode,
the display will be empty and when in GEN mode the last
measurement and average measurements will appear on
the display.
The user may set measurements parameters and display
them in the device menu.
DEVICE MENU:
• DELETE DATA (deleting saved data):
» CURRENT DATA (current data: pressing the left
button will delete the last measurement)
» CURRENT GROUP (current group: pressing the left
button will delete the entire, most recently measured
set of data)
• RECALL (last measurement)
• BROWSE STAT. (measurement statistics):
» NUMBER(quantity)
» MEAN (measurement average)
» MIN (smallest measurement)
» MAX (largest measurement
• OPTIONS(options):
» MEASURE MODE (measurement method selection):
o SINGLE (single measurement: press the probe
against the tested surface and then remove it
quickly and eciently)
19
1
4
5
6
7
12
2 21 3
20
8
9
11
14
16
15
17
18
13
10
EN EN
Rev. 16.08.2018
Rev. 16.08.2018
 Loading...