187
FR
ES
PT
IT
EL
PL
RU
KZ
UA
RO
EN
12
FR
ES
PT
IT
EL
PL
RU
KZ
UA
RO
EN
4.1 UNBOXING
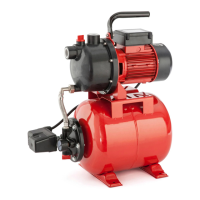
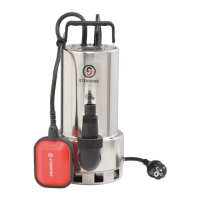
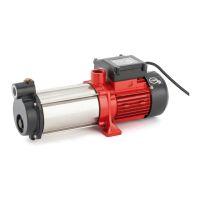
1. ON/OFF switch
2. Connector caps
3. Discharge connector (output)
4. Drainage plug
5. Suction connector (input)
6. Power cord
7. Handle
8. Filling plug
• Do not use any sharp tool (cutter, knife...) when unboxing, you
may damage the product.
• Do not use the power cord to lift, carry or transport the
machine.
• Do not scrape the power cord across sharp edges and ensure
that it does not get pressed.
4.2 INSTALLATION
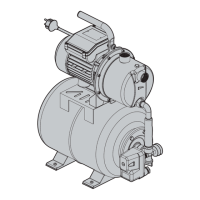
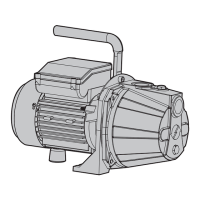
Tightly screw the pump illustration
2.2
Attach the pump to a flat level surface with suitable screws and silent block if necessary.
DANGER! Risk of injury due to electric shock.
Warning! Do not plug in before installation is fully completed !
CAUTION ! Always wear safety glasses and gloves during
installation.
Suction hose illustration
2.3
Assemble the different elements together according to the illustration. In case screw are necessary : tight
it with appropriate tool.
• As a basic principle, we recommend using:
- A preliminary filter, in order to avoid unnecessary damage to the pump as a result of stones and solid
foreign bodies.
- A suction-hose set with suction hose and an check valve with a strainer (in order to prevent long
priming periods).
• If you cannot obtain a suction-hose set, please purchase :
- an 25 mm (1”) intake hose
- a check valve with a strainer
- 2 hose clamps 2 standard adapters (one for the suction hose, one for the discharge line) and assemble
the suction-hose set yourself using a standard adapter and a clamp.
Attach the lter to the wall. Make sure that the vibrations of the pump do not damage this
installation (exible connection is strongly recommended)
4.3 FIRST USE
WARNING ! Read the « SAFETY INSTRUCTION » section at the
beginning of this manual including all text under subheading
therein before using this product.
Pay particular attention using the machine for the first time : focus and dedicate all your attention to this
first use.
Setting up your pump
• Place the pump on flat firm surface to ensure safe operation.
• Remove the connectors caps from the connectors and store them.
Connecting the suction hose
• Screw the standard connectors onto the suction connector.
• Assemble the suction hose using a standard connector and clamp. Make sure the assembly is tight
enough as a leaking suction hose will draw in air instead of water.
• If the water is not so clear, add a filter between the suction connector and suction hose.
Risk of damage to the pump!
If without lter: unwanted particles (sand, stones, etc.) will
cause damages to the pump. Any damage caused in this way
will not be covered under our warranty
 Loading...