4 5
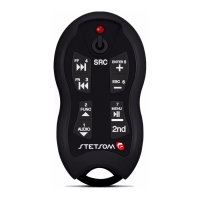
The second key feature "2nd"
The Alcance Control SX2 has a great market dierenator, can control up to
16 dierent funcons. Each one of the 8 TX2 Control keys can perform two
funcons, for a total of 16. The 2nd key is to select what funcon each buon
will run, rst or second.
Pressing the 2nd Led (01) buon lights indicang that the second funcon is
acve, pressing again it goes back to the rst funcon keys. The second funcon
remains acve for 5 seconds, aer that me the LED switches o automacally
returning to rst funcon.
Example: + key when the rst funcon (LED indicator (01) deleted) increases the
volume of the equipment, the second funcon acts as ENTER key widely used in
DVD equipment. The Play/Pause buon has the second funcon MENU.
The Printed funcons on each TX2 control buon are related to be funcon of
each unit, and are stored in the memory of the central RX2. Nothing prevents
these buons from being reprogramed to perform dierent funcons, by the
learn mode.
Synchronizing Your Alcance Control
Timing is necessary for the connecon between the central control TX2 and RX2.
The Alcance Control is synchronized by the factory. This operaon is required
only if the owner acquired new TX2 controls for your team, replacement or
loss of synchronizaon. The Alcance Control allows up to 16 TX2 controls are
synchronized in the same central RX2.
Resources
• Command up to 16 funcons;
• Synchronizaon with up to 16 controls (TX2) allowing mulple people to
control the same equipment.
• The TX2 control can command several devices even though dierent
brands.
• Easy Sync. No need for technical assistance when purchasing new remote
controls units.
• It Contains various models of appliances in memory beyond the “Learn”
funcon that enables programmac control of the market.
• Low baery indicator on the control and central.
Installing Your Alcance Control
The control panel can be installed or hidden somewhere visible for
monitoring your LED indicator (16). The most important is that your antenna
(15) is not blocked by the bodywork of the car or metal parts which act as
a shield for radio transmission frequency. It may be close to the edge of the
window since glass does not block the recepon or in the panel and drawers.
The power cable (18) is biased. The route that has white stripe should be
connected to posive and black to negave way. Power can be an automove
baery, 9V or a USB.
The Red (17) Infra transmier must be xed at some point poinng to the
panel of the equipment to be controlled, make sure that nothing is between
the two.
 Loading...