20
503,5
80
1498
334
156
1264
1055
558
194
56
22 - 40 verstellbar
1755
376
C26_04_01_0112
2.5 Installation
2.5.1 Transport and positioning
To protect the equipment against damage,
it must be transported vertically inside
its dedicated packaging. Where space is
restricted, you may also move the equipment
tipped backwards at an angle.
2.5.2 Positioning
1. Undo the four screws from the non-
returnable pallet.
2. Remove the washers.
3. Before removing the equipment from
the pallet, remove the anti-vibration
mounts from the pack supplied with
the equipment, and insert fully into the
equipment.
4. Remove the equipment from its pallet and
position it where required.
5. Level the equipment by manipulating the
anti-vibration mounts.
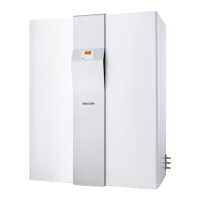
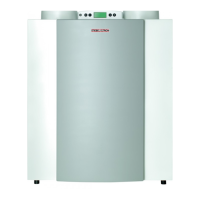
The equipment is designed for the installation
of the expelled air pipe at the top, for example
leading off to the right (see Fig. 9).
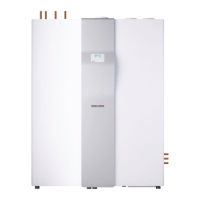
Connection dimensions
1 Cold water supply
2 DHW connection
3 Condensate drain
4 Circulation connection
5 Heating flow
6 Heating return, heating circuit 1
7 Heating return, heating circuit 2
8 Fill & drain valve, heating water
9 HE flow*
10 HE return*
11 Extract air connections
12 Expelled air connections
(optional installation)
13 Fill and drainage tap, DHW
14 Safety valve
15 Straight-through shut-off valve
16 Test valve for pressure gauge
17 Non-return valve
18 Test valve
19 Pressure reducing valve
(only in case of 4.8 bar pressure)
20 Electrical cable grommet
21 Circulation pump
22 Sensor well for thermostat *
23 Filter cassette
* Only for SOL versions
Fig. 9
Checking installation conditions
The room in which the equipment is to be
installed must meet the following conditions:
No risk from frost.
Strong floor (wet weight approx. 500 kg).
Never operate the device in rooms at
risk from explosion due to dust, gases or
vapours.
The extract air supplied to the equipment
must not be lower than +15 °C, otherwise
the evaporator would ice-up. Also, the
lower the extracted air temperature, the
lower the heat pump efficiency.
The available floor area in the installation
room must be at least 2 m². Never install
this equipment in rooms with a volume of
less than 4 m³.
Never restrict the available space around
the device through walls or ceilings closer
than shown in Fig. 8.
When installing the ventilation equipment
inside a boiler room, ensure that the
boiler operation will not be impaired.
15 19 18 17 16 15 13 10 1 22
Dimensions in mm
Ø 160
12
11
3
9
20
2
4
14
1721
23
7 5
6 8
2.5.3 Heating water connection
The heat pump must be installed by a
qualified contractor in accordance with the
water installation drawings, which are part of
the engineering documents.
Observe DIN 4751 sheet 1 and 2 plus TRD
721 (safety equipment) regarding the safety
equipment required for the heating system.
Install and adjust an overflow to safeguard an
adequate volume flow through the heat pump
under all operating conditions.
Flow and return connection
Due to the low vibration design of the heat
pump, structure-borne noise is largely
prevented. To facilitate an easy connection to
the heating system, the equipment is supplied
with angled plug-in fittings.
Flushing the heating system
Thoroughly flush the pipework before
 Loading...