PROTECT SIDE VIEW MIRRORS
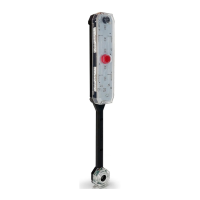
Set Button
Sensor
DO NOT PRESS
Battery Cover
Battery Indicator
Siren
Garage Door
Track Mount
Display &
Sensor Unit
Garage Door
Track Mount
Garage Door
Track Mount
Clamp
Screw
Wing
Nut
Display Unit
Mount
USB-C Port
INTRODUCTION
Let the Garage Side Parking Sensor help you
consistently guide your car when you enter and exit
your garage. The Garage Side Parking Sensor is low
maintenance and easy to install.
When a vehicle SLOWLY enters the garage, the sensor
will illuminate GREEN to indicate it is clear to enter. A
bright YELLOW light indicates when your side view
mirror is getting close to garage opening. A bright RED
light and siren indicates you are too far over and in
danger of damaging the side of the vehicle, reposition
the vehicle to avoid collision.
Use USB-C port (charger & cable not included) OR 4 AA
Batteries (not included) to power the Garage Side
Parking Sensor.
DO NOT USE BOTH AT THE SAME TIME
GARAGE TRACK MOUNT ASSEMBLY
MOUNTING THE GARAGE SIDE PARKING SENSOR
Installing Batteries
GARAGE TRACK MOUNTING:
Remove the battery compartment cover on the back
of the sensor module.
Insert 4 new ‘AA’ alkaline batteries (not included) .
Replace cover.
When it is time to replace the batteries, the battery
indicator light will ash every 6 seconds.
1.
2.
3.
Measure from the
oor to the top of
your vehicle wheel
well.
Mark your garage door track at
height of the top of your vehicle
wheel well measurement plus
12 inches.
1 MEASURE TOP OF WHEEL WELL
2 MARK MOUNTING HEIGHT
3 MOUNT GARAGE DOOR TRACK MOUNT
4 MOUNT DISPLAY UNIT TO TRACK MOUNT
5 ALIGN DISPLAY WITH GARAGE DOOR OPENING
The STKR® Garage Side Parking Sensor should now be
properly installed and ready for use.
SETTING THE DESIRED STOPPING DISTANCE
The STKR® Garage Side Parking Sensor can be adjusted
to set the stop zone from 4 inches away from the
sensor up to 2 feet away from the sensor.
The default distance is set to turn the red light on at
approx. 6 inches from the sensor. If you would like a
dierent warning distance follow the steps below. You
may change the distance as many times as you like.
IMPORTANT: Remove batteries before storing the
Garage Side Parking Sensor for extended periods.
Batteries corrode over time and may cause permanent
damage to the unit. Dierent types of batteries or new
and used batteries should not be mixed. Exhausted
batteries should be removed from the unit and
disposed of properly.
Low Battery Alert (blue ashing LED): ash every 6 seconds
Minimum Stop Range……………………….~4 inches
Maximum Stop Range…………………………~2 feet
The maximum detection zone is within 3 feet of the
side your vehicle.
The yellow light illuminates 6 inches from the predeter-
mined stop zone. Flashing yellow illuminates 2 inches
from the predetermined stop zone.
WARRANTY:
STKR® products are guaranteed: 1 year warranty
against manufacture and material defects under
normal use. In order to claim warranty, the original
receipt must be presented. Claims under warranty will
be repaired or replaced. Call STKR® at 1-704-508-1031.
This warranty gives you specic legal rights. Rights
vary from state to state.
- Do not mix old and new batteries;
- Do not mix alkaline, standard
(carbon-zinc), or rechargeable
(Ni-Cd, Ni-MH, etc) batteries.
- Dispose of batteries properly.
NOTE: Garage Side Parking Sensor stop distances can
vary due to vehicle type, temperature, and weather. It
is important to check your reaction time and leave
sucient stopping distance for these variations.
Always test the desired stop distance when parking a
new vehicle and adjust mounting location or stopping
distance if necessary.
CAUTION!: The Garage Side Parking Sensor
was designed for slow speed parking. For rapid
entrance speeds, the display module may not accurate-
ly reect distance, so approach slowly! Remember, this
is only a parking aid. It does not stop your car. That is
your job! Due to variations in driver skill and reaction
time we make no guarantees with this product. Use at
your own risk and approach with caution every time.
When in doubt, stop the car and check the conditions
and location of the car.
The Garage Side Parking Sensor is not suitable for use
in wet locations.
PARK YOUR CAR EXACTLY WHERE YOU WANT IT
For more info & video instruction
visit www.STKRconcepts.com
Questions? Call 704-508-1031
Troutman, NC 28166
CAUTION! It may be wise to have a 2nd person guide
you to the desired location to ensure you don’t hit
anything with your car.
Once your car is parked as far over as
possible, simply press the “Set
Distance” button rmly. The red,
yellow, and green LEDs will
illuminate. Release the button (Note:
you can reset the parking distance
anytime by repeating this step).
Test your new setting by slowly driving your car into
your garage. If your reaction times are slow to stop
the car when the red light illuminates, you may want
to adjust the red zone distance to allow for the delay.
Your STKR® Garage Side Parking Sensor is now set to
illuminate the red zone light indicating you are too far
over and need to readjust your vehicle. Yellow means
you are 2-6 inches from the red zone. Flashing yellow
lets you know you are within 2 inches of the red zone.
Pull your vehicle into your
garage as far over as you can
without your mirror hitting
the garage opening or other
obstacle and stop with your
mirror in-line with the sensor
(Ignoring the default settings
on the parking sensor).
CAUTION!
DO NOT PRESS OR
DAMAGE THE SENSOR
If it is visually damaged
it will no longer be
accurate at detecting
the side of your vehicle
Set Distance
Red Zone
Yellow Zone
Green Zone
Flashing Yellow
OPERATION
Center the mount over the marking on the garage
door track. Rotate and snap into place.
Garage Door Track
Garage Door Track
[LEFT] [RIGHT]
Loosen the garage track mount wing nut to move the
display unit in-line with the garage door opening.
Tighten wing nut.
[LEFT] [RIGHT]
Wing nut
Slide the display unit onto the garage track mount.
NOTE: Make sure to use the display unit slot that
corresponds with the side of the garage door track it
will be mounted to.
Left
Slot
Right
Slot
[LEFT] [RIGHT]
+12”
wheel well
height
FEATURES
POWER SUPPLY
PACKAGE CONTENTS
1
2
3
4
Troutman, NC | 704-508-1031
info@STKRconcepts.com | STKRconcepts.com