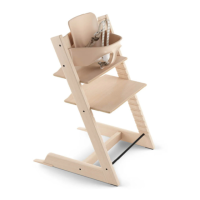
Stokke® HandySitt®
Stokke® HandySitt®
54 UK
WARNING
ر ي ذ
WARNING
Prevent serious injury or death from sliding out, falls,
or tipping over.
Never leave child unattended.
Always use the restraint system and ensure it is
correctly fitted.
Always secure child in the restraint system until child
is able to get in and out of the Stokke® HandySitt®
without help (about 3 years old).
Never allow a child to push away from the table.
Always use the chair attachment system and ensure it
is correctly fitted before use.
Always engage safety strap to secure this product to
adult chair.
Always check the security and the stability of the chair
mounted seat on the adult chair before each use.
Never use this product on anything but adult chairs
where safety strap can be fed under the seat of the
adult chair and pulled taut.
WARNING – Only use this product on an adult chair
placed on a stable, smooth surface.
WARNING – Always ensure that screws are properly
tightened.
WARNING
Prevent serious injury or death. Do not use in motor
vehicles.
Only use this product when your child can sit up
unaided – usually from approximately 6 months of age.
Do not use this product if any part is broken, torn,
missing or incorrectly fitted.
Do not use with any accessories not provided by
Stokke.
Do not use this chair mounted seat on stools or
benches.
When using this product with Stokke®
HandySitt® Floor Legs:
WARNING
Prevent crushed or amputated fingers. Make sure
locking devices are secure.
- Be aware of the risk that a child can push with
its feet against the floor and cause the product to
slide backwards. This may be dangerous if the floor
has steps of different levels, is uneven or there is a
staircase nearby.
- Never use this product on an elevated surface.
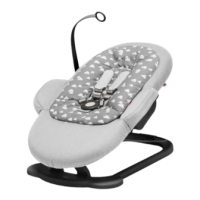
Fig. 1.0 Components of the Stokke® HandySitt®
1. Arm hook
2. Sliding arm
3. Wooden seat
4. Wooden leg
5. Non-slip feet
6. Safety strap
7. Restraint system (5-point harness)
8. Seat strap
9. Arm bolt
10. Wooden back
11. Back support w/lock bar
12. Seat springs
Fig. 2.0a Mounting of Arm Bolts (9)
Remove the protective cap and screw the Arm Bolts into the threadedholes.
Fig. 2.0b Mounting of plastic Back Support (11)
to Wooden Back (10)
1. Slide the plastic back support over the wooden back until the lower rib
snap over the wooden edge.
2. Secure the plate using the locking bar. Slide the locking bar to the center
of the back.
Fig. 3.1 Mounting the Stokke® HandySitt® on an adult chair
1. Turn the arm bolts one turn counter clockwise to release the sliding arms.
2. Place the arm hooks of the Stokke® HandySitt® over the back rest of the
adult chair.
3. Press the wooden seat down until the seat springs pop out and the seat
straps are taut.
4. Pull the Stokke® HandySitt® forward until the wooden seat is completely
level. Always ensure that the non-slip feet are positioned as far from the
edge of the adult chair as possible. Tighten both arm bolts clockwise to
fix the sliding arms in position.
5. To fasten the Stokke® HandySitt® to the adult chair, feed the safety strap
under the seat of the adult chair. Clip the buckle together and pull the
loose end of the strap until the safety strap is taut. The child should not
be allowed to use the Stokke® HandySitt® until it is firmly secured to the
adult chair.
6. Make sure that the wooden seat is down and the seat springs are
popped out and the seat straps are taut before use.
Fig. 3.2 Adult chairs the Stokke® HandySitt® will fit on
To ensure that your child is seated safely, the Stokke® HandySitt® should
only be used on adult chairs with the following characteristics:
• A back rest height of 30 – 45 centimeters
• If the top of the back rest is level, then it shall be at least 36 centimeters wide
• If the adult chair has a curved back rest, it shall have a minimum width of
41 centimeters
• NEVER MOUNT THE HANDYSITT® ON AN UNSTABLE ADULT CHAIR.
Fig. 4.0 Folding
To fold the Stokke® HandySitt® for transport or storage, press in the springs
on both side of the seating surface and simultaneously pull the wooden
seat forward.
Fig. 5.0 Mounting / dismounting of the restraint system (7)
When your child reaches the age of 3 years, the use of restraint system is
not mandatory. You can then dismount the harness.
1. Unscrew the arm bolts (9) and guide screw with washer (d) counter
clockwise to release the sliding metal arms of the Seat (Fig. 5.0-c.)
2. Slide the metal arms (2) until the wart in the metal arm slide meet the
end of the groove (5.0-b.) and lift it over the metal tap To remove
it from the wooden leg.
3. Attach/Remove the folded strap ends into the slots on both sides of the
Stokke® HandySitt® (Fig. 5.0-a). Make sure that the strap end forms a
“T” as shown on (Fig.5.0) when attaching.
4. Position the wart of the metal arm into the opening of the groove (5.0-b.)
5. Slide the metal arms downward, so that the arm bolts (9) can be
inserted and screw the arm bolts on clockwise.
6. Turn the arm bolts clockwise to tighten the sliding metal arms in position
(Fig. 1.0-B) set back the Guide screw with washer (d) and tighten it
without trapping the sliding metal arm.
Cleaning and maintenance
To clean the Stokke® HandySitt®, remove the sliding arms by fully
unscrewing the arm bolts and guide screw with washer (turn counter
clockwise). Slide the metal arms (2) until the wart in the metal arm slide
meet the end of the groove (5.0-b.) and lift it over the metal tap To
remove it from the wooden leg. All components of the Stokke® HandySitt®
and the Stokke® HandySitt® Floor Legs can be cleaned with a damp cloth.
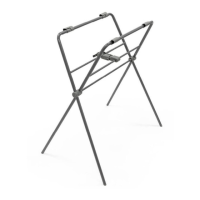
Fig. 6.0 Mounting additional Stokke® HandySitt® Floor Legs
(Sold separately) on the Stokke® HandySitt®
1. Unscrew the arm bolts and orient the legs so that the hole is oriented
over screw hole on both sides.
2. Insert the arm bolts and tighten.
IMPORTANT! KEEP FOR FUTURE REFERENCE
AE
:
.
.
.
.
) :Stokke® HandySitt®
.(
.
.
.
.
.
-
.
.
-
:
:
.
.
-
.
.
.Stokke
.
:Stokke® HandySitt®
:
:
. .
-
.
.
.
-
®Stokke® HandySitt 1.0
.1
.2
.3
.4
.5
.6
( ) .7
.8
.9
.10
.11
(
) .12
(9) 2.0a
.
(11) 2.0b
(10)
.1
.
. .2
.
Stokke® HandySitt® 3.1
.1
.
Stokke® HandySitt® .2
.
.3
.
ß
Stokke® HandySitt® .4
.
.
.
Stokke® HandySitt® .5
.
.
Stokke® HandySitt®
.
.6
.
3.2
Stokke® HandySitt®
Stokke® HandySitt®
:
•
•
•
HANDYSITT® •
.
4.0
Stokke® HandySitt®
.
(7) / 5.0
. .
.1
.(5.0 ) .
(2) .2
(5.0)
.
/ .3
.(5.0 ) Stokke® HandySitt®
. (5.0 ) "T"
(5.0) .4
.
.5
(9)
.
.6
(5.0 )
Stokke® HandySitt®
)
.(
(9)
. (5.0)
Stokke® ®Stokke® HandySitt
. ®HandySitt
+6.0
( ) Stokke® HandySitt®
Stokke® HandySitt®
.1
.
. .2
!

 Loading...