EasyManua.ls Logo

Sudio Rafter - User Manual

Sudio Rafter
4 pages
Print Icon
To Next Page IconTo Next Page
Loading...
Rafter 36” Bathroom Vanity
Page 1 of 4
Before beginning assembly, we encourage you to take a few minutes to go through this booklet. It contains
important information on installation and care tips to keep your furniture looking as good as new.
Thank you for Shopping with us!
We hope
we were able to provide your home with the perfect vanity. This vanity has been constructed with design,
quality and functionality in mind. We hope you enjoy this new addition!
Your feedback is invaluable to us and we would love to hear about your experience. Please take the
time to leave us a review.
Question and Answer IconNeed help?

Do you have a question about the Sudio Rafter and is the answer not in the manual?

Summary

Notes, Assembly and Installation

Step 1: Installation

Place vanity, ensure level, remove drawers, install plumbing, and secure to wall.

Step 2: Door Installation

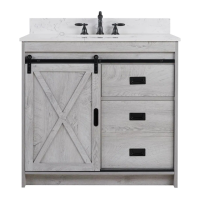
Install sliding door by aligning tracks and securing with screws.

Step 3: Backsplash Installation

Apply silicone to backsplash and secure it to vanity and wall.

Care and Maintenance

Cleaning Instructions

Dust regularly, avoid chemicals, protect from extreme conditions, and clean spills promptly.

Stain and Scratch Removal

Tips for removing common stains and minor scratches with household items or professional help.

Dimensions

Vanity Measurements

Provides detailed top and back view measurements for the 36" bathroom vanity.

Overview

This document describes the assembly, installation, care, and maintenance of a 36-inch bathroom vanity.

Function Description:

The 36-inch bathroom vanity is designed to provide a functional and aesthetically pleasing addition to a bathroom. It serves as a base for a sink and faucet, offers storage through drawers and a door, and includes a countertop and backsplash. The vanity is constructed with an emphasis on design, quality, and functionality, aiming to enhance the home's aesthetic and utility.

Important Technical Specifications:

  • Dimensions:
    • Top View: The overall width of the countertop is 914 mm (36 inches). The depth is 559 mm (22 inches). The sink cutout has a diameter of approximately 35 mm (1 3/8 inches) for the drain opening and 45 mm (1 3/4 inches) for the faucet hole. The distance from the side edges to the center of the sink cutout is 101.5 mm (4 inches) on both sides.
    • Back View: The total height of the vanity is 838 mm (33 inches). The main cabinet height is 337 mm (13 1/4 inches) from the bottom to the top of the back rail panel, and 361 mm (14 1/4 inches) from the bottom to the top of the countertop. The width of the open back section is 483.5 mm (19 inches), and the depth of the cabinet from the back to the front of the internal structure is 354.5 mm (14 inches).
  • Components (Part List):
    • Part A: Vanity w/top (1 PC) - This is the main cabinet structure with the integrated countertop.
    • Part B: Backsplash (1 PC) - A separate piece designed to protect the wall behind the vanity from water splashes.
    • Part C: Door (1 PC) - A sliding barn-style door for accessing the cabinet interior.
    • Part D: Hardware (2 PCS) - Screws for securing the door.
  • Construction: The vanity is designed with a sliding barn-style door and multiple drawers, suggesting a blend of open and closed storage options. The countertop is made of stone, which is known for its resilience to stains and scratches.

Usage Features:

  • Storage: The vanity includes drawers and a cabinet with a sliding door, providing ample storage space for bathroom essentials.
  • Countertop: The stone countertop offers a durable surface for daily use.
  • Installation:
    • Two-person handling: The manual explicitly states that handling the vanity will require two people due to its size and weight.
    • Leveling: It is crucial to install the vanity on a level floor to prevent misalignment and twisting of the cabinet. Shims may be required to level the legs if the floor is uneven.
    • Drawer Removal: Drawers can be removed to facilitate plumbing installation and to secure the vanity to the wall. This involves pressing plastic clips on both sides of the drawer bottom (right spring clip downward, left spring clip upward) and then pulling the drawer straight out.
    • Drawer Reinsertion: To reinsert drawers, both drawer slides on the vanity must be completely closed, with the ball-bearing component moved to the front. The drawer box slides are then carefully aligned with the cabinet slides and pushed all the way back until properly installed.
    • Wall Anchoring: The vanity should be secured to the wall through the back rail panel using appropriate screws and wall anchors.
    • Door Installation: The sliding door is installed by aligning its bottom to the floor track and its top wheels to the upper track, then sliding it into place. Once in position, screws are inserted just below the wheels to secure the door.
    • Backsplash Installation: After plumbing is in place, a bead of silicone is applied to the unpolished back side and bottom edge of the backsplash, which is then secured to the vanity and wall. Excess silicone should be wiped away immediately. The smooth face of the backsplash should face the front.
  • Plumbing: Faucet, drain, silicone, and other plumbing components are not included and must be purchased separately. Professional installation is recommended to ensure all building and plumbing codes are respected and to prevent water leaks.

Maintenance Features:

  • General Cleaning:
    • Regular dusting with a soft, dry cloth is recommended.
    • Avoid all chemicals, household cleaners, and abrasives that can damage the finish.
  • Wood Furniture Care:
    • Protect the wood from excessive exposure to sunlight and extreme changes in temperature and moisture, which can cause damage.
    • Avoid placing hot appliances (e.g., curling irons, hair dryers) directly on the countertop.
    • Do not place extremely heavy items on the countertop.
  • Stone Countertop Care:
    • Spill Management: Despite the stone's resilience, spills should be wiped up promptly, especially oil-based and acidic liquids, which are prone to staining. Do not let liquids sit on the stone overnight.
    • Cleaning: Clean the stone with a mild, non-abrasive soap and water. In bathrooms, rinse the vanity top frequently with clean, hot water to prevent soap scum buildup.
    • Sealing: The stone countertop is factory-sealed, but reapplication of a penetrating non-toxic sealer is necessary over time. The frequency depends on countertop use and sealer quality. A food-safe sealer is typically not needed for bath areas.
    • Stain and Scratch Removal:
      • Oil-based stains can be removed with acetone, mineral spirits, or ammonia.
      • Organic stains (coffee, tea, juice) can be removed with hydrogen peroxide mixed with a few drops of ammonia.
      • Water spots or rings, caused by mineral evaporation, can be buffed gently with 00 gauge steel wool. Small nicks and scratches can often be removed similarly.
    • Professional Assistance: For larger scratches, chips, or resilient stains, professional assistance from a local stonemason may be required.

Sudio Rafter Specifications

General IconGeneral
BrandSudio
ModelRafter
CategoryBathroom Fixtures
LanguageEnglish

Related product manuals