Sun Bicycles
Tug. A.Bug
User’s Manual
Please read and understand the information in this manual before
installing and using your new Sun Bicycles Tug-A-Bug trailer.
Compatibility:
This trailer is designed, and should only be attached to
adult bicycles with a 26", 27" or 700C rear wheel. It con-
nects to the seat post which must be 25.4mm, 27.2mm,
28.6mm, or 31.6mm in diameter. The bottom of the hitch once
attached must be at least 25 inches
from the ground.
The towing bicycle must have a steel or alloy seat post.
Weight Limits:
The trailer can carry 1 rider with the maximum weight of
85lbs. The front rider must be at least 150lbs to maintain
proper control of both the bicycle and the trailer when in
motion. The Sun Bicycles Tug-A-Bug is not a baby seat. It
is for use with children that are already able to ride a
bicycle without training wheels.
Proper Operation:
This trailer is designed for paved roads. Use on rough
roads could cause loss of control. Do not exceed 12mph.
Riding faster than 12mph could cause loss of control and
possible injury or death to either rider. This trailer is not
designed for and should not be used at night.
Installation
To install the hitch to the towing bicycle:
1) Remove the hitch from the trailer by removing the
quick release binder. Be careful not to lose the plastic
washers.
2) Remove the seat p
ost from the towing bicycle and
confirm it is made of steel or alloy and then
determine the diameter. Slide the proper sized plastic
shim on the seat post and install the hitch over the shim,
on the seatpost. The protruding ridge on the shim
(flange) should be at the base of the hitch. This will keep
the plastic shim from rising up out of the hitch during
operation and protect your frame from damage. The
plastic ridge must rest against the top o
f your bicycles
seat post clamp to insure the hitch will not lower itself
during operation. IMPORTANT: DO NOT TIGHTEN COM-
PLETELY THE BOLTS SECURING THE HITCH ASSEM-
BLY TO THE SEAT POST. Tighten enough to eliminate
play, however, the hitch assembly must swing freely from
right to left.
3) Install the seat post back into the bicycle and clamp
securely. There must be a minimum of 3" of seat post
inside the frame. Tighten the bol
ts on the hitch to
remove play while at the same time allowing the hitch to
swing from left to right.
4) Re-attach the trailer to the hitch with the quick release
binder bolt. Use the original supplied binder bolt. Do not
substitute the supplied binder bolt with any other type of
binder. Make sure to re install the safety pin. This will
insure the quick release binder bolt’s nut does not come
loose.
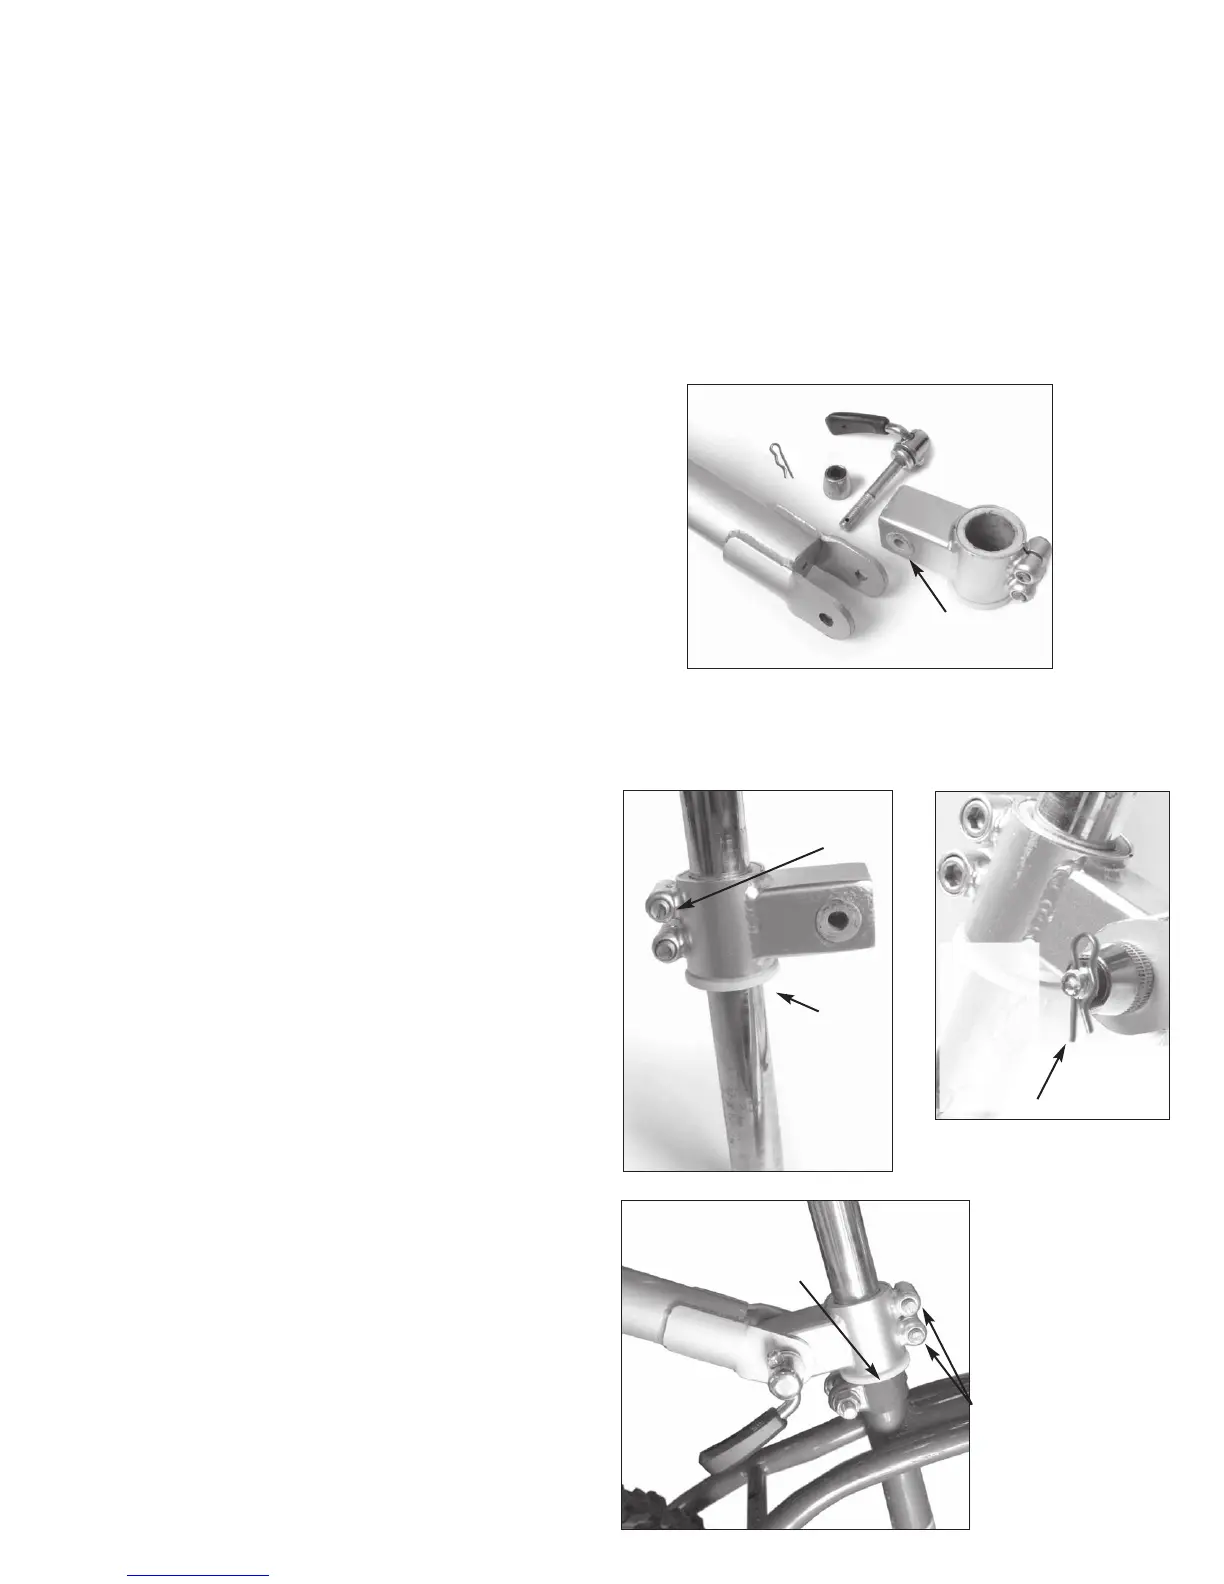
Plastic washers.
Shim
flange
under
hitch
assembly
Shim flange
between hitch
assembly & seat
colar
Do not over-
tighten bolts
Pin must
be
fully
engaged,
pressed
through
the QR
hole.
Left is the entire
hitch assembly
attached to the
bicycle’s seat post.
Pictured top is the hitch assembly disassembled. Below left is the
seatpost with part of the hitch assembly attached. Pictured right is
the nut and bolt of the quick release opposite the lever. PIN
MUST BE FULLY ENGAGED.
Do not over-
tighten bolts.
Tighten enough
to allow the
hitch to swing.
 Loading...