EasyManua.ls Logo

Sunnydaze Decor LOG HOOP User Manual

Sunnydaze Decor LOG HOOP
3 pages
To Next Page IconTo Next Page
Page #1 background imageLoading...
Page #1 background image
08/2023CC-7140 Page 1 / 3
Thank you for choosing Sunnydaze Decor. We stand behind our brand and the quality of the items we sell.
Replacement parts or products will be sent at our discretion within the 1-year warranty period. Proof of purchase, with
the date of purchase as well as photos of the merchandise defect, must be provided. Photos are used to determine
the cause of defects and for future quality control. Register your warranty at https://tiny.cc/SunnydazeWarranty
If you have any questions, comments or concerns, feel free to contact us by phone at 833-982-1977, by email:
customerservice@sunnydazedecor.com, or via our contact us page at https://tiny.cc/SunnydazeContact
Purchase Date: / / Order/Customer Reference Number:
LOG HOOP
Review all assembly and care information carefully before using this product. Save this manual for future reference.

  
A
Upper Tube 4
B
Lower Tube 2
C
Stretcher 2
D
Leg 2
E
M6x37mm Bolt 11
F
M9 Flange Nut 11
CHOKING HAZARDThis item contains small
parts that can be swallowed. Keep children and pets
away during assembly.
WARNING
Inspect packaging to ensure all
parts are accounted for before
disposing of packing materials.
Save the packing slip.
Question and Answer IconNeed help?

Do you have a question about the Sunnydaze Decor LOG HOOP and is the answer not in the manual?

Sunnydaze Decor LOG HOOP Specifications

General IconGeneral
BrandSunnydaze Decor
ModelLOG HOOP
CategoryIndoor Furnishing
LanguageEnglish

Summary

Assembly

Step 1: Connect Upper and Lower Tubes

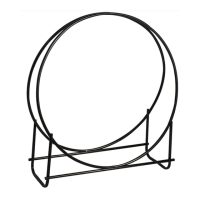
Align and loosely connect two Upper Tubes (A) with one Lower Tube (B).

Step 2: Secure Assembled Tubes

Loosely secure the top of assembled tubes using one M6x37mm Bolt (E) and one Flange Nut (F).

Step 3: Attach Stretchers

Loosely secure two Stretchers (C) to bottom, outer side of each log hoop.

Step 4: Install Legs

Align Legs (D) with hoops and stretchers and loosely secure using four Bolts (E) and Nuts (F).

Care and Maintenance

Safe Use

Only use on a flat, level surface.

Inspection and Cleaning

Periodically check fittings; clean with a damp cloth, avoid abrasives.

Safety Statements and Warnings

Key safety precautions for placing, loading, and protecting the log rack.

Related product manuals