*#1
LESLIE SWITCH
Owner’s Manual
Attaching the CU-1 to the XK-3/3C
%7
ank you and congratulations on your purchase of the
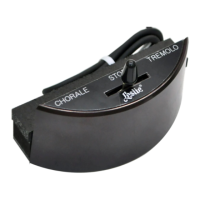
Hammond CU-1 Leslie switch. e lever switch on the
“Half-Moon” shaped CU-1 unit is used to control the Leslie
e ects just like on the original B-3. Please read the installa-
tions instructions carefully before you install the CU-1.
Purchased items:
CU-1 unit
(w/2 Thumb screws) ................. 1
Spacer ............................................ 1
Setting up the XK-3/3C
For your safety, please operate your Hammond prod-
uct on a level, stable surface.
1. Attaching the CU-1 unit.
Remove the protective paper from the adhesive tape on the spacer,
and attach the spacer to the CU-1 unit as shown above.
No spacer is needed for mounting the CU-1 Unit on the Lower Key-
board Unit XLK-3.
e CU-1 can be mounted to the front rail of the XK-3/3C is two dif-
ferent locations. Chose the location that is most comfortable to you.
Line up the screws attached to the CU-1 unit with the pair of chosen
holes located on the bottom side of the XK-3/3C’s front rail and se-
curely tighten these screws.
NOTE: Do not place the XK-3/3C with the CU-1 unit attached onto a at
desk type surface. Since the CU-1 extends past the bottom of the
XK-3/3C, the CU-1 unit and front rail of the XK-3/3C could be seri-
ously damaged.
NOTE: Before placing your XK-3/3C into an ATA keyboard type case, make
sure you remove the CU-1 unit rst.
2. Connecting to XK-3/3C
Insert the plug on the CU-1 unit into the jack located on the rear of the
XK-3/3C labeled “Foot Switch 1”.
For other compatible model, see owner’s manual of your instrument
which attach the CU-1 for detail.
1. Go to the foot switch page.
Turn on the XK-3/3C, touch the [MENU], [4]Control and choice the
“FOOT SW” page using [PAGE] buttons.
2. Set the device for CU-1.
Select “CU-1” using [VALUE] buttons.
is setting is memorized when you turn o the power.
For other compatible model, see owner’s manual of your instrument
how to set up the CU-1.
Playing with your CU-1 Switch
CHORALE:
e Leslie’ s rotation speed is slow.
TREMOLO:
e Leslie’ s rotation speed is fast.
STOP:
In this position, the Leslie is not rotating, It takes a few seconds for
the Leslie to completely stop rotating when switched from either the
Chorale or Tremolo positions. You can choose the Brake button while
the Leslie is in the O position. e “Brake” e ect gets the sound of
a stopped rotor or you make select “ rough” which by-passes the
Leslie e ect.
NOTE: On newer Hammond products, the speeds of the Leslie can also
be selected by means of a kick switch on the expression pedal or a
switch button on the product itself. Thus the selected speed on the
CU-1 unit may occasionally not match the action speed (slow-fast-
o ) of the Leslie. If this occurs, simply move the lever switch on the
CU-1 to the adjacent position and the actual rotor speed will then
mach the CU-1 selection.
Manufacturer:
SUZUKI MUSICAL INSTRUMENT MFG. CO., LTD.
25-12, Ryoke 2 Chome, Naka-ku,
Hamamatsu 430-0852 (Shizuoka)
JAPAN