Do you have a question about the Suzuki HP-11 and is the answer not in the manual?
Proper location, transport, and handling to prevent damage.
Power cord safety, interference, and service guidelines.
How to clean the piano cabinet and keys safely.
Ensure all listed items are present before assembly begins.
Assemble the piano stand as per the instructions.
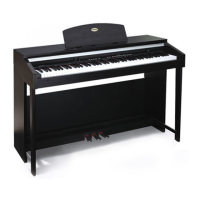
Position the piano on its stand and plug the AC cord into an outlet.
Turn on the power, adjust volume, and start playing.
Verify package contents and begin the assembly of the piano stand.
Assemble the piano stand following the provided diagrams and steps.
Continue assembling the piano stand by connecting components and tightening hardware.
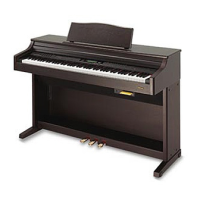
Plug the pedal cable into its receptacle on the bottom right of the piano.
Verify package contents and begin the assembly of the piano stand.
Attach the horizontal pedal assembly and horizontal support board to the legs.
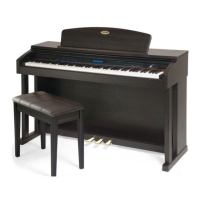
Attach the back panel skirt and then mount the piano to the stand.
Tighten all hardware, insert leg covers, and connect the pedal cable.
Plug the AC power cord into the piano and then into the power outlet.
Turn on power, set volume and brilliance, then begin playing.
Description of Power, Master Volume, Brilliance, Demo, Chorus, and Reverb controls.
Covers Function, instrument voices (Piano 1-Flute), Split, and Dual features.
Details Transpose, Lesson, Value, Metronome, Measure, and Recorder functions.
Play 13 demonstration songs to showcase available voices.
Adds realism with Reverb and Chorus effects to enhance sound.
Explains Chorus effect settings and usage for enriching sounds.
Divides the keyboard into two sections with different voices for each.
Combines or mixes two instrument voices to play simultaneously.
Adjusts the overall pitch of the piano to play in a familiar key.
Details how to raise or lower the piano pitch using value buttons.
Splits the piano into two 44-note keyboards for practice or duets.
How to select different instrument voices for the 44-note keyboards.
Explains how value buttons alter engaged features or functions.
How to set and adjust metronome tempo and time signatures.
Steps to record musical performance on Track 1.
Steps to playback recorded music from Track 1.
Record a second musical passage while listening to the first.
Play back both recorded tracks at the same time.
Explains four types of touch sensitivity: Fixed, Soft, Normal, Hard.
Steps to change the piano's touch sensitivity settings.
Steps to increase the keyboard's pitch by cents.
Steps to decrease the keyboard's pitch by cents.
Explanation of MIDI and its purpose for musical instruments.
Description of MIDI IN, OUT, and THRU ports on the piano.
Examples of connecting to a tone generator, another keyboard, or a computer.
Controls whether the piano's internal tone generator is active or bypassed.
How to select a discrete MIDI channel to receive data on.
Select MIDI channel for lower split keyboard input.
Select MIDI channel for transmitting MIDI data.
Select MIDI channel for transmitting lower split keyboard MIDI data.
Bass/Treble controls, Audio In/Out jacks for sound management.
MIDI connections and headphone jack usage for silent play.
Description of soft, sustain, and sostenuto pedals for different models.
| Brand | Suzuki |
|---|---|
| Model | HP-11 |
| Category | Musical Instrument |
| Language | English |