Design and specifications are subject to change without notice.
Menu > Channel > Dish Setup
In the you can edit/add
transponders.
► icon will
appear ahead of the chosen transponder).
Continue until you have marked all desired
transponders. Press BLUE button to start
scanning the chosen transponder.
Dish Setup Menu
Press Menu
Choose Channel Menu
Press Enter or Move down with the down arrow
Choose Dish Setup and press Enter
Choose the desired satellite and press Right
button to move to Transponders window.
To Add a new transponder press RED button
To Edit the highlighted transponder press Green
Button
To Delete a transponder press Yellow button
To Scan one or several transponders, highlight
the transponder and press Enter (the
Dish Setup
Satellite
HOTBIRD 6,7
ATRA 1H
ASTRA 2A
SIRIUS 5
NILESAT 101
EUTELSAT W3A
EUTELST W1
BADR-2.3.4
TransPonder
001 10723 H 29900
001 10750 H 27500
001 10775 H 27500
001 10830 V 28000
001 10892 H 30000
001 10930 H 15000
001 11747 V 29900
001 12015 V 27500
LNB Type
LNB Power
22 KHz
Toneburst
DISEqC1.0
DISEqC1.1
Motor
HOTBIRD 6, 7A, 8
09750/10600
On
Auto
None
None
None
None
Add
Move
Select
OK
Exit
EXIT
Delete Edit Scan
Quality
Dish Setup
Satellite
HOTBIRD 6,7
ATRA 1H
ASTRA 2A
SIRIUS 5
NILESAT 101
EUTELSAT W3A
EUTELST W1
BADR-2.3.4
TransPonder
001 10723 H 29900
001 10750 H 27500
001 10775 H 27500
001 10830 V 28000
001 10892 H 30000
001 10930 H 15000
001 11747 V 29900
001 12015 V 27500
LNB Type
LNB Power
22 KHz
Toneburst
DISEqC1.0
DISEqC1.1
Motor
HOTBIRD 6, 7A, 8
09750/10600
On
Auto
None
None
None
None
Add
TransPonder
Frequency
Symbol(ks/s)
Polarity
Quality
102
10715
27500
H
Dish Setup
Satellite
HOTBIRD 6,7
ATRA 1H
ASTRA 2A
SIRIUS 5
NILESAT 101
EUTELSAT W3A
EUTELST W1
BADR-2.3.4
TransPonder
001 10723 H 29900
001 10750 H 27500
001 10775 H 27500
001 10830 V 28000
001 10892 H 30000
001 10930 H 15000
001 11747 V 29900
001 12015 V 27500
LNB Type
LNB Power
22 KHz
Toneburst
DISEqC1.0
DISEqC1.1
Motor
HOTBIRD 6, 7A, 8
09750/10600
On
Auto
None
None
None
None
Add
Move
Select
OK
Exit
EXIT
Delete Edit Scan
Quality
Menu > Channel > Dish Setup
In the you can setup the
DiSEqC to connect several LNB:s.
Dish Setup Menu
Press Menu
Choose Channel Menu
Press Enter or Move down with the down arrow
Choose Dish Setup and press Enter
Choose the desired satellite and press Right 2
times to move to the LNB window
Choose corresponding DiSEqC model and
choose the LNB port for the LNB directed to the
highlighted satellite. Repeat the same procedure for all DiSEqC ports and thereafter press Blue
button to scan the satellites
Menu > Channel > Dish Setup
In the you can setup a dish
with a DiSEqC motor.
Dish Setup Menu
Press Menu
Choose Channel Menu
Press Enter or Move down with the down arrow
Choose Dish Setup and press Enter
Choose the desired satellite and press Right 2
times to move to the LNB window
Choose corresponding motor model to your motor
and set the parameters for it such as limits,
positions.
Dish Setup
Satellite
HOTBIRD 6,7
ATRA 1H
ASTRA 2A
SIRIUS 5
NILESAT 101
EUTELSAT W3A
EUTELST W1
BADR-2.3.4
TransPonder
001 10723 H 29900
001 10750 H 27500
001 10775 H 27500
001 10830 V 28000
001 10892 H 30000
001 10930 H 15000
001 11747 V 29900
001 12015 V 27500
LNB Type
LNB Power
22 KHz
Toneburst
DISEqC1.0
DISEqC1.1
Motor
HOTBIRD 6, 7A, 8
09750/10600
On
Auto
None
None
None
DiSEqC1.2
Set Limit
Move Continue
Move Step
Set West Limit
Set East Limit
Quality
STOP
STOP
Goto Reference
Disable Limit
Move
Select
OK
Exit
EXIT
Set Limit
11
Not for T/X12available
Not for T/X12available
Not for T/X12available
Design and specifications are subject to change without notice.
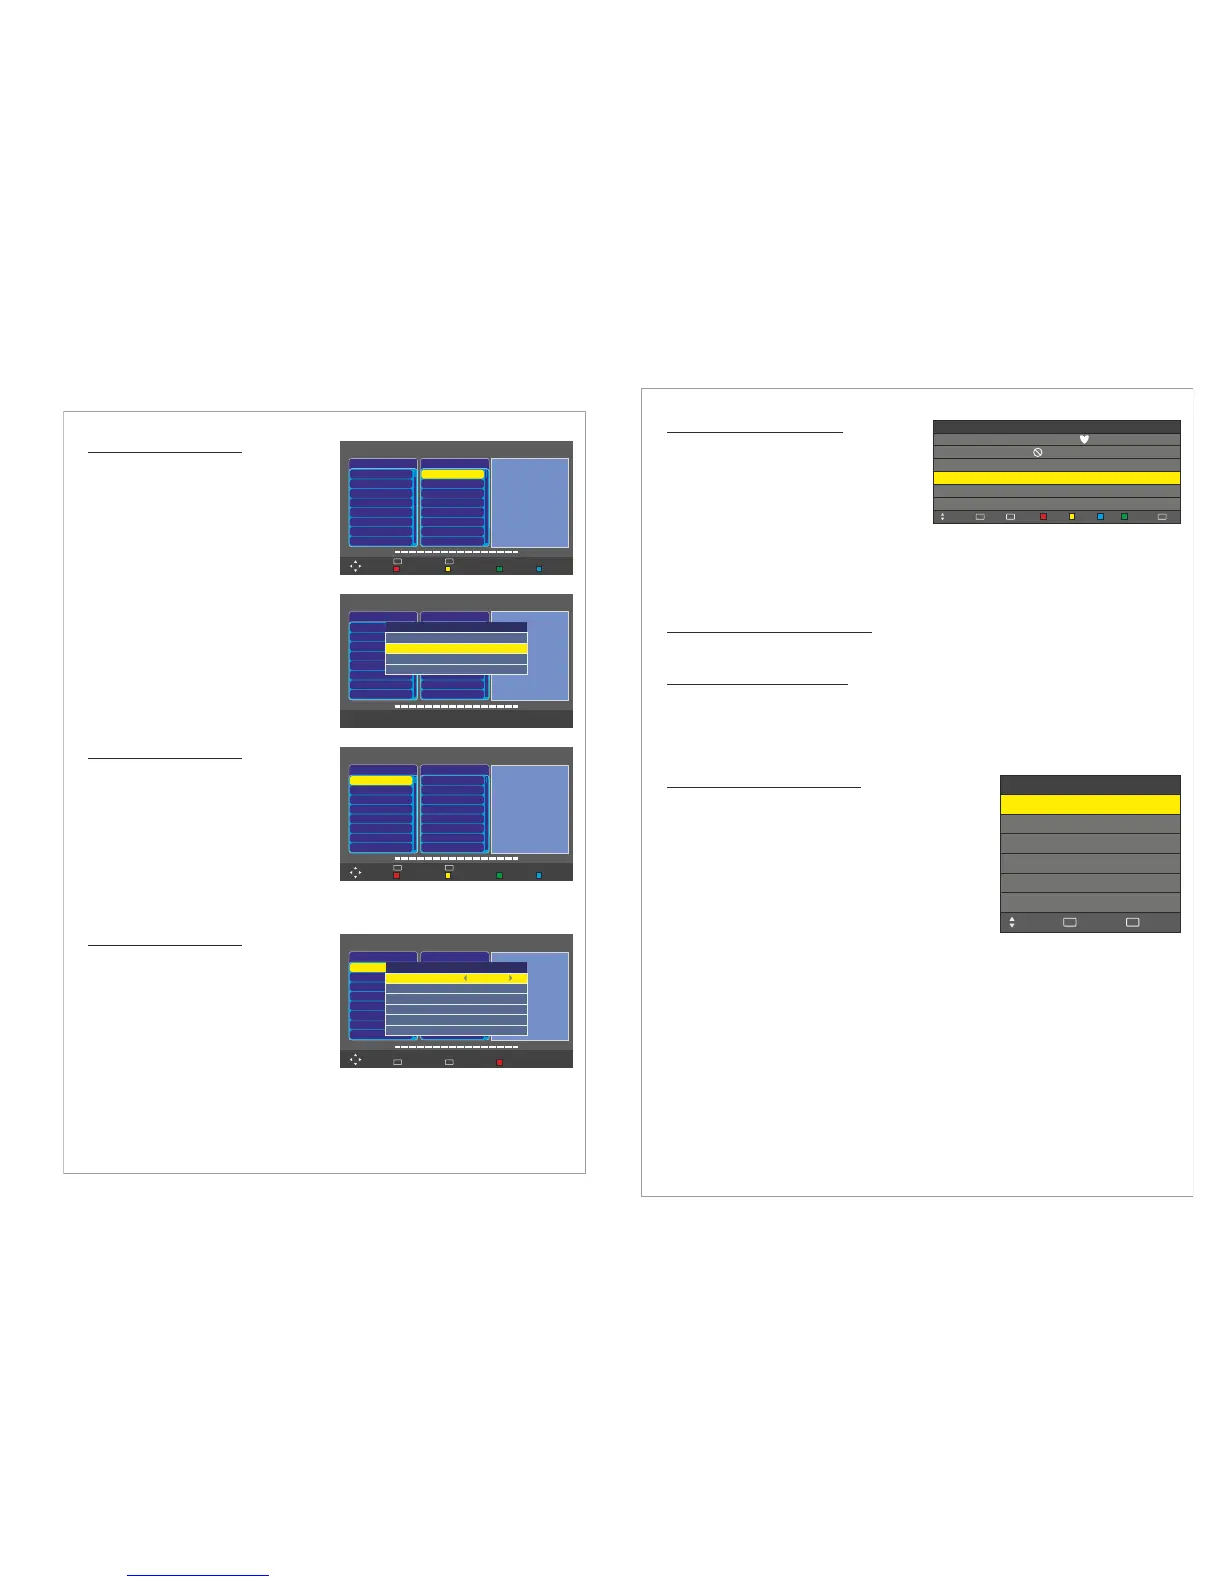
Menu > Channel > Program Edit
In you can:
Delete a channel ( )
Move a channel (
)
Skip a channel ( )
Rename a channel (
)
Add a channel to favorits list ( )
To access do the following
Program Edit Menu
Program Edit Menu
use Red button
press Yellow button, choose
new position, press Enter
use Blue button
press Green button, change
the channel name using the arrow buttons
use FAV button
Press Menu. Choose Channel Menu
Press Enter or Move down with the down arrow
Choose Program Edit
CH.NAME
Delete
FAV
FAV
Move
0 C-05
SKIP
FAV TYPE
1 C-06
2 C-07
3 C-08
4 C-09
5 C-10
Move Skip Rename
Back
MENU
Select
OK
ATV
ATV
ATV
ATV
ATV
ATV
Menu > Channel > Signal Information
Menu > Channel > CI Information
Choose to display detailed information about the signal quality, strength
and other details.
Choose to display detailed information about the Common Interface Module
you have inserted in the CI-slot.
To watch paid channels, the “CI or CI+ CARD” must be inserted. If you don’t insert the “CI or CI+
CARD,” some channels will display the message “Scrambled Signal”.
Signal Information Menu
CI Information Menu
Menu > Channel > PVR File System
Use the to prepare your LCD to
record DVB-T programs and use the Time Shift function. In
order to record or time shift programs you need to connect a
USB-memory or an Externa Hard Drive to your LCD.
The first time you connect a USB-memory or external hard
drive you will need to format it in the PVR File System. All data
on the USB-memory or external hard drive will be erased,
therefore please backup any data before formatting in the PVR
File System.
To access do the following
PVR File System Menu
PVR File System Menu
Press Menu. Choose Channel Menu
Press Enter or Move down with the down arrow
Choose PVR File System and press Enter
PVR File System
Select Disk
Check PVR File System
USB Disk
Time Shift Size
Exit
EXIT
Move
Format
C:
Start
Speed
Select
OK
12
 Loading...