Do you have a question about the TAKE-A-LABEL TAL-2100ER and is the answer not in the manual?
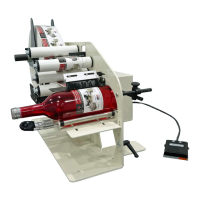
Replace the existing label roll and install a new one onto the unwind disc.
Guide the label web through rollers, photo eye, and over the peel plate.
Rotate brush and holder up to provide clearance for web threading.
Install the waste wind clip and place webbing onto the waste wind shaft.
Step on the footswitch a few times to cycle the applicator for label alignment.
Remove one label and position the webbing only within the photo eye.
Press and hold the 'Normal' button for 3 seconds until the lights finish flashing.
Dispense one label completely with the next stopping at the peel plate.
Slide the roller forward, cycle the unit, then move back to adjust stop position.
Loosen screws and adjust rollers to center product for easy rolling.
Loosen handles to create a 1/16” gap between peel plate and product.
Rotate brush and holder down to aid label application to the product.
| Print Resolution | 203 dpi |
|---|---|
| Power Supply | AC 100V - 240V, 50/60Hz |
| Label Type | Continuous, Die-cut labels |
| Printing Technology | Thermal Transfer / Direct Thermal |
| Connectivity | USB |
| Memory | 8MB Flash |
| Supported Barcode Types | Code 39, Code 128, EAN-8, EAN-13, UPC-A, UPC-E, ITF, Codabar, QR Code, Data Matrix |
| Label Width | 0.75" - 4.72" (19mm - 120mm) |
| Core Diameter | 3" (76mm) |
| Dispensing Speed | Up to 7.9"/sec (200mm/sec) |