This document is a user's guide for the TAKUMA RS WING, a product designed for water sports, likely a wing for wingfoiling or similar activities. The guide covers inflation, deflation, packing, and repair procedures, along with important safety and maintenance tips.
Function Description
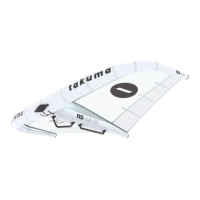
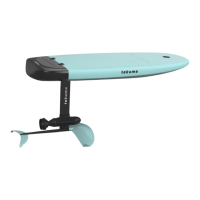
The TAKUMA RS WING is an inflatable wing used for propulsion on water. It is designed to be used in conjunction with other equipment, such as a board and foil, to allow a rider to "fly above water." The wing captures wind to generate thrust, enabling the user to glide across the water's surface.
Important Technical Specifications
- Inflation Pressure: The RS WING should be inflated to a recommended 8 PSI.
- Components:
- Inflation/Deflation Valve: For inflating and deflating the wing.
- Leash & Pump Attachment Loop: For securing the leash and pump.
- Leading Edge: The main inflatable structure at the front of the wing.
- Power Tip Battens: Reinforcements at the wing tips.
- Wing Tip: The ends of the wing.
- Direct Control Bars: Handles for gripping and controlling the wing.
- Central Strut: The inflatable structure running through the center of the wing, connecting to the leading edge.
- Included Accessories:
- Wrist leash
- Pump valve adapter
- Repair kit
- Bag for storage and transport
Usage Features
Safety Precautions:
- The product should only be used by individuals in good physical health and who are experienced swimmers.
- Avoid using under the influence of alcohol, drugs, or medications.
- It is recommended to take lessons from a certified instructor.
- Always check for legal requirements and rules that apply in your location.
- Observe local weather forecasts and never go out in severe weather conditions (thunderstorms or severe wind).
- Always use a certified personal flotation device (PFD), a leash, a certified helmet, and a full neoprene wetsuit, booties, and gloves.
Inflation:
- Place the TAKUMA RS WING on a clean and flat surface.
- Ensure the leading edge is facing into the wind.
- Connect the pump to the inflation valve on the leading edge.
- Inflate the RS WING to the recommended 8 PSI.
- Repeat the inflation process for the central strut.
Deflation:
- Place the TAKUMA RS WING on a clean and flat surface.
- Ensure the leading edge is facing into the wind.
- Open the inflation valve on the leading edge to release air.
- Repeat the deflation process for the central strut.
Packing:
- Ensure the wing is completely dry before folding and packing.
- Do not hang by the leading edge handle to dry, as the strut bladder may bunch up and pop when reinflated.
- After deflation, fold the wing systematically to fit into its bag. The guide illustrates a multi-step folding process:
- Fold the wing tips inwards.
- Roll the wing from the leading edge towards the trailing edge, expelling remaining air.
- Secure the rolled wing with straps.
- Place the folded wing into the provided bag.
Maintenance Features
Power Tip Battens Insert/Removal:
- Insert: Slide the battens into their designated sleeves at the wing tips.
- Removal: Unzip the sleeve and slide the battens out.
Direct Control Bars Removal:
- The control bars can be removed by detaching them from their connection points on the central strut.
Leading Edge Bladder Repair:
- For small air leaks or punctures, use the provided repair kit. For bigger tears, professional repair is recommended.
- Removal of Bladder:
- Carefully push the inflation valve inside the leading edge.
- Open the wing tip and pull out the bladder, attaching a long line around the end using a larks head knot. Repeat for the other side, ensuring the line is at least double the length of the wing.
- Open the zipper next to the inflation valve on the leading edge and pull out the bladder one side at a time.
- Remove the lines from the tips and secure them in place well outside the inflation valve.
- Leak Detection:
- Inflate the bladder.
- Immerse the bladder in water and check for air bubbles to locate the leak.
- Draw a circle around the puncture with a marker pen.
- Patching:
- Fully deflate the bladder.
- Sand down the area around the puncture using sandpaper and clean with alcohol.
- Place the bladder on a smooth flat surface and stick a repair patch over the puncture.
- Reinflate the bladder to check if it is fixed properly.
- Reinstallation of Bladder:
- Deflate the bladder and reattach the lines to the tips using a larks head knot.
- Insert the bladder back into the leading edge, using the lines to pull it back into position. Ensure there are no twists in the bladder.
- Once in position, pull the inflation valve back through and reattach it.
- Remove the lines from around the bladder and close the tips.
Strut Bladder Repair:
- The process is similar to the leading edge bladder repair.
- Removal of Bladder:
- Carefully push the inflation valve inside the leading edge (strut connection point).
- Open the strut tip and pull out the bladder.
- Attach a line around the end using a larks head knot, ensuring the line is at least double the length of the strut.
- Open the strut zip and pull out the bladder.
- Follow steps 5 to 8 of the leading edge bladder repair guide for leak detection, patching, and reinstallation.
Useful Care Tips:
- Frequently check your wing for damage. If you notice any small holes or tears in the canopy, fix it with the repair kit or take it to a local repair center.
- Avoid storing your wing in enclosed warm areas for extended periods, such as a car on a summer's day, as excessive heat may cause the glue to de-laminate.
- Avoid leaving your wing in direct sunlight or wind for prolonged periods of time as this can cause material deterioration.
- When placing your wing on the ground, secure it by placing a sandbag or other soft heavy object on the canopy.
- Do not leave the wing inflated for extended periods of time if not in use.
- Rinse your wing with fresh water from time to time if it has been in contact with salt water.
For further assistance, customers can contact customerservices@takuma.com or find tutorial videos on the TAKUMA YouTube channel at http://youtube.takuma.com. Warranty information is available on takuma.com.