Do you have a question about the Tamiya Grasshopper II and is the answer not in the manual?
Guide to setting up the BEC radio system and necessary accessories for operation.
Instructions for using a standard 2-channel radio system with receiver power sharing.
Lists essential tools and paint recommendations for building the model.
Details on compatible sizes for servos and receivers to ensure proper fitment.
Information on battery eliminators and the benefits of Tamiya Ni-Cd batteries for performance.
Lists necessary tools and specifies the recommended power source for the model's operation.
Recommendations and tips for painting the model's body and parts for a finished look.
Guide to identifying and preparing parts before starting the assembly process.
Instructions for correctly wiring the speed controller to the radio system for operation.
Guidance on selecting and attaching servo horns and preparing servos for installation.
Step-by-step procedure to verify all radio control components are functioning correctly before final assembly.
Detailed instructions for mounting servos and other components, ensuring proper alignment and fit.
Correct procedure for safely disconnecting the battery and powering down the RC system after use.
Steps for installing the speed control servo and connecting it via the speed control rod.
Instructions on how to securely mount the receiver battery pack within the model's chassis.
Guidance on lubricating switches and correctly connecting various RC system wires and plugs.
Instructions for installing receiver batteries and routing the antenna wire for optimal signal reception.
How to properly secure and route the battery connector wire and antenna wire for neatness and protection.
Detailed steps for assembling the front uprights and attaching the front bumper for structural integrity.
Instructions for installing shock absorbers and coil springs, critical for the model's suspension system.
Steps for assembling the rear shaft and gearbox, including options for upgrading to ball bearings.
Guide to installing the differential gear assembly, crucial for power transmission to the wheels.
Instructions for securely mounting the motor and connecting its wires for the model's propulsion.
Detailed steps for correctly mounting the gearbox onto the chassis, ensuring proper alignment.
A practical guide explaining the correct usage and tightening of tapping screws for plastic parts.
Instructions for connecting the motor and speed controller wires, ensuring correct polarity and function.
Step-by-step guide to fitting tires onto wheels and mounting the assembled wheels onto the model.
Instructions for properly routing the antenna wire for optimal radio signal reception.
Procedure for calibrating the radio system, including trim adjustments for steering and speed control.
A guide on how to safely remove and handle adjusters used in the assembly process.
Essential safety warning regarding battery disconnection to prevent overheating and damage.
Instructions for adjusting the front wheel toe-in for improved steering performance and stability.
Guide to connecting the battery to the speed controller and properly storing the connectors.
Tips for painting the driver figure and modifying specific components like the BT6 part.
Detailed instructions on how to cut, position, and apply decals smoothly without wrinkles or air bubbles.
Advice on creatively applying any leftover sponsor decals to personalize the model.
A list of recommended paint colors for achieving the desired finish on the model.
Important guidelines for safe operation, including avoiding crowds and public roads.
Safety advice for switch operation and troubleshooting common issues like overheating or runaway vehicles.
Essential checks before running the model and the correct sequence for powering up the system.
Recommended maintenance steps after running the model to ensure its longevity and performance.
Guide for installing optional 540 motor and the C.P.R. unit for enhanced performance.
Instructions for fitting a spare body set and modifying the body mount for better compatibility.
Visual guide to all parts, including diagrams and corresponding part numbers for identification.
Details on included accessories like tool bags, blister packs, and spare parts such as lubricants and fasteners.
Comprehensive identification of all mechanical and plastic parts with their respective numbers and quantities.
Information on how to order replacement parts and a price list for common spare components.
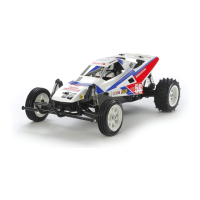
| Type | RC Buggy |
|---|---|
| Motor | RS-540 |
| Drive | 2WD |
| Chassis | ABS Plastic |
| Shock Absorbers | Friction |
| Required Battery | 7.2V Racing Pack |
| Radio System | 2-Channel |