Do you have a question about the Taurus ALPATEC MG10 and is the answer not in the manual?
Appliance use by children (8+) and persons with reduced capabilities requires supervision.
The appliance is not a toy; children must be supervised to prevent them from playing with it.
Cleaning and user maintenance by children require adult supervision.
Do not store explosive substances like aerosol cans with flammable propellants.
Appliance is for domestic use only, not industrial, professional, or hospitality environments.
Damaged mains connections must be replaced by authorized service; do not attempt self-repair.
Warning: Fill with potable water only and connect to potable water supply only.
Warning: Keep ventilation openings clear of obstructions.
Warning: Do not use mechanical devices to accelerate defrosting.
Warning: Do not damage the refrigerant circuit.
Warning: Do not use electrical appliances inside food storage compartments unless recommended.
Ensure correct voltage, use earthed sockets, and check cable/plug condition.
Do not force, use for lifting, wrap, clip, or crease the power cord.
Do not touch wet plugs, use damaged cables, or operate if casing is broken or dropped.
Place on flat surface away from heat, sunlight, rain, or moisture.
Unroll power cable, ensure accessories are fitted and functional, do not operate without water.
Do not move while in use, use handles, do not tip or turn over.
Disconnect from mains when not in use, before cleaning, or refilling water tank.
Store out of reach of children; use appliance according to instructions and conditions.
Only use water; bottled mineral water for human consumption is recommended.
Ensure service by specialists using only original spare parts or accessories.
Misuse or failure to follow instructions voids warranty and manufacturer's liability.
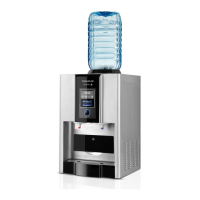
Lists and identifies external parts of the appliance, numbered 1 through 12.
Explains indicators (ICE, HOT, etc.) and button functions for operation.
Remove all packing material and ensure safe placement away from hazards.
Place on a flat, stable surface with 15cm free space for ventilation.
Ensure the power socket is easily accessible for quick disconnection.
Wait at least 2 hours after installation before first use, with front cover open.
Instructions for adding bottled water or connecting to a water supply.
Steps to connect power and press buttons to start desired functions (hot/cold water, ice).
Sequence for dispensing hot water to avoid automatic heater protection.
Note that ice cubes may be small or irregular during the first three cycles.
Press the 'COOL' button to dispense cold water.
Pull out the ice drawer and use the scoop to take ice.
Procedure to set the current time on the appliance.
Instructions to set automatic ON/OFF times for ice making function.
Instructions to set automatic ON/OFF times for hot water function.
Procedure to disable previously set automatic ON/OFF times for hot water.
Procedure to disable previously set automatic ON/OFF times for ice making.
Press start/stop button to begin ice making; processing time is 7-20 minutes.
Ice may be small/irregular or not fully transparent initially due to processing.
Lights indicate 'Tank empty' or 'Tray full' status for ice making.
Turn off, unplug, and clean the appliance after finishing usage.
Appliance has handles on the back for easy transport.
Device protects the appliance from overheating.
Clean with damp cloth and mild detergent; avoid solvents and submerging.
Drain water from the back unit for cold (blue) and hot (red) water lines.
Table listing problems, possible causes, and solutions for common issues.
Details maximum and minimum inlet water pressure requirements.
Lists EU directives the appliance complies with (Low Voltage, EMC, RoHS, Ecodesign).
Information on packaging recycling and the WEEE symbol for disposal.
| Brand | Taurus |
|---|---|
| Model | ALPATEC MG10 |
| Category | Water Dispenser |
| Language | English |