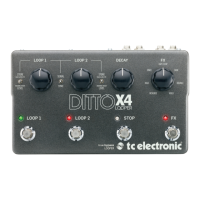
10 Ditto X4 Looper User Manual
Exporting Ditto X4 Looper loops to a computer
If you have created a really great loop (e.g. a song idea or a beautiful ri), you
may want to reuse it. Now you could simply record the signal coming from Ditto
X4 Looper’s audio outputs to your DAW – but this could lead to signal quality
degradation and requires post-editing (trimming) the recording. This is why Ditto
X4 Looper allows you to export your loops in pristine quality.
1. When you are happy with your loops, nudge the STORE/LEVEL switch(es)
up briey. This will store each loop within the device in a format (actually,
two formats) that can easily be transferred to a computer. After storing
the current loops, please wait a few seconds before connecting the pedal
to your computer.
2. After power has been connected to the looper and it has run its startup
sequence, connect a USB port on your computer to the USB port of Ditto X4
Looper using the supplied USB cable. The LOOP footswitch LEDs will start
blinking orange, indicating that Ditto X4 Looper now is in USB transfer mode,
and audio will be disabled.
3. Your computer will recognize Ditto X4 Looper as an external USB storage
device. It will be shown in the Finder (OS X) or Windows Explorer as a drive
called “DITTO” containing folders called “TRACK1” and “TRACK2”.
Each “TRACK” folder should hold two les: “TRACK.AIF” and “TRACK.WAV”.
These les contain the loops that you have previously stored (see step 1) in
both AIFF and WAV formats. AIFF is commonly used in OS X, while WAV is the
commonly used format for Microsoft Windows.
Please refer to the instruction manual of your DAW to learn which format you
should use.
4. Copy the respective le (“TRACK.AIF” or “TRACK.WAV”) to your computer,
e.g. by dragging it from the “TRACK” folders to the desktop. Wait for the le
transfer to nish. Note that you may need to rename one or both tracks if
they are carried to the same folder on your computer.
5. On a Windows PC, eject the “DITTO” drive by clicking it with the right mouse
button in Windows Explorer and selecting “Eject” from the context menu.
On a Mac, eject/unmount the “DITTO” drive by selecting it and pressing
[Cmd] and [E] simultaneously.
6. Disconnect Ditto X4 Looper from your computer. The LOOP footswitch
LEDs will stop blinking orange and return to green, and audio will be
enabled again.
About audio formats
Ditto X4 Looper saves audio les in 32 bit oating point format. If your DAW
does not support this AIFF/WAV “avor” – or if it doesn’t support AIFF or WAV
at all – you will have to convert the les coming from Ditto X4 Looper to a
supported format.
Please consult your DAW’s manual or support pages to nd out which audio
formats it supports. You should then be able to nd a free audio format
converter – either as an application for your operating system or as an
online service.
If nothing else works, you can simply record the signal from Ditto X4 Looper’s
audio outs into your DAW.
Importing loops into Ditto X4 Looper
from a computer
Did you nd (or create) an insanely great song that you would like to use on
stage as a backing track? Well, with Ditto X4 Looper, you can – without having to
schlep your notebook on stage. All you have to do is transfer your backing track or
base loop from your computer to Ditto X4 Looper using a USB connection.
1. Create a loop in your DAW and export it as an audio le in either AIFF or
WAV format.
2. Connect a USB port on your computer to the USB port of Ditto X4 Looper
using the supplied
USB cable. The LOOP footswitch LEDs will start blinking orange, indicating
that Ditto X4 Looper is now in USB transfer mode, and audio will be disabled.
3. Your computer will recognize Ditto X4 Looper as an external USB storage
device. It will be shown in the Finder (OS X) or Windows Explorer as a drive
called “DITTO” containing a folder called “TRACK”.
4. Copy your audio le (in AIFF or WAV format) from your computer to Ditto X4
Looper by dragging it to the “TRACK1” folder of the “DITTO” drive for the
track to be played from LOOP 1 controls and "TRACK2" folder for the track to
be played from the LOOP 2 controls. Wait for the le transfer to nish.
5. Eject/unmount Ditto X4 Looper as described in “Exporting Ditto X4 Looper
loops to a computer”. The LOOP footswitch LEDs will icker as the loop
is read.
6. Disconnect Ditto X4 Looper from your computer. The LOOP footswitch
LEDs will stop blinking orange and return to green, and audio will
be enabled again.
 Loading...