This document serves as a service manual for the Technics RP-DJ1210 Stereo Headphones, providing essential information for maintenance, repair, and understanding its features. It is intended to be used in conjunction with the service manual for Model No. RP-DJ1200 (Order No. AD9605128C8) and its supplement manual (Order No. AD9709124S8).
Function Description:
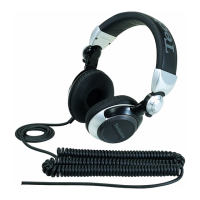
The Technics RP-DJ1210 are stereo headphones designed for high-quality audio reproduction. They are particularly suited for professional use, such as DJ monitoring, due to their robust construction and specific features like a rotary housing for single-side monitoring. The headphones are engineered to deliver clear and powerful sound, making them suitable for environments where high fidelity and durability are paramount.
Important Technical Specifications:
- Type: Dynamic Closed-type
- Driver Unit: 41 mm (1-5/8in.) diameter
- Impedance: 32 Ω at 1 kHz
- Sensitivity: 106 dB/mW
- Rated Power: 200 mW
- Power Handling Capacity: 1,500 mW
- Frequency Response: 8 Hz – 30,000 Hz
- Cord: Approx. 3m (9.8ft.) long, Stereo mini-plug (3.5mm (1/8in.) diameter), straight-type, gold-plated
- Plug: 6.3mm (1/4in.) diameter large stereo plug adapter (gold plated) (RFX1414)...1pc.
- Weight: Approx. 230g (8.11oz.) (without cord), Approx. 330g (11.64oz.) (net)
- Accessories: Carrying pouch (RFX1415)...1pc.
- Color: Silver (S)
- Areas: Europe, Asia, Latin America, Middle East and Africa (E)
Usage Features:
- Rotary Housing for Single-Side Monitoring: A key feature for DJs, the headphones incorporate a useful rotary housing that allows for easy single-side monitoring. This design enables users to pivot one ear cup away from the ear while keeping the other on, facilitating seamless transitions between monitoring the mix and listening to external sounds.
- Foldable Design: The RP-DJ1210 boasts a foldable design, enhancing its portability. This feature, combined with the supplied carrying pouch, makes the headphones convenient to transport and store, protecting them from damage during travel.
- Splash-Proof Specifications: Designed for demanding environments, the headphones have splash-proof specifications, offering high resistance to perspiration. This makes them suitable for extended use in active settings where exposure to moisture might be a concern.
- High Sensitivity and Power-Handling Capability: The driver unit is engineered for high sensitivity and a high power-handling capability, ensuring robust sound output and clarity even at high volumes. This is crucial for professional audio monitoring where precise and powerful sound reproduction is essential.
- HOLD/RELEASE Mechanism: The headphones feature a unique HOLD/RELEASE mechanism for the housing unit's rotation.
- HOW TO HOLD: Sliding a lever in the direction of "HOLD" engages a brake, preventing the housing unit from rotating. This secures the unit in a fixed position, which can be useful during intense monitoring sessions.
- HOW TO RELEASE: Sliding the lever in the opposite direction releases the brake, allowing the housing unit to rotate freely. The rotational range is 180° forwards and 90° backwards.
- WARNINGS for Usage:
- Users are advised not to rotate the housing unit beyond its specified rotational range (180° forward, 90° backward) and to avoid forcing rotation when the unit is in "HOLD" status, as this can lead to failure or malfunctioning.
- It is recommended to avoid wearing the headphones while driving, cycling, or in situations requiring immediate reaction to environmental changes.
- Extended use at high volumes should be avoided, and users should be mindful of situations where hearing impairment could be a risk.
Maintenance Features:
The service manual provides detailed instructions for disassembly and reassembly, which are crucial for maintenance and repair. Key maintenance procedures include:
- Removal of Ear Pad: Instructions are provided for removing the ear pads on both L and R sides, which is often necessary for cleaning or replacement.
- Removal of Speaker Assembly with Baffles: This involves peeling off the screen to access screw holes, removing screws, and then detaching the speaker assembly. Unsoldering lead wires is also part of this process.
- Removal of Housing Assembly: Detailed steps are given for releasing the hanger assembly from the housing assembly, emphasizing care to avoid damaging the crossover cord.
- Removal of Hanger Assembly: This involves removing the crossover cord from its groove, detaching the hanger assembly, and then removing the hanger cover.
- Removal of Rotary: Instructions cover releasing claws, removing the decoration cap, pulling out the crossover cord from the rotary, and removing the nut to access internal components like rock washers, slide washers, and the rock plate.
- Removal of Band Holder (A) and Band Holder (B): This involves releasing the band holders from the groove, often requiring the removal of dual adhesive tape.
- Removal of Slider Guide (A) and Slider Guide (B): Steps include releasing claws and sliding the guides out of their grooves.
- Removal of Slider Cover and Slider: This involves inserting a minus screwdriver into a slot to release the slider cover, removing lead wires, and then detaching the slider spring and the slider itself. Care is advised to avoid damaging the crossover cord.
- Removal of Head Pad: Instructions detail sliding and removing the head pad in the direction of an arrow.
- Installation Notes for Slider Cover and Slider: Specific guidance is provided for arranging the crossover cord along the groove, mounting the slider spring, passing the crossover cord through a hole, and ensuring proper slack in the crossover cord even when the slider is fully lowered.
- Installation Notes for Slider Guide (A) and Slider Guide (B): Instructions detail engaging ribs with holes and grooves, and securely latching the four claws of the slider guide (B).
The manual also includes a comprehensive "REPLACEMENT PARTS LIST" with part numbers, names, and descriptions for various cabinet parts, packaging materials, and accessories, facilitating easy identification and ordering of replacement components. This ensures that technicians can effectively service and repair the headphones, extending their lifespan and maintaining their performance.