English - 22 -
Fader Control:$GMXVW WKHYROXPH EDODQFH
EHWZHHQWKH PDLQ 79 DXGLR Main DQGDXGLR
FRPPHQWDU\AD
Captions:&RQ¿JXUHWKHVHWWLQJVIRUWKHFDSWLRQV
<RX FDQ VHW WKHODQJXDJH WH[W VL]H DQG VW\OH
XVLQJWKHRSWLRQVRIWKLVPHQX+LJKOLJKWDisplay
DQGSUHVVOKWRWXUQRQRURႇWKHVDPSOHFDSWLRQ
demonstration.
Text to speech::LWKWH[WWRVSHHFKIHDWXUH\RXU
79FDQFRQYHUWZULWWHQWH[WLQWRYRLFHWH[WWRKHOS
YLVXDOO\LPSDLUHG SHRSOH OLVWHQ WR WKHLQIRUPDWLRQ
WKH\DUHXQDEOHWRUHDG<RXFDQFKRRVH\RXUSUH-
IHUUHGHQJLQHFRQ¿JXUHWKH HQJLQH VHWWLQJV DQG
VSHHFKUDWHSOD\DVKRUWGHPRQVWUDWLRQRIVSHHFK
V\QWKHVLVDQGGLVSOD\GHIDXOWODQJXDJHVWDWXVXVLQJ
WKHRSWLRQVRIWKLVPHQX
High Contrast Text:
Increase the contrast of the
PHQXRSWLRQVDQGWH[WVWRPDNHWKHPHDVLHUWRUHDG
+LJKOLJKWWKLV RSWLRQ DQG SUHVVOK to turn this
IHDWXUHRQRURႇ
Restart: $FRQ¿UPDWLRQ PHVVDJH ZLOO EH GLVSOD\HG
select RestartWRSURFHHGZLWKUHVWDUWLQJ7KH79ZLOO
VZLWFKRႇRQ¿UVW6HOHFWCancel to exit.
Remote & Accessories
<RXFDQXVHZLUHOHVVDFFHVVRULHVVXFKDV\RXUUHPRWH
FRQWUROGHSHQGVRQWKHPRGHORIWKHUHPRWHFRQWURO
KHDGSKRQHVNH\ERDUGVRUJDPHFRQWUROOHUVZLWK\RXU
$QGURLG79$GGGHYLFHVWR XVH WKHPZLWK\RXU79
6HOHFWWKLV RSWLRQ DQG SUHVV OK to start searching
DYDLODEOHGHYLFHVLQRUGHUWRSDLUWKHPZLWK\RXU79,I
available highlight Add accessoryRSWLRQDQGSUHVV
OKWRVWDUWWKHVHDUFK6HW\RXUGHYLFHWRSDLULQJPRGH
Available devices will be recognised and listed or
SDLULQJUHTXHVWZLOOEHGLVSOD\HG7RVWDUWSDLULQJVHOHFW
\RXUGHYLFHIURPWKHOLVWDQGSUHVVOKRUKLJKOLJKW
OKDQGSUHVVOKZKHQWKHSDLULQJUHTXHVWDSSHDUV
&RQQHFWHGGHYLFHVZLOODOVREHOLVWHGKHUH7RXQSDLU
DGHYLFHKLJKOLJKWLWDQGSUHVVOK. Then highlight the
UnpairRSWLRQ DQG SUHVV OK. Then select OK and
SUHVVOKDJDLQWRXQSDLUWKHGHYLFHIURPWKH79<RX
can also change the name of a connected device.
+LJKOLJKWWKH GHYLFH DQG SUHVV OKWKHQ KLJKOLJKW
Change nameDQGSUHVVOK again. Press OK again
and use the virtual keyboard to change the name of
the device.
Channel List
7KH79VRUWVDOOVWRUHGFKDQQHOVLQWKHChannel List.
Press the OKEXWWRQWRRSHQWKHChannel List in Live
79PRGH<RX FDQ SUHVVWKH OHIW GLUHFWLRQDO EXWWRQ
WRVFUROOXSWKHOLVWSDJHE\SDJHRUSUHVVWKHULJKW
directional button to scroll down.
7RVRUWWKHFKDQQHORU¿QGDFKDQQHOLQWKHFKDQQHO
OLVWSUHVVWKHYellowEXWWRQWRGLVSOD\WKHChannel
OperationRSWLRQV$YDLODEOH RSWLRQV DUHSort and
Find. SortRSWLRQPD\QRWEHDYDLODEOHGHSHQGLQJRQ
WKHVHOHFWHGFRXQWU\GXULQJWKHLQLWLDOVHWXSSURFHVV
To sort the channels highlight SortDQGSUHVVWKHOK
EXWWRQ6HOHFWRQHRIWKHDYDLODEOHRSWLRQVDQGSUHVV
OK again. The channels will be sorted according to
\RXUVHOHFWLRQ7R¿QGDFKDQQHOKLJKOLJKWFind and
SUHVVWKHOKEXWWRQ9LUWXDONH\ERDUGZLOOEHGLVSOD\HG
(QWHUDOO RUDSRUWLRQRI WKHQDPHRUQXPEHURIWKH
FKDQQHO\RX ZDQW WR ¿QGKLJKOLJKWWKH FKHFN PDUN
V\PERORQ WKH NH\ERDUG DQG SUHVVOK. Matching
results will be listed.
7R¿OWHUWKHFKDQQHOVSUHVVRed button. Select Type
RSWLRQVZLOOEHGLVSOD\HG<RXFDQVHOHFWDPRQJTV
Radio, Free, Encrypted and FavouritesRSWLRQVWR
¿OWHUWKHFKDQQHOOLVWRUVHOHFWAll channelsRSWLRQWR
see all installed channels in the channel list. Available
RSWLRQVPD\GLႇHUGHSHQGLQJRQWKHRSHUDWRUVHOHFWLRQ
Note: ,I DQ\ RSWLRQ H[FHSW All channels is selected in
the Select Type menu, you can only scroll through the
channels that are currently listed in the channel list using the
Programme +/- buttons on the remote.
Editing the Channels and the Channel List
You can edit the channels and the channel list using
the Channel SkipChannel Swap, Channel Move
Channel Edit and Channel DeleteRSWLRQVXQGHUWKH
Settings>Channel>Channels menu. You can access
the Settings menu from the Home Screen or from the
TV optionsPHQXLQ/LYH79PRGH
Note: The options Channel Swap, Channel Move and Chan-
nel Edit may not be available and appear as greyed out de-
pending on the operator selection and operator related settings.
<RXFDQ WXUQ R௺WKH LCN setting in the Settings>Channel
>Channels menu, as it prevents channel editing. This option
might be set to On by default depending on the selected
country during the initial setup process.
Managing Favourite Channel Lists
<RX FDQ FUHDWH IRXUGLႇHUHQW OLVWV RI \RXU IDYRXULWH
channels. These lists include only the channels that
DUHVSHFL¿HGE\\RX3UHVVWKHOKEXWWRQWRGLVSOD\
the channel list.
7RDGGDFKDQQHOWRRQHRIWKHIDYRXULWHOLVWVKLJKOLJKW
WKDWFKDQQHOLQWKHFKDQQHOOLVWDQGSUHVVWKHBlue
EXWWRQ)DYRXULWHOLVWVHOHFWLRQPHQXZLOOEHGLVSOD\HG
Highlight the list/s you want the channel to be added
DQGSUHVV OK. The channel will be added to the
selected favourite list/s.
To remove a channel from a favourite list highlight
WKDWFKDQQHOLQWKHFKDQQHOOLVWDQGSUHVVWKHBlue
EXWWRQ)DYRXULWHOLVWVHOHFWLRQPHQXZLOOEHGLVSOD\HG
Highlight the list/s you want the channel to be removed
DQGSUHVVOK. The channel will be removed from the
selected favourite list/s.
English - 23 -
To set one of your favourite channel lists as the main
FKDQQHOOLVWSUHVVWKHRed button and set the Select
TypeRSWLRQWRFavourites. Then highlight the desired
IDYRXULWHOLVW DQG SUHVV OK. In order to change the
SRVLWLRQRI D FKDQQHO LQ WKHIDYRXULWH OLVW SUHVV WKH
YellowEXWWRQ WKHQ KLJKOLJKW WKHMove RSWLRQ DQG
SUHVVOK. Then use the Up and Down directional
EXWWRQVWRPRYHWKHFKDQQHOWRWKHGHVLUHGSRVLWLRQ
DQGSUHVVOK. In order to delete a channel from the
IDYRXULWHOLVWSUHVVWKH YellowEXWWRQWKHQKLJKOLJKW
the DeleteRSWLRQDQGSUHVVOK.
Programme Guide
%\PHDQV RI (OHFWURQLF 3URJUDPPH *XLGH(3*
IXQFWLRQRI\RXU79\RXFDQEURZVHWKHHYHQWVFKHGXOH
of the currently installed channels on your channel
OLVW,WGHSHQGVRQWKHUHODWHGEURDGFDVWZKHWKHUWKLV
IHDWXUHLVVXSSRUWHGRUQRW
(OHFWURQLF3URJUDPPH*XLGHLVDYDLODEOHLQ/LYH79
PRGH7RVZLWFKWR/LYH79PRGH\RXFDQHLWKHUSUHVV
the Exit button or highlight the Live TVDSSIURPWKH
AppsURZRQ WKH+RPH6FUHHQDQGSUHVV OK. For
VRPHFRXQWULHV WKHLive TVDSS ZLOOEHVLWXDWHG LQ
the Home tab on the Home Screen and the row with
WKLVDSSZLOOEHQDPHGDVFavourite Apps. In order
WRDFFHVVWKH(OHFWURQLF3URJUDPPH*XLGHSUHVVWKH
Guide button on the remote.
Use the directional buttons to navigate through
WKHSURJUDPPH JXLGH <RX FDQXVH WKH 8S'RZQ
directional buttons or Programme +/- buttons to
VZLWFKWRSUHYLRXVQH[WFKDQQHORQWKHOLVWDQG5LJKW
Left directional buttons to select a desired event of
WKHFXUUHQWO\KLJKOLJKWHGFKDQQHO,IDYDLODEOHWKHIXOO
QDPHVWDUWHQGWLPHDQGGDWHJHQUHRIWKHKLJKOLJKWHG
HYHQWDQGDEULHILQIRUPDWLRQDERXWLWZLOOEHGLVSOD\HG
on the screen.
Press Blue EXWWRQ WR ¿OWHU WKHHYHQWV 'XH WR WKH
ODUJHYDULHW\RI¿OWHURSWLRQV\RXFDQ¿QGHYHQWVRI
WKHGHVLUHGW\SHTXLFNHU3UHVVYellow button to see
detailed information on the highlighted event. You can
also use the Red and Green buttons to see events
RISUHYLRXVGD\ DQG QH[W GD\7KH IXQFWLRQV ZLOOEH
assigned to the coloured buttons on the remote when
they are available. Follow the on-screen information
for accurate button functions.
Press the Record button to add a timer for the
KLJKOLJKWHGHYHQW LQ WKH JXLGH <RXFDQ GH¿QHWKH
W\SHRIWKHWLPHUE\VHWWLQJWKHSchedule typeRSWLRQ
as Reminder or Record:KHQRWKHUSDUDPHWHUVDUH
VHWSUHVVWKHGreen button. The timer will be added
to the schedule list. You can access the schedule list
from the RecordPHQXLQ/LYH79PRGH
7KHJXLGHFDQQRWEHGLVSOD\HGLIDTVLQSXWVRXUFH
is blocked from the Settings>Channel>Parental
Controls>Inputs BlockedPHQXLQ/LYH79PRGHRU
on Home Screen.
Connecting to the Internet
<RXFDQDFFHVVWKH,QWHUQHWYLD\RXU79E\FRQQHFWLQJ
LWWRDEURDGEDQGV\VWHP,WLVQHFHVVDU\WRFRQ¿JXUH
WKHQHWZRUN VHWWLQJV LQ RUGHU WRHQMR\ D YDULHW\ RI
VWUHDPLQJFRQWHQW DQG LQWHUQHW DSSOLFDWLRQV 7KHVH
VHWWLQJVFDQEHFRQ¿JXUHGIURPSettings>Network &
Internet menu. You can also highlight the Connected/
1RW&RQQHFWHGLFRQRQWKH+RPHVFUHHQDQGSUHVVOK
to access this menu. For further information refer to
Network & Internet section under the title of Settings.
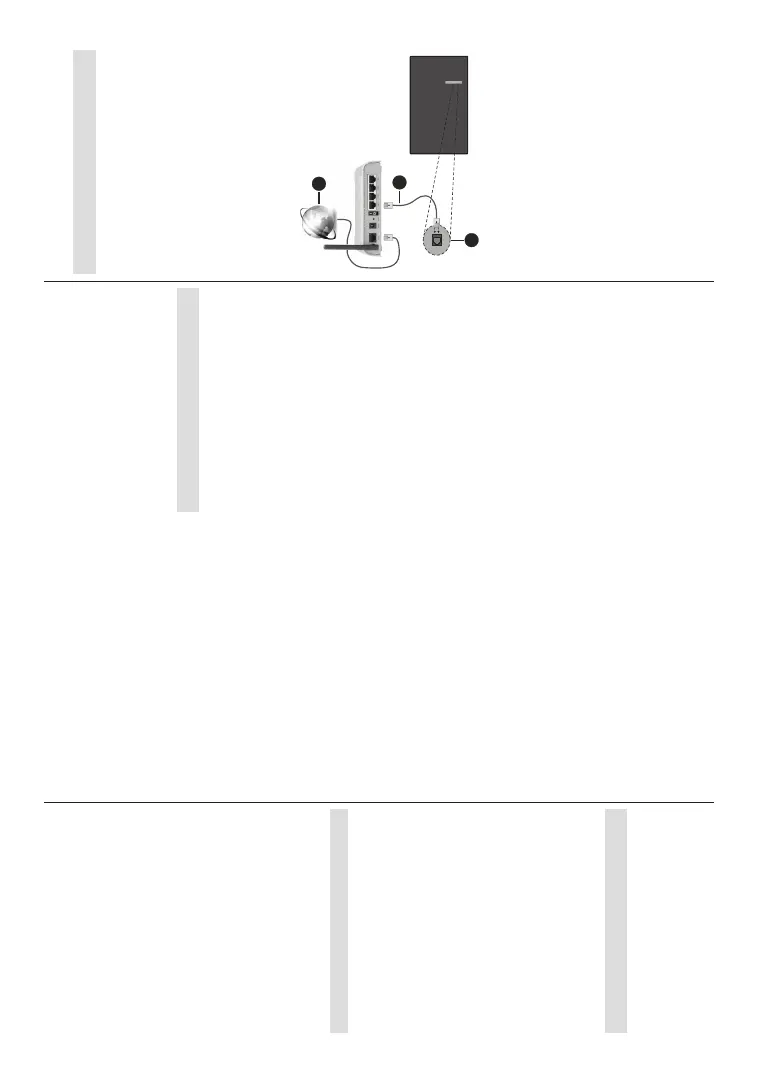
Wired Connection
&RQQHFW\RXU79WR\RXUPRGHPURXWHUYLDDQ(WKHUQHW
FDEOH7KHUHLV D /$1 SRUW RQWKH UHDUOHIW VLGH RI
\RXU79
The status of the connection under the Ethernet
section in the Network & Internet menu will change
from Not connected to Connected.
2
3
1
1. Broadband ISP connection
2. /$1EthernetFDEOH
3. /$1LQSXWRQWKHUHDUOHIWVLGHRIWKH79
<RXPLJKWEHDEOHWRFRQQHFW\RXU79WRDQHWZRUN
ZDOOVRFNHWGHSHQGLQJRQ\RXUQHWZRUN¶VFRQ¿JXUDWLRQ
,QWKDWFDVH\RXFDQFRQQHFW\RXU79GLUHFWO\WRWKH
network using an Ethernet cable.
 Loading...