Wearing The Remote
The Basics
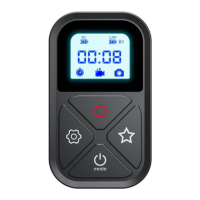
LCD Display
Button
For Hero 11/10/9/8/MAX
Camera Remote Control
Model: GP-RMT-T10 www.telesin.cn
USER GUIDE
Please read this statement carefully and by using this product you will be deemed to have acknowledged and accepted it in full. Please check
the product carefully before each use and do not use it if damaged or deformed. By using this product, you acknowledge and agree that you are
fully responsible for your actions and the possible consequences of using this product.You undertake to use this product only for legitimate and
lawful purposes. You understand and agree that Telesin Digital Co.,Ltd ("Telesin") shall not be liable for any misuse, adverse effects, damages,
injuries, penalties or other legal consequences arising directly or indirectly from the use of this product. The user should follow the precautions
including but not limited to those mentioned herein. To the extent Telesin reserves the right to interpret and modify this commitment within the
limits of national laws and regulations.
Disclaimer
1
2
Charging Po
Star Button
Pairing/Setting Button
Power/Mode Button
Shutter/Select Button
LCD Display
Anchor Point for Lanyard
Wrist Strap Fixing Slot
RC
CAM
When in the three main modes "Video", "Photo", "Time-lapse"
Mode Button【Power/Mode Switching】
Shutter/Select Button
Star Button
Setting Button【Pairing, small mode switching】
Remote Control Batte
Camera Batte
Bluetooth
Recording Time/ Number of Videos/Photos
Time Lapse
Video
Photo
3S Long Press
3S Long Press
1S Sho Press
1 Sho Press
1 Sho Press
Set the current main mode to "Quick mode"
Enter to the "Quick mode”
2S Long Press 3S Long Press
Power On
(After pairing, you can control the camera on and o)
Power O
1S Sho Press
Mode Switching
Shoot photo, turn on/off recording
The camera switches among the sub-modes.
Enter phone pairing mode, only photo function in phone mode, Bluetooth
name is "T-10"