Model:U807
尺寸:450X390mm 说明书封面彩色印刷,材质:157G双铜 其他内容双面单黑印刷+哑油
Arm Blood Pressure Monitor
Instruction Manual
Table of Contents
Product Structure
Product Structure
Setting mode
Proper use of the unit
Setting mode
Setting mode
Proper use of the unit
Introduction
Introduction
CONTRAINDICATION
INTENDED USE
3
4
7
8
10
13
13
14
15
15
15
15
16
16
17
17
19
20
21
22
23
27
Safety Information
Safety Information
Safety Information
Safety Information
Each part name
Battery installation
Battery installation
Battery installation
Setting mode
How to set
Pre-measurement
Proper use of the unit
Common factors
of wrong measurement
Fitting the cuff
Measuring procedure
Discontinuing a measurement
Memory-recall of measurement
Read memory record
Memory-clear of measurements
Checking IMEI details
Signal Strength Indicator
About blood pressure
Exceptional situations
Care and maintenance
Specification
Warranty information
EMC Declaration
FCC Statement
Your new digital blood pressure monitor uses the oscillometric
method of blood pressure measurement.This means the monitor
detects your blood's movement through your brachial artery and
converts the movements into a digital reading. An oscillometric
monitor does not need a stethoscope, so the monitor is simple to
use.
To assure the correct use of the product, basic safety
measures should always be followed including the warning and
the caution listed in the instruction manual:
Those who have arrhythmia, diabetes, blood circulation
or apoplexy problem, please use under the physician's
instruction.
The following symbols may appear in this manual, on the label,
on the device, or on its accessories. Some of the symbols
represent standards and compliances associated with the
device and its use.
Intelligent inflation will reduce the uncomfortable feeling by
incorrect inflation, and shorten the measurement time, prolong
the cuff's usage lifetime.
2x90 sets memory function,each measurement result will be
displayed on the screen, and automatically stored.This unit has
blood classification index, could easy to check your classification
index, could easy to check your classification index.
Please read the manual carefully before you use the unit, and
keep the manual well after using.
This product can't be used in patients who is with severe heart
insufficiency to avoid suffocation and death.This product is not
suitable for infants and children.
This automatic blood pressure monitor intends to measure the
systolic pressure, diastolic pressure and pulse rate through
upper arm. It's expected to be used at home or in the hospital,
intended for people over 12 years old.
Symbol descriptions
Direct current
Follow instructions for use
DISPOSAL: Do not dispose of this product as unsorted
municipal waste. Collection of such waste separately
for special treatment is necessary.
Authorized Representative in the European Community
CAUTION: This alert identifies hazards that may cause
minor personal injury, product damage or
property damage.
WARNING: This alert identifies hazards that may cause
serious personal injury or death.
Specifies serial number
Type BF applied part
Contact your physician for specific information about
your blood pressure. Self diagnosis and treatment which
use measured results may be dangerous. Follow the
instructions of your physician or licensed healthcare
provider.
Please place on a high place where children can't be
touched.
No modification of this equipment is allowed.
Do not modify this equipment without authorization of the
manufacturer.
The cuff hose around neck may cause the suffocation.
The swallowing of small part like packaging bag,
battery,battery cover and so on may cause the suffocation.
Do not replace or remove the battery from device (in the
case of device with rechargeable lithium battery).
Do not use a cellular phone near the unit. It may result in
operational failure.
Please avoid using in high radiant area in order to make
your measuring data correctly.
Please don't use a dilution agent, alcohol or petrol to clean
the unit. Please don't hit heavily or fall down the product
from a high place. Use the right cuff, otherwise it can not
work.
If this equipment is modified, appropriate inspection and
testing must be conducted to ensure continued safe use of
equipment.
Do not use the equipment where flammable gas (such as
anesthetic gas, oxygen or hydrogen) or flammable liquid
(such as alcohol) are present.
Do not dispose of electrical appliances as unsorted
municipal waste. Use separate collection facilities.
Contact you local government for information regarding
the collection systems available. If electrical appliances
are disposed of in landfills or dumps, hazardous
substances can leak into the groundwater and get into
the food chain, damaging your health and well-being.
WARNING:
Classification
1. Internally powered equipment;
2. Type BF applied part;
3. Protection against ingress of water or particulate matter: IP21;
4. Not category AP / APG equipment;
5. Mode of operation: Intermittent operation.
The user must check that the equipment functions safely and
see that it is in proper working condition before being used.
Air socket
AC/DC socket
Setting button
Memory button
Start / stop button
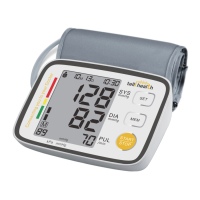
Year/Month/Date/Time
Systolic blood pressure
Diastolic blood pressure
Pulse
Pulse rate
Irregular heart beatLow battery
Memory times
Memory symbol
Blood pressure
classification
User
Cuff Size and Connection
Display
Body
The accessories cuff is universal size for upper-arm circumference
22-42 cm use. The cuff is treated as the applied part.
Insert the connector with cuff tube into
the hole which is on the left side of the
device as pictured.
(Only provided cuff can be used, can not
change to any other branded cuff.)
SIM card installation
Adapter technical features:
Battery installation
LOW battery and charge
Remove the battery cover from the battery compartment,
the SIM card slot is on the right side (as picture shown).
Insert SIM card into the slot in accordance with direction
“ ” and chip side down.
The device is equipped with 1pc 3.7V 1000mAh
rechargeable lithium battery.
SIM card slot
Noted:
Do not replace or remove the battery from device.
When power on, the low battery symbol will be displayed once the
device starts. Plug in the device using the included USB cable to charge.
Take the USB cable and connect it to the charger (charge connector) or
to your USB port on your computer or power bank. Connect the end of
the round tip to the USB socket of device.
During charging when power off, the LCD will shows the blood
pressure bars on the left side from one bar to six bars in a continuous
loop. And unmoved 6 bars along with the battery symbol
will be displayed once battery is full, as picture shown.
Noted: the lithium battery could be used
for about 70 times when charge
is full. Charge time is 4-6 hours.
If the device under setting mode and battery charging in the same
time, LCD can show the same as above, e.g. user setting
Dispose of the battery in accordance with all federal, state and
local laws. To avoid fire and explosion hazard, do not burn or
incinerate the battery.
WARNING:
Adapter Usage
Measurement
Pre-measurement
1.When optional AC adapter is in use, it should comply with the
requirement of IEC 60601-1:2005. Furthermore, all configurations
shall comply with the requirements for medical electrical systems
(see IEC 60601-1-1 or clause 16 of the 3Ed. of IEC 60601-1,
respectively). Anybody connecting additional equipment to medical
electrical equipment configures a medical system and is therefore
responsible that the system complies with the requirements for
medical electrical systems. Attention is drawn to the fact that local
laws take priority over the above mentioned requirements. If in doubt,
consult your local representative or the technical service department.
2. When using AC power, to avoid possible damage to the monitor,
use only the exclusive AC adapter that can be purchased from
authorized dealers. Other adapters may vary in output voltage and
polarities.
3. Insert the adapter plug into the hole on the backside of the unit
as pictured
4. Insert the other side of the adapter into the outlet
with 100-240V.
5. To remove the AC adapter, disconnect the adapter
plug from the outlet first and then disconnect the
cord from the unit's socket.
Output voltage: 5V±5%
Max output current: At least 1A
Output plug polarity: <+> inner
External diameter: 5.5 mm 0.1mm
Internal diameter: 2.1mm 0.1mm
Note:
• When use AC adapter, the power of battery won't be consumed.
• When suddenly stop during measurement (like the plug off from
the outlet by carelessness), it must be reinserted the plug into the
unit, and restart the measurement.
How to set
2. Speaking setting
3. User setting:
4. Year setting:
5. Month and date setting
Measuring Procedure:
6. Time setting:
1. Start to set, Unit setting:
Press the SET button when power off, 0 or 0.0 will be displayed, then
the setting begin.
Continute to above step, the unit will be changed when press the MEM
button each time. Press the SET button to confirm the unit, then it will enter
into the User setting mode.
mmHg unit
kPa unit
Continute to above step, the screen will display SPE OFF or SPE ON, press
the MEM button and it will change between SPE OFF and SPE ON, press
the SET button to confirm the option. Following this, the device will enter
into the User setting mode.
Remark:
SPE OFF: close the speaking function.
SPE ON: open the speaking function.
Continue to above step, the screen will display or , press
button MEM ,it will be changed between and , press button SET
when you confirm the user, then it will enter into the year setting mode.
Continue to above step, the screen will display and flash 20XX, the last
digit of the year will increase 1 when press button MEM each time, you
could choose from 2020 to 2099. Press button SET when you confirm
the year, then it will enter into the month and date setting mode.
Continue to above step, the screen will display xxMxxD and xxxx, and
keep flashing on month, the digit will increase 1 when press button MEM
each time, you could choose from 1 to 12. Press button SET when you
confirm the month, then it will set the date. Same as the month setting,
each time you press button MEM, the digit will keep changing from 01 to
31. Press button SET when you confirm the date, then it will enter into
the time setting mode.
Year setting
user 1
user 2
Month setting
Continue to above step, the screen will display xxMxxD and xx:xx, and
keep flashing on the digits of hour, the digit will increase 1 when press
button MEM each time, you could choose from 0 to 23. Press button SET
when you confirm the hour, then the digits of minute start to flash, same as
the hour setting, each time you press button MEM the digits will keep
changing from 00 to 59. Press button SET when you confirm the minute,
then the total setting mode is completed.
Date setting
Relax for about five to ten minutes prior to the measurement
Avoid eating, drinking alcohol, smoking, exercising and bathing
for 30 minutes before taking a measurement.
All these factors will influence the measurement result.
Remove any garment that fits closely to your upper arm.
Always measure on the same arm(normally left).
Take measurement regularly at the same time of every day,as
blood pressure changes even during the day.
Common factors of wrong measurement
All efforts by the patient to support their arm can increase
blood pressure.
Make sure you are in a comfortable,relax position and do no
tactivate any of the muscles in the measurement arm during
measurement. Use a cushion for support if necessary.
If the arm artery lies lower or higher than the heart,a false
reading will be obtained.
Note:
Only use clinically approved cuffs!
A loose cuff or a exposed bladder causes false reading.
With repeated measurements ,blood accumulates in the arm
which can lead to false reading.
Consecutive blood pressure measurements should be
repeated after 1 minute pause or after the arm has been held
up in order to allow the accumulated blood to flow away.
Proper Use of the Unit
Note:
If it is not possible to fit the cuff to your left arm, it
can also be placed on the right. However, all
measurements should be made using the same arm.
1. ) Place the cuff flat on the table with the velcro
side down. Pass the end of the cuff through the
metal loop so that a circle is formed. The velcro
closer will now be facing outwards (ignore this step
if the cuff has already been prepared).
2. ) Push the cuff over the left upper arm so that
the tube points in the direction of the lower arm.
3. ) Wrap the cuff on the arm as illustrated. Make certain
that the lower edge of the cuff lies approximately 2 to
3 cm above the elbow and the rubber tube leaves the
cuff on the inner side of the arm.
4. ) Tighten the free end of the cuff and close the
cuff by affixing the velcro.
5. ) The cuff should be snug on your upper arm so
That you can fit 2 fingers between the cuff and your
upper arm. Any piece of clothing restricts the arm
and should be removed.
6. ) Secure the cuff with the velcro closer in such a
way that it lies comfortably and not too tight. Lay your
arm on a table (palm upwards) so that the cuff
is at the same height as the heart. Do not bend the
tube.
Fitting the Cuff
After the cuff has been appropriately positioned, the
measurement can begin as follows:
1.Press the START/STOP button, all symbols appear
on the display, then the pump begins to inflate the cuff,
the rising pressure in the cuff is shown on the display.
2.After the suitable pressure has been reached, the
pump stops and the pressure gradually falls. The
cuff pressure is displayed. In case that the inflation
is not sufficient, the device automatically re-inflates
to a higher pressure.
4. When the measurement has been completed,
the systolic, diastolic and pulse rate will
appear on the display.
Remark: Once finish the measurement, the
device it will upload the dada to the background
server automatically with showing two rotating
signal bar in the top right corner of LCD (as Pic 1).
After uploading the data successfully, the LCD
will show End (as Pic 2) and then the device
switches off immediately. If fail to upload the data,
LCD will display Err.
If it is necessary to interrupt a blood pressure measurement for any reason
(eg. the patient feels unwell) the START/STOP button can be pressed at
any time. The device immediately decrease the cuff pressure automatically.
3. When the device detects the signal, the heart
symbol on the display starts to flash.
Note:The symbol will be displayed along with the reading if the irregular
heartbeat is detected during the measurement.
Discontinuing a measurement
This blood pressure monitor automatically stores 2x90 sets measurements
value, the oldest record will be replaced by the latest measurement value
when more than 90 sets each user.
Memory-recall of measurements
Press the button MEM when power off, the latest 3 times average value will
be shown, press the button MEM again,the last measurement value will be
shown, as well as subsequent measurements can be display one after the
other by pressing the button MEM each time.
Read memory record
Manufacturer