CHECK YOUR TELSTRA SERVICES ARE ACTIVATED
The T-Hub
®
2 is designed to work exclusively with Telstra services, using:
• A full service Telstra HomeLine
®
plan.
• BigPond
®
or Telstra Broadband service.
• Home Network Gateway, or other compatible Wi-Fi modem (Wi-Fi modems that support 802.11b/g/n are
compatible). Please note that this is not included with the T-Hub
®
2.
The following HomeLine features are required to be activated to experience the
full benefits of the T-Hub 2:
• Flashing Message Indicator (a free service that enables you to view Voicemail).
• Calling Number Display – enables the Tablet to display the name of the caller,
as well as enabling you to take a second incoming call via the Tablet (if Call Waiting is activated).
• MessageBank
®
or Telstra Home Messages 101.
®
Charges may apply for the activation of these services. Refer to the terms of your HomeLine plan to
determine if these features are included at no charge. Contact T-Hub
®
2 Support on 1300 136 841 to
arrange for any of these services to be activated.
1
TELSTRA T-HUB
®
2
GETTInG STARTED
GUIDE
The T-Hub
®
2 is a unique combination
of home phone and tablet, designed
specifically for Telstra’s home phone
and internet services.
This guide will help you get started as
quickly and easily as possible –
you’ll be making calls and browsing
the internet in no time.
Important Note
Before setting up your T-Hub
®
2, if you have never used MessageBank
®
or Telstra Home Messages 101
®
,
dial 101 using your existing phone to activate your messaging service. If you are a MessageBank
®
customer
you may be prompted to enter a six digit PIN during installation. It is usually the last six digits of your
telephone number. As it will take a minimum of 3 hours to activate your Telstra messaging service, you can
still walk through the installation wizard, but you may not be able to set up Voicemail or your SMS service.
These services can be setup after completing the Installation Wizard.
A) DECIDInG wHERE TO LOCATE YOUR HAnDSET
You can choose to place your handset with the T-Gateway or keep it separated.
The advantage of placing the handset with your T-Gateway™ is that you only need one power
supply (which saves on clutter). If it is more convenient to keep the handset and T-Gateway
separate – simply choose a location for your handset dock near a power point in your
preferred room, and plug it in.
If you want to place your handset together with your T-Gateway™,
follow these simple steps to “dock” your handset:
• Remove the plastic cover from the bottom of the T-Gateway™ by pulling it towards you.
• Push the handset dock (item 10) into the cavity at the bottom of the T-Gateway™ – it should click into place.
• To remove, press down on the lever under the handset dock and pull it away from the T-Gateway.
COnnECTInG YOUR T-HUB
®
2 TO THE T-GATEwAY
Ethernet
Telephone
Line
Wi-Fi
DECT
Small power
adapter
Small power
adapter
Large power
adapter
Base
Station
Handset
Tablet
Tablet
Dock
Handset
Dock
Wi-Fi
Gateway
DECT
DECT & Wi-Fi
C) COnnECTInG THE TABLET
• Place the tablet (item 1) into the tablet dock (item 2)
and connect the dock to the mains power using the
larger of the power adaptors (item 3).
• Turn on the tablet by holding down the power button on
the top right hand corner for about 3 seconds. The tablet
will take a minute to get started and then the Installation
Wizard will appear.
B) InSERTInG THE HAnDSET BATTERIES
• Take the handset (item 8) and remove handset back cover.
• Insert batteries (item 9) into handset and replace the cover.
• Place the handset into the handset dock (item 10).
• Connect the handset dock to mains power using one of the
two identical power supplies (item 5).
Important Note
If you are setting up the T-Hub
®
2 Base Station, it is essential that it is connected to your Home Network Gateway/
Wi-Fi modem using the Ethernet cable provided during the Installation process. If you choose to remove the
Ethernet cable at a later stage, the handset and base station will not receive future updates and you will observe
that the Call Log information on the handset and tablet may differ. Telstra will advise you to reconnect the
Ethernet cable once a software update for the handset or base station becomes available.
Before we get started, we need to check if you will be setting up your T-Hub 2 with a T-Gateway™
or another type of Wi-Fi modem. Compare your modem with the T-Gateway pictures above.
• If you have a T-Gateway™ skip to step 5.
• Otherwise if you have any other type of Wi-Fi modem (including other Telstra modems),
read the Important Note below and follow step 4.
CHECK If YOU HAVE A T-GATEwAY™
2
OPEnInG YOUR T-HUB
®
2 KIT
Familiarise yourself with the contents of your T-Hub
®
2 kit:
Handy Hint
It is recommended that both the tablet and the handset are charged initially overnight to get optimum
battery performance.
THAT’S IT! YOU’VE COnnECTED YOUR T-HUB
®
2
By now you should have your T-Hub 2 kit connected and up and running.
For a run through the installation wizard and overview of the tablet and
handset functions, turn over the page.
Important Note
The T-Hub
®
2 Tablet and Handset require electricity to work. You will not be able to make any telephone calls
or use other features such as internet browsing when the power fails. Alternative arrangements should be
made to access emergency services in times of power failure.
nEED HELP?
For detailed help on how to use your T-Hub 2, download the online T-Hub 2
User Guide that can be found at www.telstra.com.au/thubsupport
Alternatively, if you have a specific question, refer to the online
T-Hub 2 FAQs at www.telstra.com.au/home-phone/help-faqs/
To seek and share advice and support with Telstra’s online community,
visit Telstra Crowd Support at crowdsupport.telstra.com.au/
For 24x7 T-Hub 2 Phone Support, call 1300 136 841
A) DECIDInG wHERE TO LOCATE YOUR HAnDSET
You can choose to attach your handset to the base station or keep it separated.
The advantage of placing your handset with your base station is that you only need
to use one of the two identical power supplies (item 5) which saves on clutter.
If it is more convenient to keep the handset and base station seperated, simply choose a location for
your handset dock (item 10) near a power point in your preferred room, and move onto Step B.
If you want to attach your handset together to the base station,
follow these simple steps to “dock” your handset:
• Remove the plastic cover from the bottom of the base station (item 4) by pulling it towards you.
• Push the handset dock (item 10) into the cavity at the bottom of the base station – it should click into place.
• To remove, press down on the lever under the handset dock (item 10) and pull it away from the base station.
C) COnnECTInG THE TABLET
• Place the tablet (item 1) into the tablet dock (item 2)
and connect the dock to the mains power using the
larger of the power adaptors (item 3).
• Turn on the tablet by holding down the power button
on the right hand corner for about 3 seconds. The
tablet will take a minute to get started and then the
Installation Wizard will appear.
B) COnnECTInG THE BASE STATIOn
• Connect the base station (item 4) to the mains
power using one of the two identical power
supplies (item 5) Connect the base station to your
Home Network Gateway or Wi-Fi modem using the
ethernet cable (item 11) Connect the phone cable
to your phone socket.
COnnECTInG YOUR T-HUB
®
2 TO THE BASE STATIOn
7. 9.
10.
11. 12.8.
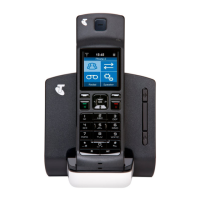
1. 3. 4. 5. 6.2.
1) Tablet
2) Tablet dock
3) Tablet power supply
4) Base Station
5) 2 x Power supply for Handset & Base Station
6) Telephone cable
7) Telephone connection adapter
8) Handset
9) Handset batteries
10) Handset dock
11) Ethernet cable
12) SD card key
Small power
adapter
Large power
adapter
DECT
DECT & Wi-Fi
Integrated
Gateway
Telephone
Line
Power adapter
Ethernet
DECT & Wi-Fi
Handset
Tablet
Tablet
Dock
Handset
Dock
3
4
5
6
Figure 1.0 - T-Gateway