- 4 -
II Install the camera
Tips
Please make sure the wall or the ceiling is strong enough to withstand three times the weight of the camera.
You may need to prepare a hammer drill, a drill bit, a rubber hammer, a screwdriver, and a ladder for the installation.
−
−
Fix the camera
Install the waterproof kit
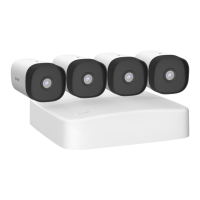
The camera supports wall and pendant mounting. The mounting bracket of wall mounting is included in
the package. If you want to install the camera by pendant mounting, please purchase the bracket by
yourself.
The wall mounting is taken as an example here.
You can install the waterproof kit and wrap the end with waterproof tape for the Ethernet port as required.
When you connect the Ethernet cable to the Ethernet port of the camera, the waterproof kit installation
steps are as follows.
Բ Գ
Marker pen
Horizontal adjustment screw
Swing bracket
Vertically adjust
Horizontally adjust
Vertical adjustment screw
Ԯ ԯ
Ա
Unfasten the horizontal adjustment screw on the
bottom, rotate the swing bracket to a suitable angle,
and then fasten the screw.
Install the camera (Running the cable through the wall
is taken as an example)
Adjust the monitoring direction and fix the camera
Thread diameter: 6 mm; Length: 6
mm machine screw
Anchor
Thread diameter: 6 mm;
Length: 25 mm
self-tapping screw
Horizontal adjustment screw
The included waterproof kit is not suitable for the Ethernet cable with protection cover on the
crystal head. See the example on the right.
Tips
Ԯ ԯ
Բ
Ա
 Loading...