EasyManua.ls Logo

TENTCO JUNIOR BAOBAB - User Manual

TENTCO JUNIOR BAOBAB
2 pages
Print Icon
To Next Page IconTo Next Page
Loading...
JUNIOR
JUNIOR
BAOBAB
BAOBAB
Tent & Frame assembly
1. Lay out the frame on the ground, the frame is assembled by matching the coloured poles to the
matching coloured corners.
2. Start by building the roof section of the frame first.
3. Insert the top half of the poles into the roof section and place the frame in the desired position.
4. Pull the canvas skin over the frame.
5. Lift the frame and insert the bottom half of the poles 1 side at a time
6. Bring the bow tent and extension together and hook the flysheet legs onto the bow tent frame.
8. Attach the extension canvas to the frame with the velcro sewn into the inside seams.
9. Peg the bottom of the canvas to the ground at all the anchor points using straight pegs.
10. Secure the guy ropes with the anchor, remember the rope at the crown of the bow tent.
11. The flaps at the side can be extended with extra poles (not provided) to extend the shade.
12. See overleaf more instructions on erecting the tent.
This extension tent is erected over a steel frame which is then joined to the bow tent with
the canvas section over the top of the bow tent frame.
The bow tent flysheet is not used as the extension has it’s own flysheet for the bow tent.
Go to to view instructional videos on how to erect your tentwww.tentco.co.za
Question and Answer IconNeed help?

Do you have a question about the TENTCO JUNIOR BAOBAB and is the answer not in the manual?

Overview

This document describes the "Junior Baobab" tent, a product from Tentco, a quality tent manufacturer. The tent is designed for ease of erection and offers a versatile setup.

Function Description

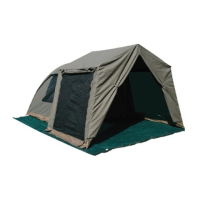
The Junior Baobab tent is an extension tent designed to be joined to a bow tent. Its primary function is to provide additional covered space, effectively extending the living area of an existing bow tent setup. This makes it suitable for camping and outdoor activities where extra shelter or storage space is desired. The tent features a steel frame construction, ensuring stability and durability.

Important Technical Specifications

The tent's structure is based on a steel frame. The canvas section of the tent is designed to fit over the top of the bow tent frame, indicating a seamless integration with the existing structure. The bow tent flysheet is not used as the extension has its own flysheet for the bow tent, simplifying the setup process and ensuring comprehensive coverage.

Usage Features

The Junior Baobab tent is designed for straightforward erection, as detailed in the provided instructions. The setup process involves several key steps:

  1. Frame Assembly: The first step is to lay out the frame on the ground. The frame components are color-coded for easy matching, ensuring correct assembly. Once assembled, the frame should be placed in the desired position.
  2. Canvas Placement: The canvas skin is then pulled over the assembled frame.
  3. Pole Insertion (First Side): Lift one side of the frame and insert the bottom half of the poles.
  4. Pole Insertion (Second Side): Insert the bottom half of the poles on the other side. These poles are attached to the frame with velcro on the tent, providing a secure fit.
  5. Canvas Positioning and Pegging: Pull the canvas into its correct position and secure it with straight pegs at all designated peg points after joining it to the bow tent.
  6. Guy Rope Securing: Use anchor pegs to secure the guy ropes, enhancing the tent's stability, especially in windy conditions.
  7. Extension Canvas and Velcro: The extension canvas is attached to the frame with velcro sewn into the inside seams, ensuring a snug and weather-resistant connection.
  8. Bottom Pegging: Peg the bottom of the canvas to the ground at all anchor points using straight pegs.
  9. Guy Rope Installation: Secure the guy ropes with an anchor, remembering the rope at the crown of the bow tent.
  10. Side Flaps: The tent includes side flaps that can be extended with poles (not included) to create more shade, offering versatility in different weather conditions.

The erection process is detailed in a step-by-step manner, making it accessible even for first-time users. The instructions emphasize matching color-coded corners for frame assembly, which simplifies the initial setup. The use of velcro for attaching poles and the extension canvas highlights a user-friendly design that prioritizes ease of assembly and a secure fit. The inclusion of side flaps for optional shade extension adds to the tent's adaptability, allowing users to customize their outdoor experience.

The manual also provides a link to www.tentco.co.za for instructional videos on how to erect the tent, further assisting users with visual guidance.

Maintenance Features

While the document does not explicitly detail maintenance features, the robust steel frame and canvas construction suggest a durable product designed for outdoor use. Proper erection, as outlined in the instructions, contributes to the longevity of the tent by ensuring it is set up correctly and securely, minimizing stress on its components. The ability to extend side flaps for shade also implies a design that helps protect the tent from prolonged sun exposure, which can contribute to material degradation over time. Regular cleaning and proper storage, though not explicitly mentioned, would be standard maintenance practices for any tent to ensure its longevity.

TENTCO JUNIOR BAOBAB Specifications

General IconGeneral
BrandTENTCO
ModelJUNIOR BAOBAB
CategoryCamping Equipment
LanguageEnglish

Related product manuals