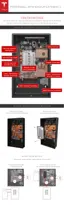
STEP 1 - REMOVE THE LID AND BOTTOM COVER
For easiest installation, pre-install wiring and set all switches while Powerwall is still on its pallet,
as described below.
1. Lay the box flat on the ground with the pallet side down.
2. Use a T20 Torx to remove 8 screws from each box side. Do not remove the screws near the
corners of the box.
3. Lift the box lid and set it aside.
4. Verify that the box contains the following items:
• Powerwall
• Wall mount bracket on the pallet under the unit (wall mounting fasteners are not
included)
• Two side covers
• Two M6, 10 mm external hex bolts for the wall mount bracket side tabs (plus one spare
bolt for side tabs or bottom cover)
• Spare M4, T20 bolt (if needed for splash cover)
If any parts are damaged or missing, contact the Tesla Energy Authorized Reseller or Tesla
Energy
Certified Installer. If any damage is detected, address high voltage and other safety
risks immediately. Do not continue the installation procedure.
5. Use a 10 mm hex socket to remove a 10 mm external hex M6 screw on each side of the bottom
cover.
6. Carefully slide
o the bottom cover, ensuring that nothing is caught or bent.
7. Set the bottom cover and the 2 screws aside for reassembly after the wiring is complete.
Step-by-Step Installation Instructions
8 Powerwall Installation Manual

 Loading...