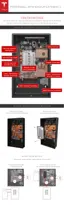
STEP 2 - REMOVE THE SPLASH COVER
Warning: Before beginning the wiring portion of the installation, verify that the inverter is
powered o.
Note: When the splash cover is removed, an Enable circuit disables the internal electronics of
Powerwall. Refer to the illustration in Step 5 for the location of the Enable buttons.
Warning: Ensure the Enable buttons are not pressed by any wiring.
Warning: The Enable buttons only disable power from Powerwall. They do not disable power
from the inverter.
1. Turn
o power to the relevant area at the circuit breaker panel.
2. Turn o the inverter.
3. Open the DC disconnect switch (if applicable for the installation).
4. Use a multimeter to verify that the wires from the inverter to Powerwall are not live.
5. Use a T20 Torx driver to remove the two splash cover screws.
6. Carefully remove the splash cover. Ensure that nothing is caught or bent. Set the screws and
cover aside for reassembly after the wiring is complete.
Warning: Use a multimeter to ensure no voltage is present on the terminals of the
Powerwall circuit board.
7. Before fitting any wires, practice removing and re-fitting the splash cover. Keep the whole
cover square to the unit as it is aligned with the mounting holes. Do not push in one side
before the other.
Step-by-Step Installation Instructions
Tesla Energy 9

 Loading...