1110
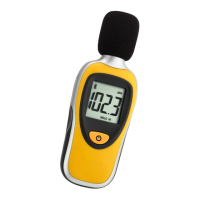
SOUND BEE - Sound Level Meter
• Please pay attention to the connection wires.
• Close the battery compartment again.
• All LCD segments will be displayed for about a few
seconds.
• On the display appear the battery symbol and the cur-
rently measured Sound Pressure Level in dB (A).
• The unit is ready for use.
• The instrument will turn off automatically after 15
minutes, if no button is pressed.
• Press and hold the ON/OFF button for at least 3 se-
conds to turn off the instrument immediately.
6.2 Measuring of the sound pressure and the HOLD
function
• Press the ON/OFF button.
• All LCD segments will be displayed for about a few se-
conds.
• On the display appear the battery symbol and the
currently measured Sound Pressure Level in dB (A).
• Set up the device in the direction of the sound source.
• Press the MAX/MIN button to activate the HOLD func-
tion.
• HOLD appears on the display.
• The actual measured Sound Pressure Level stays on
the display.
• Press again the button, to deactivate the HOLD func-
tion.
6.3 Reading of the maximum and minimum values
• Press and hold the MAX/MIN button for at least 3 se-
conds to enter the maximum and minimum mode.
• MAX appears on the display.
• The highest measured Sound Pressure Level in dB (A)
will appear on the display.
• Press the button again.
SOUND BEE - Sound Level Meter
Caution!
Risk of injury:
• In case of loud noise, make sure you have adequately
protected your hearing.
• Keep this instrument and the battery out of the reach
of children.
• Batteries must not be thrown into a fire, short-circuit-
ed, taken apart or recharged. Risk of explosion!
• Batteries contain harmful acids. Low batteries should
be changed as soon as possible to prevent damage
caused by leaking.
• Wear chemical-resistant protective gloves and safety
glasses when handling leaking batteries.
Important information on product safety!
• Do not place your product near extreme temperatures,
vibrations or shocks.
• Protect it from moisture, sand, dirt and dust.
5. Elements
Buttons
ON/OFF button (front)
MAX/MIN button (laterally)
Housing (back)
Tripod screw
Battery compartment (screwed)
6. Operation
6.1 Getting started
• Open the screw of the battery compartment (below
RoHS sign) and insert the battery 9 V. Ensure that the
battery polarity is correct.
TFA_No. 31.2003 Anleitung_10_19 31.10.2019 11:06 Uhr Seite 6
 Loading...