Do you have a question about the The Original ScrapBox Ultimate Sewing Box and is the answer not in the manual?
Lists all tools necessary for the assembly of the Ultimate Sewing Box.
Lists hardware components specific to the Left Box assembly.
Lists hardware components specific to the Right Box assembly.
Lists hardware for the main center box structure.
Lists hardware for the sliding table mechanism.
Lists hardware for the fold-down work tables.
Lists hardware specific to the left swing door assembly.
Lists hardware specific to the right swing door assembly.
Details the types and quantities of shelves and totes provided.
Attaching wheels, posts, and support pins to the base and lid.
Connecting Side 1 to the base and lid using posts and cams.
Connecting Side 2 to the base, lid, and shelf using posts and cams.
Inserting posts into sides for door attachment.
Carefully setting the door onto the installed posts.
Inserting and locking cams on the interior sides of the box.
Installing hinges and attaching the swing door to the box.
Attaching wheels, posts, and support pins to the base and lid.
Connecting Side 1 to base and shelves using posts and cams.
Connecting Side 2 to base, lid, and shelves using cams.
Carefully setting the door onto the installed posts.
Inserting and locking cams on the interior sides of the box.
Placing shelf pegs into the side panels for shelf support.
Placing shelf pegs into the divider for shelf support.
Sliding the divider and shelves into position.
Manually screwing the divider to secure it.
Installing hinges and attaching the swing door to the right box.
Aligning and tapping dividers into the center box lid.
Manually screwing dividers into the center box lid.
Manually screwing dividers into the bottom of Shelf 2.
Using shelves as spacers to lift the top section for side attachment.
Inserting posts and base support pins into sides 1 & 2.
Tapping Side 1 carefully into the built section.
Hammering bolts and tightening nuts for the wheels on the base.
Aligning and tapping base and shelf 1 onto posts in Side 1.
Sliding shelves under unattached corners to stabilize.
Inserting and locking cams into the base, shelves, and lid.
Tapping Side 2 carefully into the built section.
Installing and tightening cams for Side 2 connections.
Sliding back panels into grooves and aligning holes.
Installing 25mm Euro screws to secure the back panels.
Attaching angle brackets with washer screws to the base of each box.
Installing hinges on the center box sides with Euro screws.
Attaching Left and Right Boxes to the Center Box hinges.
Installing door knobs or handles onto the box doors.
Installing barrel locks, long table legs, and washer screws.
Installing hinges onto the tables, leaving them loose.
Attaching tables to left and right boxes with Euro screws.
Inserting support pins below and above metal grooves.
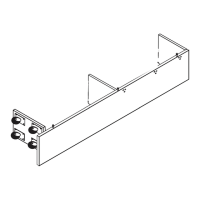
Installing the large rail sections onto the center box.
Attaching the smaller rails to the center box sliding table.
Attaching short table legs to the sliding table.
Inserting the sliding table into the installed rails.
Installing the remaining hinges on the back fold out table.
Attaching the fold out table to the center box sliding table.
Placing rubber caps onto the pivot brackets.
Attaching pivot brackets to the back fold out table.
Clipping acrylic guards into holes on swing doors.
Recommended shelf placement and types for the left box.
Recommended shelf placement and types for the center box.
Recommended shelf placement and types for the right box.
Instructions for installing 1/4 inch adjustable shelves using shelf pegs.
Ensuring box levelness and removing sash lock before crown attachment.
Options for installing the light kit into the crown.
Securing the crown to the top of the center box with screws.
| Brand | The Original ScrapBox |
|---|---|
| Model | Ultimate Sewing Box |
| Category | Indoor Furnishing |
| Language | English |