Do you have a question about the Thermador DWHD440MPR and is the answer not in the manual?
Lists materials suitable for dishwasher use, including aluminum, china, crystal, glass, plastics, and stainless steel.
Lists materials that should not be washed in the dishwasher, such as acrylic, adhesive-joined pieces, bone-handled utensils, iron, pewter, brass, bronze, and wood.
Instructions on how to properly load the top rack to avoid blocking spray arms and ensure optimal cleaning.
Guidance on placing large items, pots, pans, and bowls upside down in the bottom rack.
Recommends unloading the bottom rack first, then the silverware basket, and finally the top rack.
Instructions on how to raise or lower the upper rack to accommodate larger items.
Details on how to load the long silverware basket and its loading pattern.
Explains how to fold down tines on the racks to accommodate different types of dishes.
Describes the use of cup shelves for small cups or larger utensils.
Guidance on using specific dishwasher detergents, avoiding hand dishwashing products, and recommended amounts for soft water.
Explains the importance of rinse aid for drying and how to refill the dispenser.
Step-by-step instructions on how to adjust the rinse aid dispensing level from r:00 to r:06.
Details the available wash cycles: Pots & Pans, Auto, Normal, and Quick for various soil levels.
Explains how to use options like Delay Start, Half Load, PowerBoost, and Extra Dry for customized washing.
Provides detailed data on cycle times, water consumption, and temperatures for various cycles and options.
Step-by-step guide on how to turn on the unit, select a cycle, and start the wash.
Instructions on how to stop and drain a running cycle.
How to temporarily stop and then restart a cycle.
Procedure for setting a delayed start time for the dishwasher cycle.
Instructions on how to activate the intensive drying feature for better drying results.
How to adjust the automatic power off setting for energy saving purposes.
Instructions to turn the InfoLight indicator on or off.
Guidelines for cleaning the exterior, interior, and stainless steel surfaces of the dishwasher.
Detailed steps on how to remove, clean, and reinstall the filter system to prevent blockages.
Instructions on checking and cleaning spray arms for deposits to ensure proper water distribution.
Procedure for safely removing blockages from the waste water pump.
Advice on preparing the dishwasher before leaving for vacation, including winterizing.
Instructions for winterizing the dishwasher if it will be unused in freezing temperatures.
Lists common causes and actions for when the dishwasher fails to start.
Addresses issues with the display not lighting up, including fuse or breaker checks.
Explains reasons why a wash cycle might take longer than usual.
Identifies causes and solutions for dishes not being clean, such as spray arm issues or clogged filters.
Covers issues like incorrect rinse aid settings or improper loading causing streaks.
Discusses reasons for poor drying, such as empty rinse aid dispenser or improper loading.
Provides steps to resolve odor issues, including cleaning filters and drain hose.
Addresses problems with the dishwasher not filling, checking water supply and delay start.
Advice on cleaning the control panel to avoid discoloration or marks.
Covers causes of leaks like suds, door seal issues, or improper installation.
Explains how to remove tub stains caused by water hardness using lemon juice.
Discusses normal operating sounds versus noises caused by improper loading.
Steps to resolve issues with the detergent dispenser cover not closing properly.
Addresses problems with selecting or starting a dishwasher cycle.
Provides the primary phone number for customer service inquiries and support.
Directs users to the official Thermador website for customer service contact information.
Guidance on reaching out to installers or authorized contractors for service needs.
Defines what the limited product warranty covers, including purchase conditions and user eligibility.
Outlines the duration of the warranty, including specific terms for electronics, dish racks, and stainless steel.
Explains the process for repairs or replacements under warranty and the limitations.
Lists conditions and circumstances that are not covered by the product warranty.
Details legal limitations on warranties, remedies, and liability for damages.
Instructions on how to contact authorized service centers or call for warranty service.
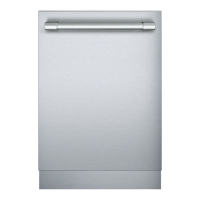
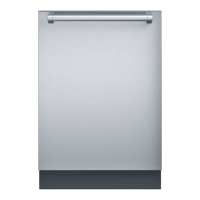
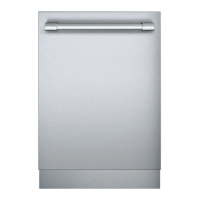
This document is a Use and Care Guide for Thermador dishwashers, specifically models DWHD440MFM, DWHD440MFP, and DWHD440MPR. It provides comprehensive instructions for operating, maintaining, and troubleshooting the appliance, ensuring users can achieve optimal performance and longevity from their dishwasher.
The primary function of this device is to wash household dishware and kitchenware. It is designed to offer superior performance through innovative and careful engineering, catering to consumers who demand high-quality cleaning results. The dishwasher incorporates various cycles and options to accommodate different types of loads and soil levels, making it a versatile appliance for everyday use.
The dishwasher offers a range of features designed to enhance its usability and cleaning effectiveness:
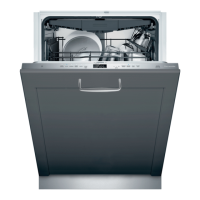
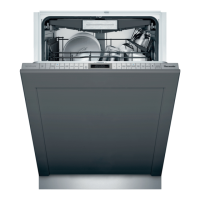
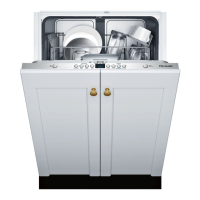
Loading the Dishwasher: Users are advised to remove all food particles, bones, toothpicks, and excessive grease before loading. Items with burned-on, baked-on, or starchy soils may require pretreatment. Only dishwasher-safe items should be loaded, with bowls, pots, and pans facing the spray arms to ensure proper cleaning. Avoiding nesting and contact points between dishes, and separating items of dissimilar metals, is recommended.
Loading the Top Rack: Items should not protrude through the bottom of the racks or block the spray arms. The top rack must be pushed until it stops against the back of the tub to ensure the spray arm connects to the water supply. The door should not be used to push racks in.
Loading the Bottom Rack: Large items, pots, pans, and bowls should be placed upside down in the bottom rack. The vent should not be blocked by tall baking sheets, which should be loaded on the left side of the dishwasher.
Unloading the Dishwasher: For best results, the bottom rack should be unloaded first, followed by the silverware basket, and then the top rack.
Silverware Basket: Knives and sharp utensils should be placed with their handles up, while forks and spoons should be placed with their handles down to reduce the risk of cut-type injuries. Large or oddly-shaped items should be loaded carefully to prevent nesting. The long silverware basket fits along the side of the lower rack, and its lid can be snapped to the handle to keep the basket open.
Rack Accessories: The dishwasher features a RackMatic® adjustable upper rack, which can be raised or lowered to accommodate larger items. To lower, pull the empty top rack out until it stops, then press the RackMatic adjustable handles inward and let the rack drop gently. To raise, pull the empty top rack out until it stops, then grasp the top of the rack above the handles and pull upward until it locks into position.
Flip Tines: The racks include tines that can be folded down to create space for different loading needs. To fold, grasp the tine, release it from the notch, and push it downward to the desired position.
Cup Shelves: The dishwasher includes cup shelves that can be used for small cups or larger serving utensils.
Adding Detergent: Only detergents specifically designed for dishwashers should be used, with fresh powdered dishwashing detergent or detergent tabs recommended for best results. Hand dishwashing products should not be used. The detergent dispenser has measuring lines for 1 tablespoon (15ml) and 2 tablespoons (25ml), with 3 tablespoons (45ml) filling the dispenser completely. For soft water, 1 tablespoon (15ml) is usually sufficient. Detergent tabs should be placed so they do not come into contact with the cover.
Adding Rinse Aid: Liquid rinse aid should always be used to achieve proper drying, even if the detergent contains a drying additive. The "Add Rinse Aid" indicator light signals when the dispenser needs refilling. The rinse aid dispenser should be filled until full, and any excess wiped up. The lid must be snapped fully closed. The amount of rinse aid dispensed can be adjusted from "r:00" (off) to "r:06" (highest setting) via the control panel.
Wash Cycles:
Wash Cycle Options:
Operating the Dishwasher: To start, press the [On/Off] button, select a cycle and desired options, then press [Start]. To cancel a cycle, press and hold [Start] for approximately 3 seconds until "0:01" is displayed, wait about 1 minute for draining, then open the door and press [On/Off]. To interrupt a cycle, press [On/Off] to turn the unit off, and press it again to resume. The cycle completion signal can be adjusted in tone from "b:00" (off) to "b:03" (loudest).
Intensive Drying: This feature uses a higher final rinse temperature to improve drying results, potentially increasing running time. It can be turned on or off via the control panel settings.
Auto Power Off: To save energy, the dishwasher turns off 1 minute after the wash cycle ends. This setting can be adjusted from P:00 (does not turn off automatically) to P:02 (turns off after 120 minutes).
InfoLight®: An LED illuminates the floor to indicate when the unit is running. This feature can be turned on or off via the control panel settings.
Regular inspection and maintenance are crucial for preventing faults and ensuring the long-term performance of the dishwasher.
Overall Condition of the Machine: The front of the appliance should be regularly wiped with a damp cloth, using water and a small amount of liquid soap. Sponges should not be used as they can scratch surfaces, especially stainless steel. The outer edges of the inside door panel should be cleaned regularly to remove debris. If spots appear on stainless steel, ensure the rinse aid dispenser is full and functioning correctly. Steam cleaning products should never be used.
Filters: The filter system, consisting of a coarse filter, a flat fine filter, and a micro filter, prevents large foreign objects from reaching the pump. Filters should be checked for residue by unscrewing the filter cylinder, removing the filter system, cleaning any residue under running water, and reinstalling in reverse sequence, ensuring arrow marks face each other.
Spray Arms: Spray arms should be checked for grease and limescale deposits. If deposits are found, the detergent dispenser should be filled with detergent, and the appliance run without utensils on the cycle with the highest rinsing temperature. Alternatively, appliance cleaners suitable for dishwashers can be used. Spray arms can also be unscrewed for inspection and cleaning.
Waste Water Pump: Large food remnants not retained by the filters may block the waste water pump. To clear a blockage, disconnect power, remove filters, scoop out standing water, pry off the pump cover with a spoon until it clicks, then grip and pull upward. Check the inner compartment for foreign objects, then replace the cover and reinstall filters. Caution should be exercised as items causing blockages may be sharp.
Preparing for Vacation: Before leaving for vacation, turn off the main valve and the water supply at the nearest point to the dishwasher. For colder weather, professional winterization is recommended to prevent freezing damage to the fill valve.
Self Help/Troubleshooting: The manual includes a comprehensive self-help section to address common problems such as the dishwasher not starting, display not illuminating, long cycle times, dishes not getting clean or dry enough, odors, water not filling, fascia panel discoloration, water leaks, tub stains, and noise during wash cycles. Each problem is listed with its potential cause and recommended action, allowing users to troubleshoot issues before contacting customer service.
This guide emphasizes safety instructions, including warnings about electrical shock, proper grounding, and the use of appropriate detergents and rinsing agents. It also advises against tampering with controls, abusing the appliance, or allowing children to play with it. The importance of understanding how to shut off water and power supplies is highlighted for safety.
| Style | built-in dishwashers |
|---|---|
| Color | custom panel ready, custom |
| Load Capacity | 15 |
| Number of Cycles | 4 |
| Cycle Selections | 4 |
| Options/Settings | sensor wash, extra dry, powerboost |
| Drying Type | heated drying |
| Noise level | 48 decibels adjusted |
| Control Type | touchpad |
| Delay Start | yes |
| Child Lock | no |
| Load Sensor | yes |
| Number of Racks | 2 |
| Cycle Signal | yes |
| Water Softener | no |
| Sanitize Settings | no |
| Smart Home | no |
| Annual Energy Consumption | 279 kilowatt hours |
| Voltage | 120 volts |
| Current | 12 amperes |
| Depth | 23 1/16 inches |
|---|---|
| Height | 33 7/8 inches |
| Width | 23 9/16 inches |
| Net Weight | 83 pounds |