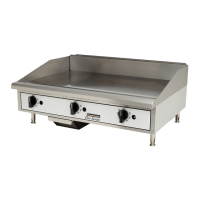
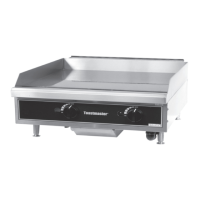
The Toastmaster Gas Griddle is a commercial cooking appliance designed for professional use in food service locations. This owner's manual provides comprehensive instructions for its installation, operation, maintenance, and care, ensuring optimal performance and longevity. It is crucial that all persons involved in using or installing this appliance read and understand this manual thoroughly.
Function Description
The Toastmaster Gas Griddle is engineered to provide a reliable and efficient cooking surface for a variety of food items. It operates on gas, with models available for both natural gas and propane, and is shipped from the factory configured for natural gas, with conversion instructions provided for propane. The griddle features a robust cooking surface, designed to withstand the demands of commercial kitchens. Its primary function is to cook food evenly and efficiently, with various models offering different cooking surface sizes to accommodate diverse operational needs.
Usage Features
The griddle is equipped with several features that enhance its usability and performance in a commercial setting:
- Gas Operation: The unit utilizes gas for heating, offering a powerful and responsive cooking experience. It is designed to conform to national and local gas codes, ensuring safe operation.
- Convertible Pressure Regulator: A convertible pressure regulator is included with each griddle, set for natural gas manifold pressure upon shipment. Instructions are provided for converting the regulator for propane use, making the unit versatile for different gas supplies.
- Manual Shut-Off Valve: A manual shut-off valve should be installed upstream from the union and within six feet of the appliance, allowing for quick and easy gas supply control for safety and maintenance.
- Standing Pilots: The griddles are equipped with standing pilots, which should be lit immediately after the gas is turned on. These pilots ensure quick ignition of the main burners. Pilot flames can be observed and lit through front panel view ports, with best access from the bottom of the unit.
- Pilot Light Regulation: The pilot light flames can be adjusted to be as small as possible while still being high enough to ignite the burner immediately when the burner valve is turned on high.
- Burner Adjustment (TMGM Models): For manual control models (TMGM), burner adjustment involves removing the front panel, turning the burner valve knob to "HI" position, and then adjusting the air shutter on the front of the burner. The goal is to achieve a soft blue flame with luminous tips that transition to a hard blue flame as yellow tips disappear. This process is repeated for all burners.
- Burner Adjustment (TMGT Models): For thermostatic control models (TMGT), burner adjustment also requires removing the front panel. The dial is pushed in, and the thermostat of one burner is set to 450°F (229.9°C). Similar to TMGM models, the air shutter is adjusted to achieve a soft blue flame with luminous tips, transitioning to a hard blue flame as yellow tips disappear. This ensures proper combustion and even heating.
- Burner Operation (TMGM Models): To ignite burners on TMGM models, the burner valve knob is turned to the "HI" position. Each burner is controlled by an individual high-low, on-off valve, allowing for an infinite number of temperatures within the operable range. For overnight shutdown, valves should be turned to the "OFF" position.
- Temperature Control (TMGT Models): On TMGT models, temperature controls are a combination of "ON/OFF" switches and thermostats. Turning the dial knob automatically maintains the selected heat range. Each 12-inch wide section of the griddle has an independent thermostat, providing precise temperature control across the cooking surface.
- Cooking (TMGT Models): For TMGT models, the thermostat dial knob is set to the desired temperature. After a short pre-heating period, the thermostat automatically maintains the selected temperature.
- Cooking (TMGM Models): For TMGM models, the knob is adjusted to the desired area in the heat range. Once the desired heat is reached, adjustments can be made over time to maintain the target heat.
- Idling: During idle periods, to conserve energy, the temperature setting on thermostatic models can be lowered to about 250°F (121°C), and manual models can be set to a low heat setting. This practice helps save on operating costs, as the griddle can quickly reheat to the desired cooking temperature.
- Signal Lights (TMGT Models): Thermostatic models feature signal lights for each thermostat, indicating when the unit's control knob is not in the off position, providing a visual cue for operational status.
Maintenance Features
Proper maintenance is essential for the safe and efficient operation of the Toastmaster Gas Griddle. The manual outlines several key maintenance procedures:
- Thorough Inspection on Arrival: Upon receipt, the unit must be thoroughly inspected for any shipping damage. Any damage must be reported immediately to the transportation company to initiate a claim, as failure to do so may affect the warranty status.
- Authorized Service: For service or required maintenance, users must contact a local authorized service agent. Using genuine Toastmaster factory-supplied parts is crucial, as using non-genuine parts relieves the manufacturer of all liability and voids the warranty.
- Leveling Unit: The griddle is supplied with four feet that must be screwed into the legs. The unit should be leveled by adjusting these feet, which offer 1-3/4" (43.75mm) of adjustment, to ensure accurate alignment with other units. Additionally, the legs should be adjusted to create a 1/8-inch slant from back to front on the griddle plate. This slant facilitates grease drainage into the grease gutter and ensures proper combustion air for the burners. It is explicitly stated not to install the unit without attaching the feet and not to remove them.
- Gas Piping Inspection: Gas piping must be of adequate size and installed to provide sufficient gas supply. When connecting to existing piping, its capacity should be checked. Joint compound should be used sparingly and only on male threads, and it must be resistant to LP gases. The manual warns against loose dirt or metal particles entering gas lines, as they can damage valves and affect operation.
- Checking for Gas Leaks: After installation, the entire piping system must be checked for gas leaks using a soap and water solution or other acceptable material. Open flames, matches, or candles should never be used for this purpose.
- Exhaust Canopy: It is essential to provide facilities over the griddle to carry off fumes and gases. However, the unit should not be directly connected to a flue or stack.
- Clearance: The griddle is designed for use on non-combustible countertops only. A minimum clearance of 48" (120cm) from the top of the appliance and 6" (150mm) from the sides and back to combustible and non-combustible materials is required. Adequate clearance is also necessary for proper operation and servicing.
- Air Supply: The flow of combustion and ventilation air must not be obstructed. Adequate air supply must be furnished, and the legs supplied with the unit must be installed. Air intake openings in the bottom of the appliance must remain unobstructed for proper combustion and operation.
- Seasoning the Griddle Surface (Non-Chromium Surfaces): For non-chromium griddle surfaces, thorough seasoning is required to prevent food from sticking. After cleaning, the griddle surface is seasoned by setting the temperature to 350°F (174.9°C), spreading a thin film of cooking oil, allowing it to remain for 1/2 hour, removing excess oil, and repeating the process. It is noted that even with careful seasoning, food may stick until the griddle plate is "broken in."
- Griddle Care (Non-Chromium Areas): Regular cleaning is crucial to prevent grease accumulation, which can carbonize into a hard substance. After each use, the griddle should be scraped with a scraper or flexible spatula to remove excess grease and food. A waste drawer is provided for scrapings. If burned-on grease accumulates, the griddle should be scoured and reseasoned using pumice or a griddle stone while warm. Steel wool should not be used due to the risk of steel slivers contaminating food. Daily cleaning of the stainless steel body with a clean cloth and non-abrasive cleaner is recommended, with a soft cloth for polished fronts. The waste drawer should be removed and washed daily like an ordinary cooking utensil.
- Grease Pan: A grease pan is located at the front of the unit and can be removed for cleaning. It should be checked and emptied regularly. Extreme care must be exercised when handling the grease pan containing hot grease.
The manual emphasizes that specifications are subject to change without notice due to periodic changes in designs, methods, procedures, policies, and regulations. Toastmaster reserves the right to make such revisions without entitling the buyer to corresponding changes or improvements for previously purchased equipment. While Toastmaster strives for accuracy, it is not responsible for errors or omissions in the provided information. Users assume all risks associated with using the information.