Do you have a question about the Topcon GLS -2000 Series and is the answer not in the manual?
Explains symbols used in the manual and notes regarding manual style for clarity.
Provides information on trademarks and product names featured in the manual.
Defines WARNING, CAUTION, and other symbols used in the manual for safety information.
General safety guidelines including handling, environment, and specific warnings like dust, disassembly, and carrying.
Safety instructions related to power supply connections, battery handling, and safe tripod usage.
Details on battery charging temperature range and warranty policy for expendable battery items.
IP54 specifications, sealing, and maintaining waterproof properties of the instrument.
Notes on the lithium battery's backup function and proper usage of the levelling base.
Guidelines on tripod selection and ensuring proper ventilation for heat release from the instrument.
Details laser classes for scanner unit and laser plummet, and warnings about radiation exposure.
Warnings on controls, pointing, optical instruments, and radiation exposure.
Guidelines on avoiding pedestrian/driver exposure, required training, protective gear, and accident reporting.
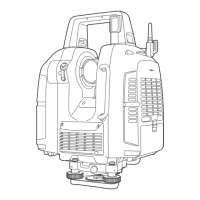
Illustrates and labels key parts like the handle, scanner unit, camera, heat vents, and battery cover.
Shows labels for laser plummet window, instrument center mark, display, and operation keys.
Describes the function of each operating key and the power indicator on the instrument.
Explains the icons and their corresponding functions available on the main menu screen.
Illustrates the main screen flow from power on through various settings like SetUp, Config, and Scan.
Details on inserting SD cards, using appropriate types, and installing batteries, including opening the cover.
Continues the procedure for inserting the SD card and installing batteries, including closing the battery cover.
Instructions for opening the left battery cover, installing batteries, and handling the backup memory.
Procedure for connecting an external power source and precautions for cable placement.
Outlines the general steps involved in preparing for scanning, setting up, and performing scans.
Steps to loosen screws and lift the instrument to detach it from the levelling base.
Steps to align the instrument with the tribrach, tighten screws, and lock the fixing lever.
How to press the power key, initial startup screen display, and main menu appearance.
Steps to press and hold the power key to switch off the instrument.
Steps for setting up the tripod, placing the instrument, and rough leveling using the tribrach.
Procedure to use the laser plummet and electronic circular level for precise centering.
Instructions on how to check SD card usage and format the card.
How to check the remaining battery level and interpret the battery status indicators.
Step-by-step guide for replacing batteries while the instrument is powered on.
Explanation of the on-screen keyboard functions for entering text and numbers.
Information on choosing target sheets based on scanning distance and assembling the target.
Steps for installing the target board and attaching the magnetic target sheet.
Procedure for accessing the tilt setting and understanding its impact on angle compensation.
Explains the meaning of OK, NG, and OFF indicators for the tilt sensor function.
Configuration options for the built-in camera, including panorama, resolution, and exposure.
Lists and explains predetermined resolution options and their corresponding accuracy.
Setting custom scan range, angles, and measurement pitch for desired scan density.
Explains different range modes (Detail, High Speed, etc.) and pulse select options for measurement.
Steps to access scan settings and input desired resolution for distance measurement.
Using the camera to tap the target and display the measured distance for rough confirmation.
How to enter temperature and pressure for data compensation.
How to set the prism constant and toggle the flash light ON/OFF for target scanning.
Procedure for setting the date and time for measurement data recording.
How to view the date of the last precision calibration.
Guide to adjust the backlight brightness level of the display screen.
How to adjust the instrument's audible volume levels.
Options for setting units for temperature, pressure, distance, and angle.
How to choose between ENH and NEH coordinate systems.
Steps to press the add station icon and enter a name for the new station.
Procedure to select or enter the occupied point name from a coordinate list.
How to input or measure the instrument height (IH).
Procedure to select or enter the backsight point name and its coordinate.
Steps to import coordinate point names for occupied and backsight points.
Performing a scan of the backsight point after setting up station and points.
Purpose of target scanning for aligning 3D data and centering targets.
Recommended search widths and target types based on distance and conditions.
Provides 3D data, requiring range and parameter settings.
Set scan range by collimating top-left and bottom-right points.
Procedure for scanning the entire circumference of the target area.
How to access and view saved measurement data files from the SD card.
Procedure for adjusting the circular level to ensure accurate leveling.
How to calibrate the tilt sensor's zero datum for accurate inclination measurements.
Procedure to press config, parameter, and PL offset to start alignment.
Using controls to adjust and verify the laser plummet beam alignment.
Procedure to press config, parameter, and PC offset for image alignment.
Using directional buttons to align cross-hairs with the survey point and display leveling screen.
Initial battery charging, charger notes, temperature ranges, and storage advice.
Information on charging time per battery, slot usage, and notes on charging lamp behavior.
Lists common error messages, typical error numbers, descriptions, and countermeasures.
Warnings for SD card formatting, recognition, space, and file deletion issues.
Warnings for tilt status, scanning errors, target finding, and measurement failures.