CH CNKRJPITESFRDEEN
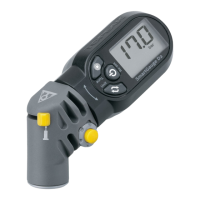
1. Air Release Button
2. Air Pressure Units
Selection Button
3. Reset and on/off Button
4. Adjusting Button
5. LCD Display Screen
6. SmartHead for Presta
or Schrader valve
7. Selector Button for
Presta or Schrader valve
8. Battery Cover
HINWEISE
CHANGING BATTERY
LCD DISPLAY SCREEN
NOTES
NOTES
NOTES
NOTAS
1. Do not violently shake or drop the gauge.
2. If the gauge gets wet, wipe it with a dry towel as soon as possible.
3. Do not apply excessive force to the LCD display screen.
4. Do not use organic solvents, such as alcohol or paint thinner when cleaning the gauge.
5. Keep this gauge away from magnets.
6. Do not expose this gauge to dust or sand as this could cause damage.
7. Smart Gauge D2 is designed for use with tires, forks and shocks.
• Display zone:
0~250 psi, 0~17.2 bar,
0~17.6 kg/cm
2
• Operating Temperature:
0˚ ~ 85˚
• Battery: CR2032 x 1 pc
• Size: 10.2 x 4.5 x 3.5 cm
• Weight: 65 g
• Anzeige:
0~250 psi, 0~17,2 bar,
0~17,6 kg/cm
2
• Betriebstemperatur:
0 ~ 85˚
• Batterie: CR2032 (1x)
• Maße: 10,2 x 4,5 x 3,5 cm
• Gewicht: 65 g
1. Luftablassknopf
2. Auswahltaste Luftdruck-
Einheiten
3. Reset- und An/Aus-Taste
4. Einstelltaste
5. LCD-Bildschirmanzeige
6. SmartHead für Presta-
und Schrader-Ventile
7. Auswahlhebel für Presta-
und Schrader-Ventile
8. Batterieabdeckung
1. Luftdruckprüfer niemals heftig schütteln oder fallen lassen.
2. Sollte der Luftdruckprüfer nass werden, so sollte er schnellstmöglich mit einem Tuch getrocknet
werden.
3. Niemals übermäßigen Druck auf den LCD-Bildschirm ausüben.
4. Zur Reinigung des Luftdruckprüfers niemals organische Lösungsmittel wie Alkohol oder
Farbverdünner verwenden.
5. Luftdruckprüfer fern von Magneten halten.
6. Luftdruckprüfer niemals Staub oder Sand aussetzen, da dies zu Beschädigungen führen kann.
7. Der Smart Gauge D2 ist geeignet zur Verwendung an Reifen, Luftfedergabeln und -dämpfern.
• zone d'affichage:
0~250 psi, 0~17 bar,
0~17,6 kg/cm
2
• Température d'opération:
0˚ ~ 85˚
• Batterie: CR2032 x 1 pc
• Taille : 10,2 x 4,5 x 3,5cm
• Poids : 65 g
1. Bouton de relâche de pression
2. Bouton de sélection d'unité
3. Bouton de réinitialisation et
allumé/ éteint.
4. Bouton d'ajustement
5. Ecran d'affichage LCD
6. Tête SmartHead pour valve
Presta ou Schrader
7. Bouton de sélection pour valve
Presta ou schrader
8. Couvercle de batterie
1. Ne pas secouer violemment ou laisser tomber le manomètre.
2. Si le manomètre est mouillé, le sécher avec un linge le plus rapidement possible.
3. ne pas exercer de pression excessive sur l'écran LCD.
4. Ne pas utiliser de solvants organiques tels alcool ou dissolvant pour peinture lors du
nettoyage du manomètre.
5. Garder le manomètre éloigner de toute force magnétique.
6. Ne pas exposer ce manomètre à la poussière ou au sable. Cela pourrait l'endommager.
7. Le manomètre Smart Gauge D2 est conçu pour fonctionner avec les pneus, amortisseurs et
fourches à suspension.
• Zona pantalla:
0~250 psi, 0~17,2 bar,
0~17,6 kg/cm
2
• Temperatura operativa:
0˚ ~ 85˚
• Batería: CR2032 x 1ud.
• Tamaño: 10,2 x 4,5 x 3,5 cm
• Peso: 65 g
1. Botón de liberación de aire
2. Botón de selección de
unidades de presión.
3. Botón de inicialización y
encendido/ apagado.
4. Botón de ajuste
5. Pantalla LCD
6. Cabeza inteligente SmartHead
para válvula Presta y Shrader
7. Botón de selección del tipo de
válvula
8. Tapa de la batería
1. No agite violentamente ni deje caer el medidor de presión.
2. Si el medidor se moja, pásele un trapo seco lo antes posible
3. No presione la pantalla LCD.
4. No utilizar disolventes orgánicos para limpiar el medidor (como alcohol o disolventes para pintura).
5. Manténgalo alejado de campos magnéticos.
6. No exponga este dispositivo al polvo o arena ya que podrían dañarlo.
7. El SmartGauge D2 está diseñado para neumáticos, horquillas y amortiguadores.
• Zona display:
0~250 psi, 0~17 bar,
0~17,6 kg/cm
2
• Temperatura operazione:
0˚ ~ 85˚
• Batteria : CR2032 x 1 pz
• Misure : 10,2 x 4,5 x3,5 cm
• Peso: 65 grammi
LCD BILDSCHIRMANZEIGE
EVRAN D'AFFICHAGE LCD
PANTALLA LCD
MONITOR DISPLAY LCD
1. Non sbattere o schiacciare violentemente il manometro
2. Se il manometro si bagna, asciugarlo subito con un panno asciutto
3. Non premete con troppa forza sul monitor LCD
4. Non usate solventi, come alcol o diluenti durante la pulizia
5. Tenete il manometro lontano dai magneti
6. Evitare il contatto del manometro con sabbia e sporco
7. SmartGauge2 è concepito per essere utilizzato con gomme, forcelle e
ammortizzatori.
1. Tasto rilascio d' aria
2. Tasto selezione aria
pressurizzata
3. Tasto reset e on/off
4. Tasto di regolazione
5. Monitor con display LCD
6. Smarthead per valvola
Presta e Schrader
7. Tasto di selezione per
valvola Presta o Schrader
8. Copertura batteria
• 氣壓顯示範圍 :
0~250 psi, 0~17.2 bar,
0~17.6 kg/cm2
• 適用溫度: 0˚ ~ 85˚
• 電池規格 : CR2032 x 1 個
• 產品尺寸 : 10.2 x 4.5 x 3.5 cm
• 產品重量 : 65 g
• 氣壓顯示範圍 :
0~250 psi, 0~17.2 bar,
0~17.6 kg/cm2
• 適用溫度: 0˚ ~ 85˚
• 電池規格 : CR2032 x 1 個
• 產品尺寸 : 10.2 x 4.5 x
3.5 cm
• 產品重量 : 65 g
1. 洩氣鈕
2. 氣壓單位調整鈕
3. 電源與重設鈕
4. 氣壓微調鈕
5. LCD 顯示螢幕
6. 美/法式氣嘴共用氣閥
7. 氣嘴選擇鍵
8. 電池蓋
1. 洩氣鈕
2. 氣壓單位調整鈕
3. 電源與重設鈕
4. 氣壓微調鈕
5. LCD 顯示螢幕
6. 美/法式氣嘴共用氣閥
7. 氣嘴選擇鍵
8. 電池蓋
1. 請勿劇烈搖晃或摔落本產品
2. 若本產品不慎弄濕,請盡速用乾毛巾拭乾,
以延續產品壽命。
3. 請勿在 LCD 面板上過度施加壓力。
4. 請勿用有機溶劑清潔本產品,如酒精或
油漆稀釋劑等。
5. 請遠離磁鐵。
6. 請勿將本產品長期暴露於充滿灰塵或風沙的環境下,
以免造成產品損壞。
7. SmartGauge D2 適用於測量輪胎、前叉或避震器。
1. 請勿劇烈搖晃或摔落本產品
2. 若本產品不慎弄濕,請盡速用乾毛巾拭乾,
以延續產品壽命。
3. 請勿在 LCD 面板上過度施加壓力。
4. 請勿用有機溶劑清潔本產品,如酒精或
油漆稀釋劑等。
5. 請遠離磁鐵。
6. 請勿將本產品長期暴露於充滿灰塵或風沙的環境下,
以免造成產品損壞。
7. SmartGauge D2 適用於測量輪胎、前叉或避震器。
重要事項
/
重要事項
螢幕顯示狀態
螢幕顯示狀態
LOW BATTERY INDICATOR
Schwache-Batterie"-Anzeige
Indicateur de batterie
Indicador de batería baja
Indicatore livello batteria basso
弱電顯示畫面
SMARTGAUGE D2SMARTGAUGE D2
SPECIFICATIONS
SPEZIFIKATIONEN / SPÉCIFICATIONS / ESPECIFICACIONES / SPECIFICHE / / / 規格說明 / 規格說明
Presta Valve
Schrader
Valve
Beep
Hold tire and gauge
tightly when operating
for precise measurement.
Hold tire and gauge
tightly when operating
for precise measurement.
Beep
Select unit and adjust proper angle.
Luftdruckeinheit auswählen und
geeigneten Winkel einstellen.
Sélectionner l'unité et l'angle approprié.
Seleccionar unidades y ajustar con
el ángulo apropiado.
Selezionare l'unità e regolare la
giusta angolazione.
選擇慣用的氣壓單位並調整適合的
操作角度
選擇慣用的氣壓單位並調整適合的
操作角度
Select valve by sliding selector button.
Passenden Ventiltyp mit Hilfe des
Auswahlhebels einstellen.
Sélectionner le type de valve en
glissant le bouton de sélection.
Seleccionar tipo de válvula
deslizando el botón de selección.
Selezionare la valvola girando il
tasto di selezione.
選擇適合的氣嘴模式
選擇適合的氣嘴模式
Reifen und Luftdruckprüfer für
eine genaue Messung festhalten.
Maintenir fermement le pneu et
le manomètre pour une mesure
plus précise.
Sujete firmemente el neumático
y el dispositivo para una
medición precisa.
Tenere ben ferma la gomma e il
manometro durante il gonfiaggio.
測量氣壓時,請緊握胎壓計並
確認輪胎與胎壓計確實密合。
測量氣壓時,請緊握胎壓計並
確認輪胎與胎壓計確實密合。
OPERATION OF SMARTGAUGE D2
HANDHABUNG DES SMARTGAUGE D2 / FONCTIONNEMENT DU SMART GAUGE D2 / FUNCIONAMIENTO DEL SMARTGAUGE D2 / UTILIZZO DI
SMARTGAUGE D2 / / /
如何操作 SMARTGAUGE D2
6 1
4
2
3
57 8
CR2032
請勿讓兒童拿取電池
吞嚥電池或塞進耳鼻孔部位會造成腸道受損或化學性灼傷
,嚴重會危害生命,若有誤食狀況請立即送醫治療。
/ 本產品內含有鈕扣型電池
使用前に絶縁材
を 外してくだ さい
첫 사용 전에
분명한 구분선을
제거하십시오
使用前請先移除
絕緣片
使用前請先移除
絕緣片