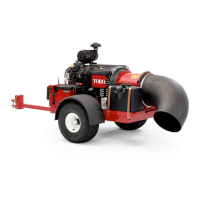
RemovingInnerHousingComponents(continued)
4.Disconnectthenozzlemotorfromthemachinewireharnessandremovethe
fastenersthatsecuretheblowerassemblytothemachineframe.Remove
theblowerassemblyfromthemachine.
5.Removethenozzlemotorbracketassembly,nozzlepulley,andrearfan
mountfromtheblowerassembly;refertoRemovingtheNozzleAssembly
(page6–16).
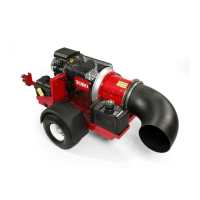
6.Positiontheblowerassemblyonsupportswiththerotorshaftpointingup.
Place14.3mm(9/16inch)thickspacersbetweenthesupportsandthe
outerhousing.Thisarrangementwillalignandstabilizetheinnerandouter
housingassembliesduringtheserviceprocedure.
g233399
Figure44
1.Supports(2x4shown)3.Outerhousing
2.14.3mm(9/16inch)spacer
7.Inspecteachofthe24statorvanestoensurethattheirmountinglugsarein
goodconditionandtheirmountingscrewistight.Removeanystatorvane
thatislooseordamaged.
A.Removetheange-headscrew(item18)thatsecuresthestatorvane
totheouterhousing.
B.Carefullytiltthevanetofreethevanelugsfromtheinnerhousing,and
removethestatorvanefromtheassembly.
C.Repeatasnecessary.
8.Inspecteachofthe4supportnstoensurethattheirmountingscrewsare
tight.Removeanysupportnthatisdamaged.
Note:Ifmultipleshimswereusedbetweenasupportnandtheouter
housingduringassembly,centertheinnerhousingintheouterhousingby
dividingthenumberofshimsevenlyoneachsideoftheassembly.
9.Removeallofthestatorvanes,supportns,andshimstoremovetheinner
housing.
10.Removetherotorshaftassemblyfromtheinnerhousingifnecessary;refer
toRemovingtheRotorShaft(page6–10).
InstallingInnerHousingComponents
RefertoFigure43forthisprocedure.
ProForce®DebrisBlower
Page6–13
BlowerAssembly:ServiceandRepairs
18237SLRevA
 Loading...