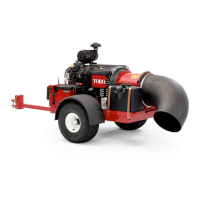
NozzleAssembly
g280635
Figure45
1.Nozzle
5.Capscrew(2each)9.Flatwasher(4each)
2.Nozzleclamp
6.Flangenut(10each)10.Ballbearing(2each)
3.Nozzlepulley
7.Capscrew(6each)11.Spacer(8each)
4.Nozzlemotorbracketassembly
8.Capscrew(2each)12.Nozzleguide(4each)
Note:Fornozzlemotorserviceinformation;refertoNozzleMotor(page5–30).
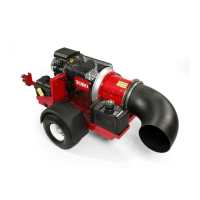
RemovingtheNozzleAssembly
RefertoFigure45forthisprocedure.
1.Parkthemachineonalevelsurface,shutofftheengine,andremovethekey
fromthekeyswitch.Blockthewheelswithchockstopreventthemachine
frommoving.
2.Topreventunexpectedmachineoperation,disconnectthenegativebattery
cablefromthebatteryterminal;refertoServicingtheBattery(page5–37).
Positionthedisconnectednegativecableawayfromthenegativebattery
terminal.
3.Loosenthenozzleclampfastenersandremovethenozzleclamp(item2)
andnozzle.
4.Loosenthe2ange-headscrewsand2angenutsthatsecurethenozzle
motorbrackettotherearfanbracket,thenremovetheV-beltandmotor
bracketassemblyfromthemachine.Disconnectthenozzlemotorfromthe
machinewireharnessifnecessary.
5.Removethenozzleguides,pulleybearings,andnozzlepulleyfromtheouter
housing.
6.Disassemblethenozzlemotorbracketassemblyifnecessary.
InstallingtheNozzleAssembly
RefertoFigure45forthisprocedure.
1.Assemblethenozzlemotorbracketassemblyifnecessary.
BlowerAssembly:ServiceandRepairs
Page6–16
ProForce®DebrisBlower
18237SLRevA
 Loading...