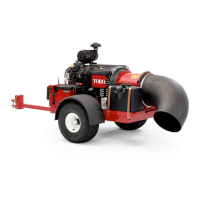
InstallingtheNozzleAssembly(continued)
Note:Wheninstallingtheleafspringassembly,theatsideoftheleafspring
shouldbedownward.Thebearingontheleafspringassemblyshouldbe
centeredontheoutsideoftheV-belt.
g280657
Figure46
1.Nozzlemotor9.Beltguard
2.Motorbracket
10.Flatwasher(10each)
3.Flange-headscrew(3each)
11.Shoulderbolt
4.Flangenut(4each)
12.Ballbearing
5.V-belt13.Locknut
6.Drivepulley
14.Leafspring
7.Flangenut
15.Capscrew(2each)
8.Capscrew(2each)
16.T orquewrenchaccess
2.Ifremoved,installthenozzlepulley,pulleybearings,andnozzleguides.
Ensurethebeveledangeofthenozzlepulleyisinstalledtowardtherear
(nozzleside)ofthemachine.
3.Tightenthenozzleguidefastenersfrom5.0to5.5N·m(45to50in-lb).
4.PlacetheV-beltinthenozzlepulleyandsecurethenozzlemotorbracket
assemblytotherearfanbracket.Tightenthebracketmountingfasteners
ngertight.
Note:Donotovertensionthebelt.
5.Usethesquareholeprovidedanda3/8inchdrivetorquewrenchtopivotthe
motorbracketassemblyto23to25N∙m(200to230in-lb).Holdthemotor
bracketinpositionandtightenthe2ange-headscrewsandangenutsto
ProForce®DebrisBlower
Page6–17
BlowerAssembly:ServiceandRepairs
18237SLRevA
 Loading...