–10–
4 Installation
• Install the air conditioner securely in a location where the base can sustain the weight adequately. If the strength is not
enough, the unit may fall down resulting in injury.
• Carry out the specified installation work to guard against the possibility of high winds and earthquake. If the air
conditioner is not installed appropriately, a unit may topple over or fall down, causing an accident.
• If the unit is installed in a small room, observe applied floor area for the unit and take appropriate measures to prevent
the refrigerant from exceeding the limit concentration even if it leaks. Consult dealer where you purchased the product
to install the unit in a small room. Accumulation of highly concentrated refrigerant may cause a fire or oxygen deficiency
accident.
• For simultaneous twin, triple, or double twin system, indoor unit must be installed in the same room. If an indoor unit
is installed in the small room, an applied floor area for the unit may not be observed.
Strictly comply with the following rules to prevent damage of the indoor units and human injury.
• Do not put a heavy article on the indoor unit or let a person get on it. (Even units are packaged)
• Carry in the indoor unit as it is packaged if possible. If carrying in the indoor unit unpacked by necessity, use buffering
cloth or other material not to damage the unit.
• Carry the package by four or more persons, and do not bundle it with plastic band at positions other than specified.
• Be sure to take measures to prevent falling at the wall surface and the floor and fix it surely considering prevention
of accident of falling because this unit is formed into a thin type. If it is not fixed, a falling accident may occur.
• After carrying in the indoor unit to the specified place, fix it to the wall and the floor immediately for safety.
Model RAV- A B C D E F G H J
HM56
200 50 107 132 157 210
Dia. 6.4 Dia. 12.7
Dia. 80
HM80
Dia. 9.5 Dia. 15.9
HM90 to HM160 380 125 50 120 160 390 Dia. 100
1750
80
30×3 30×3
600
40
25
210
815
631
5910
20
120
120
180
*
40
165
*
92
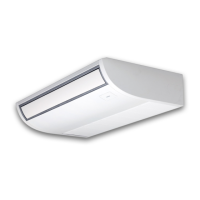
■External views
(Root of drain hose)
Bracket for
fixing to wall
Discharge port
Pitch
Pitch
Remote
controller
Piping port at rear side
(Dia. 130
Knock-out hole)
Bracket for fixing to floor
(Both side)
Intake port
Drain hose
Piping port at lower side
(50 ×120 Knock-out hole)
Wall
Positioning for refrigerant piping
Connection port for refrigerant
piping (Liquid side
G)
Connection port for refrigerant
piping (Gas side
H)
Refrigerant piping port (Both side)
(
J Knock-out hole)
Wiring hole (Both side)
(Dia. 26 Knock-out hole)
* Drain hose drawing-out port (Both side)
(Dia. 40 Knock-out hole)
* Drain hose drawing-out port (Both side) is for only HM90 to HM160 model.
To connect drain hose on right or left, route it through the knock-out for refrigerant piping on
HM56 to HM80 model.
(Unit: mm)
(Opposite
side: 120)
F
AA
B
C
D
E
(520 mm)
19-EN 20-EN
 Loading...