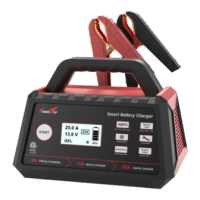
This document describes a Smart Battery Charger, model BC0253, designed for 12V Lead-acid batteries, including GEL, AGM, and STD types. Its primary function is to quickly and easily charge vehicle batteries, ensuring optimal performance and extended lifespan. The charger features an interactive LCD display that provides real-time information on charging rate, battery type, and error messages through both words and icons. It incorporates an eight-stage charging process to ensure batteries are fully charged and offers four different charging rates to accommodate various battery types. Safety features include automatic shutdown, overheat protection, and a reverse polarity indicator to safeguard both the user and the charger from damage.
Technical Specifications:
- Model No.: BC0253
- Input: 120V AC/60Hz, 9A
- Output: 12V DC, with selectable charging rates of 2A, 10A, 25A, or Automatic.
- Working Temperature: 32°F (0°C) - 104°F (40°C)
Protection Features:
- Overheat Protection: The charger automatically shuts off if it overheats and resumes operation once it has cooled down.
- Reverse Polarity: If the cables are connected incorrectly, the charger will not operate, and the LCD screen will display a message prompting the user to correct the polarity.
- Overtime Charging Protection: If a battery cannot be fully charged within 24 hours, the charger will automatically stop the charging process.
- Short Circuit Protection: In the event of a short circuit in the connected cables while the charger is operating, it will automatically cease charging.
Usage Features:
The charger offers multiple modes and settings accessible via its control panel:
- LCD Display Window (1): Shows charging status, current, voltage, battery type, start aid, and error information using words and icons.
- Start Button (2): Initiates charging after settings are selected. Pressing it again puts the charger into standby mode. To change settings or switch modes, the charger must first be stopped by pressing the START button.
- Charging Amp Selection Button (3): Allows selection of charging rates: 2A (for small-capacity batteries or slow charging), 10A (for medium-capacity automobile batteries or quick charging), 25A (for large-capacity or rapid charging), and an automatic charging rate. Slow charging is recommended for extending battery life, while rapid charging is available for quicker needs.
- Battery Type Selection Button (4): Used to select the battery type from AGM, GEL, and Standard.
- Winter Mode Button (5): Activates a special mode for charging in cold temperatures. The corresponding snowflake pattern will appear on the LCD. Pressing it again stops the mode.
- Recondition Button (6): Initiates a repair mode for deeply discharged batteries. This function helps recover batteries that have been unused for long periods and extends their lifespan. The LCD will display "BATTERY IN REPAIR NOW" during this process and "REPAIR COMPLETED" upon completion.
- Desulfation Mode (7): Activated by the "Pulse Desulfation" button. This mode uses pulse charges to break down lead sulfate crystals that can form in discharged batteries, which can impair performance. The LCD will show "BATTERY IN DESULFATION NOW" during the process and "DESULFATION COMPLETED" when finished. During charging, pressing the "Desulpation" button can also switch the interface between "Original Interface" and "8-Stage-Program Interface."
- Engine Start Button (8): Initiates an engine start aid function. The LCD guides the user through the operation, displaying countdowns (100s, 60s, 30s) and prompts like "PLEASE START YOUR ENGINE." It's advised not to attempt starting more than three times to prevent damage to the charger and battery.
Charging Process (8-Stage Charging):
- Desulphation: Pulse charges to break down lead sulfate crystals in discharged batteries.
- Soft Start: A gradual increase in charging power to protect the battery.
- Constant Current: Charges the battery at a set current, forming the main part of the charging process.
- Constant Voltage: Slowly lowers the charging rate as the battery approaches full charge, allowing for maximum absorption.
- Analysis: Automatically tests the battery state after charging. If abnormal, it enters the repair stage; if normal, it proceeds to floating charge.
- Recondition: A unique charge state to recover deeply discharged batteries. After repair, it returns to constant current charging. An error is reported if repair fails.
- Float: Provides a trickle charge to bring the battery to 100% full charge.
- Pulse: Maintains the battery at 100% charge without overcharging, suitable for intermittent use or seasonal vehicle storage.
Charging Time Factors:
- Battery State: Charging time varies with battery voltage; higher voltage batteries charge faster.
- Battery Rating: Higher rated batteries (Ah, RC, CCA) take longer to charge.
- Charge Rate: Lower charge rates take longer but charge more thoroughly. High rates can damage smaller batteries.
- Temperature: Cold temperatures increase charging time as batteries accept charge less efficiently.
- Desulfation: Sulfated batteries (from prolonged discharge) will not accept a normal charge and require desulfation.
Maintenance Features:
- Always unplug and disconnect the charger before performing any maintenance.
- After each use, clean battery corrosion and dirt from clips, cords, and the charger with a dry, lint-free cloth.
- Ensure all components are in good working order.
- Never open the charger, as it contains no user-serviceable parts.
- Store the charger in an upright position in a cool, dry location when not in use.
Troubleshooting:
The charger provides error warnings on the LCD.
- Over Temperature Error / Reverse Connection Error: The charger will automatically resume standby once the issue is resolved.
- Charging Over-Current Error / Charging Over-Voltage Error / Charging Time-Out Error / Battery Error: The AC power supply must be disconnected, and the charger fully powered down to reset and recover.
- Wrong Battery: Indicated if desulfation exceeds 4 hours, abnormal charging in soft start, charging timeout in constant voltage (24H), or repair mode timeout (4H). Solution: Replace the battery.
- Overtime Charging: Indicated if the selected charging rate is too small for a large battery or if the battery condition is poor. Solution: Select a higher charging rate and recharge, or check/replace the battery.
- Reverse Polarity: Indicated if clamps are connected to the wrong polarity. Solution: Correct the polarity.
- Over Heat: Indicated if the charger's temperature is too high or the internal temperature sensor fails. Solution: Ensure vents are unblocked; the charger will recharge automatically after cooling. If the issue persists, professional maintenance is needed for sensor failure.
- Over-Voltage / Over Current: Indicated by abnormal battery voltage or charging current. Solution: Disconnect AC power, let the battery stand, then recharge. If the error recurs, replace the battery.
Safety Warnings:
- Risk of explosive gases, electric shock, or fire.
- Keep out of reach of children.
- Read and understand all directions and warnings before use.
- Do not use in wet conditions or near combustible materials. Keep away from flames, smoke, or sparks.
- Connect only to properly grounded outlets. Extension cords are not recommended.
- Do not operate if cords, wires, or charger base are frayed or defective. Do not open the charger.
- Use only on lead-acid batteries. Do not charge dry cell batteries.
- Do not charge a frozen battery.
- Use only attachments recommended by the manufacturer.
- Unplug from outlet before repairs or cleaning.
- Ensure adequate space and position the charger far from the battery.
- Never place the charger directly above the battery being charged.
- Never set a battery or any other object on the charger.
- Use only in a well-ventilated area.
- Never allow battery acid to drip on the charger.
- Do not restrict ventilation.
- Ensure someone is nearby for assistance when working with lead-acid batteries.
- Wear complete eye and clothing protection.
- Avoid touching eyes; have fresh water and soap available for acid contact.
- Do not drop metal tools onto the battery.
- Remove all personal metal items (rings, bracelets, necklaces, watches) when working with a lead-acid battery.
- Never overcharge a battery.
- Never alter the AC cord or plug.
- Changes or modifications not approved by the manufacturer could void user authority to operate the equipment.
- This equipment complies with FCC Rules Part 15 for Class B digital devices.
- If using for a marine battery, remove and charge on shore unless specialized equipment is used.
- Check battery post polarity: positive (+) is usually larger.
- The external cord length (including plug) must be at least 6 feet (1.8m).
- Connect the red positive (+) charger clip to the positive (+) battery post.
- Place the free end of the battery cable away from the battery before connecting the black negative (-) charger clip to the free end of the cable. Never face the battery during connection.
- When disconnecting, always reverse the connection order, staying as far away as possible from the battery.
- Plug the AC power cord into a properly grounded 120V outlet according to local ordinances.
- Never change or alter the AC power cord or plug pins.