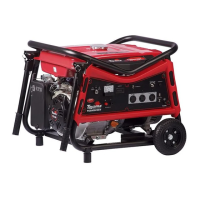
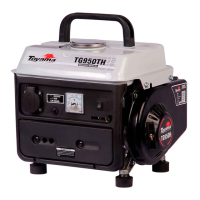
This document is a comprehensive owner's manual for a series of Toyama gasoline engine generators, covering models TG1200, TG3100, TG4500, TG6500, TG8000CXEV, and TG8000CXEV3. It provides detailed instructions for operation, maintenance, and safety precautions.
Function Description:
The device is a gasoline engine generator designed to produce electrical energy. It is intended for various applications, providing a portable power source. The manual emphasizes the importance of proper usage and maintenance to ensure safe and efficient operation.
Important Technical Specifications:
The manual provides a table of specifications for different models:
- Engine Type: Single-cylinder, 4-stroke gasoline, air-cooled, OHV (Overhead Valve).
- Displacement / Cylinder:
- TG1200: 87 cm³
- TG3100: 212 cm³
- TG4500: 389 cm³
- TG6500/TG8000CXEV/TG8000CXEV3: 420 cm³
- Maximum Rotation: 3600 rpm for all models.
- Fuel Tank Capacity:
- TG1200: 5L
- TG3100: 15L
- TG4500/TG6500/TG8000CXEV/TG8000CXEV3: 25L
- Oil Capacity: 0.4 L (TG1200), 0.6 L (TG3100), 1.1 L (TG4500/TG6500/TG8000CXEV/TG8000CXEV3).
- Recommended Oil: 10W30.
- Starting System:
- TG1200/TG3100/TG4500: Electric + Recoil Start / Recoil Start.
- TG6500/TG8000CXEV/TG8000CXEV3: Electric + Recoil Start / Manual Recoil.
- Spark Plug: Toyama TSP-4SS.
- Frequency: 60 Hz (Brazil/Colombia), 50 Hz (Chile).
- Voltage Regulator: AVR (Automatic Voltage Regulator).
- DC Output: 12V – 8.3A for all models.
- Battery (if equipped):
- TG1200: 12V 4Ah
- TG3100: 12V 7Ah
- TG4500: 12V 18Ah
- TG6500/TG8000CXEV/TG8000CXEV3: 12V 18Ah
- Maximum Power:
- TG1200: 1.2 kVA
- TG3100: 3.1 kVA
- TG4500: 6 kVA
- TG6500: 6.5 kVA
- TG8000CXEV/TG8000CXEV3: 8.5 kVA
- Net Power / Nominal Power:
- TG1200: 1 kVA
- TG3100: 2.8 kVA
- TG4500: 5.5 kVA
- TG6500: 6 kVA
- TG8000CXEV/TG8000CXEV3: 8.1 kVA
- Voltage / Tension:
- TG1200: CXV1 120V, CXV2 240V
- TG3100: 120/240V
- TG4500/TG6500/TG8000CXEV/TG8000CXEV3: CXEV3D 220V, CXEV3D 380V
- Phases: Single Phase / Monophasic (TG1200, TG3100, TG4500, TG6500), Three Phase / Triphasic (TG8000CXEV, TG8000CXEV3).
- Power Factor:
- Single Phase: 1 cos φ
- Three Phase: 0.8 cos φ
- Dimensions (Packaging):
- TG1200: 515 x 300 x 460 mm
- TG3100: 620 x 605 x 485 mm
- TG4500/TG6500/TG8000CXEV/TG8000CXEV3: 815 x 585 x 580 mm
- Net Weight:
- TG1200: 28 kg
- TG3100: 68 kg
- TG4500: 80 kg
- TG6500/TG8000CXEV/TG8000CXEV3: 86 kg
- Gross Weight:
- TG1200: 33 kg
- TG3100: 72 kg
- TG4500: 85 kg
- TG6500/TG8000CXEV/TG8000CXEV3: 91 kg
Usage Features:
- Safety First: The manual extensively covers safety symbols and precautions, including warnings about exhaust gases, operating in wet areas, proper ventilation (at least 1m free space around the equipment), and the risk of electric shock. It also advises against connecting the generator to internal power grids without approved projects.
- Initial Operation: New or recently serviced engines should operate without load and at low speed for the first 2 hours.
- Fuel and Oil: Always use good quality fuel and respect maximum/minimum oil and fuel levels. Only use unleaded gasoline with an octane rating of 93 or higher.
- Pre-Operation Inspection: Before starting, users must check the fuel level, engine oil level, for oil or fuel leaks, dirt around the muffler and starter handle, and the air filter cleanliness. They should also check for signs of malfunction, tightness of nuts and bolts, and correct fit of covers.
- Grounding: Proper grounding is crucial to avoid electric shocks and dissipate static electricity. This procedure should be performed by a qualified electrician.
- Assembly: Instructions are provided for installing wheels, handle support, and damping brackets (if equipped).
- Starting the Engine (Manual Starter):
- Disconnect all loads.
- Place the fuel register in the open position.
- For a cold engine, close the choke. For a warm engine, keep the throttle open.
- Set the switch to the ON position.
- Hold the starter handle, pull lightly until resistance is felt, then pull firmly.
- Slowly return the starter handle to its original location.
- If the engine does not start, repeat the steps.
- After the engine runs, return the choke lever to the open position (if previously triggered).
- Starting the Engine (Electric Starter):
- Connect the positive (+) battery lead to the positive (+) battery terminal.
- Connect the negative (-) battery cable to the negative (-) battery terminal.
- Disconnect all loads.
- Place the fuel register in the open position.
- For a cold engine, close the choke. For a warm engine, keep the throttle open.
- Turn the key (or press the button, depending on the model) to the start position, holding for a maximum of 5 seconds.
- If the engine does not start, wait 10 seconds and repeat.
- Connecting Loads:
- With the engine running and stable, set the load circuit breaker to OFF (if equipped).
- Switch off the appliance to be connected.
- Connect the device to the corresponding power outlet.
- Place the load circuit breaker in the ON position (if equipped) and turn on the device.
- Always switch on the appliance with the highest power first, then the lowest power.
- Warning: The sum of all connected loads must not exceed the generator's nominal power. Overloading can damage the generator and connected equipment.
- Disconnecting Loads:
- Disconnect all appliances connected to the generator.
- Set the generator load switch to the OFF position (if equipped).
- Remove the sockets.
- Let the engine operate without load for 1-2 minutes before unplugging.
- Stopping the Engine (Manual Starter):
- Disconnect the load connected to the generator.
- Let the engine run at idle for 2 minutes.
- Turn the switch to OFF.
- Place the fuel register in the closed position.
- Stopping the Engine (Electric Starter):
- Disconnect the load connected to the generator.
- Let the engine run without load for 2 minutes.
- Turn the key (or press the button) to the OFF position.
- Place the fuel register in the closed position.
- Warning: The exhaust remains hot for a few minutes after turning off the engine.
Maintenance Features:
The manual provides a detailed maintenance schedule:
-
In the First 20 Hours or 1st Month:
- Replace engine oil.
- Clean the air filter.
-
Every 50 Hours or 3 Months:
-
Every 100 Hours or 6 Months:
- Replace engine oil.
- Check and clean the spark plug.
-
Every 300 Hours or 12 Months:
- Replace the air filter element.
- Replace the spark plug*.
- Check and adjust the valve clearance*.
- Clean the tank and fuel filter*.
- Clean the combustion chamber*.
- Verify or change (if necessary) the fuel line*.
*These services must be done at an authorized Toyama technical assistance.
-
Replacing Engine Oil:
- Place the engine on a flat and level surface.
- Remove the oil dipstick and the oil drain bolt, drain all the oil into a suitable container.
- Reinstall and tighten the oil drain bolt.
- Fill the oil reservoir to the recommended maximum level.
- Put the oil dipstick back and tighten it.
- Warning: Do not tilt the engine or equipment to an angle that may cause fuel leakage. Toyama engines do not come with oil in the crankcase. Operating with low oil level can damage the equipment. The oil alert system (if available) will automatically shut down the engine if the oil level is below the recommended level. Discard used oil in a correct location.
-
Cleaning the Spark Plug:
- Turn off the engine and allow to cool.
- Disconnect the spark plug protection.
- Remove any dirt around the spark plug.
- Remove the spark plug using an appropriate wrench.
- Remove dirt from the electrode with a steel brush.
- Check the spacing between the electrode and the spark plug (must be 0.6-0.7 mm).
- Reinstall the spark plug manually, threading only what is necessary.
- After seating, tighten with a wrench about 1/8 to 1/4 turn.
- Reinstall the spark plug protection.
- Warning: A loose spark plug can overheat and damage the engine. Over-tightening can damage the threads in the cylinder head.
-
Changing the Spark Plug: Follow the same steps as cleaning, but replace the spark plug with a new one. Consult the datasheet for the recommended spark plug.
-
Cleaning the Carburetor Cup:
- With the fuel tank empty, remove the fixation bolt of the cup.
- Remove the threaded cup and the O-ring.
- Wash them using a non-flammable solvent.
- Dry them completely.
- Reinstall the O-ring, thread the cup, and tighten the fixation bolt.
- Warning: Clean the motor with the engine off. Check for possible leaks; if they occur, replace the O-ring.
-
Air Filter Maintenance:
- Remove the cover.
- Remove the foam element and wash it with warm water and neutral soap or non-flammable solvent.
- Squeeze the element onto a clean, dry cloth (never twist).
- Clean any internal dirt on the housing with a damp cloth.
- Replace the filter element and the cap.
- Warning: Clean the air filter more often in dusty areas. Operating without an air filter or with a dirty one will cause dirt to enter the engine, leading to premature wear.
-
Cleaning the Fuel Tank's Strainer:
- Remove the fuel tank cap.
- Remove the strainer from the mouth of the fuel tank.
- Soak it in a container with non-flammable solvent and remove dirt with a brush if necessary. Then let it dry.
- Reinstall the strainer in the tank.
- Replace the tank cap by tightening securely.
- Warning: Never fuel the generator without the fuel strainer; dirt in the fuel can cause damage to the equipment.
-
Removing Fuel from the Tank (for storage):
- Remove the hose clip and the fuel hose.
- Remove the fuel tank cap.
- Drain all fuel from the tank into a suitable container.
- Replace the tank cap, the hose, and the clip on the hose.
- Warning: Avoid handling fuel near sparks, flames, or hot parts. Always work in a well-ventilated area. Never drain fuel while the equipment is running. Fuel and its vapors are extremely flammable and explosive.
-
Storage:
- Remove fuel from the tank.
- Drain the remaining fuel through the carburetor drain bolt.
- Clean the air filter.
- Remove the spark plug, put 5ml of clean oil into the cylinder.
- Pull the starting rope 2 or 3 times to distribute the oil.
- Reinstall the spark plug.
- Pull the starting rope slowly until engine resistance is found, then release slowly to return to starting position.
- Clean the metal parts of the engine with a cloth dampened in a non-flammable product.
- Cover the engine and store it in a dry and ventilated place.
- Warning: Gasoline oxidizes and deteriorates over time, causing engine failure. If the cylinder has been covered with oil during preparation for storage, the engine may emit smoke for a short time after operation. Perform this procedure for storage periods longer than 30 days. Avoid humid environments and areas with electric sparks. Never clean with chemicals or abrasives.
-
Transport:
- If the engine was running, wait at least 15 minutes for cooling.
- Place the fuel register in the closed position.
- Put the engine on flat surfaces to prevent spills of oil and fuel.
- Warning: Hot engine can burn you and ignite some materials. In case of diesel leakage, clean it immediately to avoid explosions. In the event of an oil spill, clean it to avoid slipping and falling. Never carry the motor lying down or upside down.
The manual also includes a warranty term, outlining conditions for coverage and exclusions. It emphasizes the importance of reading the manual and all warnings before operating the equipment.