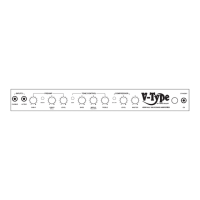
INTRODUCTION
Congratulations on your purchase of a TRACE ELLIOT V-TYPE V8 valve bass amplifier.
Please take a few minutes to read this owners manual so you may fully understand the
capabilities of this unit. With a little care your new amplifier should provide you with years
of satisfactory service.
The circuit topology of the V8 has been based on traditional valve amplifier designs,
with new ideas incorporated where beneficial for either sound quality or production
efficiency.
The main signal path through the preamp and power stage sections is 100% valve, relays
have been used for all the switching functions, and integrated circuits have been used in
the DI circuit for quiet operation and impedance matching for 600 ohm mixer inputs.
The chassis is made from gloss black, stove-epoxy coated, 16 gauge zintec. Cabinet is
made from 3/4” plywood.
Highest quality porcelain valve sockets have been used throughout for the KT88’s,
ECC83’s and EM84.
The power and output transformers have been custom made for maximum performance
using high grade laminations. Windings are resin soaked and manufactured to pass
international approvals.
A highly regulated DC supply is used for heater filaments in all preamp valves for
minimal hum levels.
An external biasing facility is featured - this enables techs to check/reset output bias at
any time without removing the chassis.
Internal wiring and glass epoxy circuit board layouts use multiple return star earthing for
low noise and hum. All audio sections have been laid out for sonic performance using
‘point to point’ wiring principles.
Gold plated jack sockets are used exclusively throughout.
Two quiet chassis mounted fans keep the power output valves at safe operating
temperatures even when playing at high volumes.
FAST TRACK GUIDE AND SWITCH ON SEQUENCE
1) Check that the POWER switch on the rear panel is set to OFF, the front panel switch is
set to STANDBY and that the unit has the correct speaker load connected.
2) Connect the unit to an appropriate mains power point with the mains lead provided.
We also recommend that the MASTER volume is turned down to zero before switch
on or switch off purely to prevent any unwanted noises from being amplified loudly.
Switch POWER switch to the ON position.
3) While the unit is warming up (allow at least one minute), connect your instrument to
an appropriate INPUT socket on the front panel.
4) Switch STANDBY switch on front panel to ON.
5) Set all front panel controls to 12 o’clock as a starting point and then adjust to taste.
6) After use switch to STANDBY and then OFF.
3
 Loading...