Chapter 2
Self-Setup and Activation
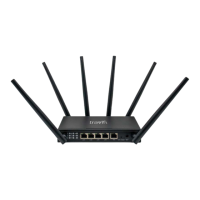
Front Side Back Side
Cellular - LTE Antennas WiFi Antennas
2.1. Pre-Activation Checks
Before activating with TravlFi, please review these 3 steps. If your RV came equipped with
the JourneyXTR from the factory, locate the device first and then proceed with steps 1-3.
1. Device Check: Check that all antennas are secure and the JourneyXTR is powered on.
2. Status Check: Power, vSIM and WiFi indicators should be illuminated. The LTE and signal
strength indicators will turn on after activation of the JourneyXTR.
3. Review Chapter 3: Continue to Chapter 3, connect your devices and call TravlFi.
66666
6
6
66
JourneyXTR
Ensure that the device is in a suitable location within the RV to receive cellular signal. Attach all sup-
plied antennas to their respective ports on the JourneyXTR and connect the JourneyXTR to power.
The JourneyXTR can be setup next to a window or windshield with adequate airflow. Cabinets may
also be suitable, but can degrade cellular reception. Do not block side vents or set other devices
on top of the JourneyXTR.
If the JourneyXTR was pre-installed by your RV manufacturer, some configurations may be
equipped with a rooftop mounted antenna.
 Loading...