About this manual
This manual is for Bontrager lights Ion 450R and
Ion 450RT.
The RT version allows wireless control when
paired with the Bontrager Transmitr system.
Please read this entire manual. Check for
updates at bontrager.com
IMPORTANT: Check your local lighting laws.
Flashing Lights and full brightness may not be
allowed in all locations. Ion 450 R/RT do not
conform to the German road traffic regulation
StVZO.
For more information
If you need help not offered by this manual, talk
to your Bontrager retailer or visit bontrager.com
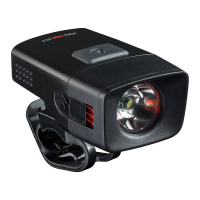
List of parts
Light (with battery enclosed)
“To see” LED light source
provides a bright light
up to 450 lumens in a
focused 15-degree beam
pattern to illuminate the
road ahead.
“To be seen” light sources at the sides of the
light provide 270-degree visibility.
The permanently enclosed Lithium-ion (Li-ion)
battery is a high-performance rechargeable
1450 mAh cell.
Quick connect mounting bracket
(PN W527649)
Quick connect fits any size of round handlebar,
22.2mm to 35mm.
The mount may be turned 90 degrees for
attaching to the stem.
Charger cable (PN W327765)
Micro USB cable can be
plugged into a computer
or wall adapter (adapter
not included).
Welcome.
www.bontrager.com
Operating the light
Power button
To turn on, press the
power button.
When turned on, the
Ion 450 will be in the
output mode last used
before turning off.
To turn off, press and hold the power button.
The power button LED tells the percent of battery
charge that remains.
Power button LED color Run time
Green 25 to 100%
Red steady 5 to 25%
Red flashing Less than 5%
To change mode
1. Quick-press the power button. Each press
moves to the next mode (see table below).
Modes of the Ion 450R/RT
Mode
Lumen Output (peak)
Runtime
(hours)
High 450 1.5
Medium 200 3
Low 100 6
Night Flash 50 steady with 150 flash 8
Day Flash 300 day pattern 10
Low Battery Low Battery protection
automatically adjusts the output brightness to
50 lumens when the battery supply goes below
5% and extends the light output for an additional
20 – 30 minutes.
High Beam* enables full brightness when paired
with Transmitr Remote and center button on
remote is pressed. Pressing the center button
again will return light to previous mode.
* Ion 450 RT only - The high beam feature can
be used only when paired to a Transmitr Remote.
Trail Configuration enables the Ion 450 R/RT
to toggle between 450 and 200 lumen steady
modes. To enable and disable press and hold
the power button for 10 seconds with the light
off. The main LED will flash once indicating trail
configuration has been enabled/disabled.
The light may be hot to touch.
CAUTION
Charging the battery
Although the Ion 450R/RT
is fully charged at the factory,
it is recommended to charge it
before first use. Complete
charging takes approximately
4 hours from empty.
1. Plug the Micro charger
cable into the USB port
on the light.
2. Plug the cable into
a computer or wall adapter.
Power button
OR
Accessories
This light is compatible with these optional
mounting systems. Please see your Bontrager
retailer for details.
Bontrager helmet mount (PN 428462)
• A strap mount that easily attaches a Bontrager
Ion or Flare light to most helmets.
Bontrager Lithos helmet Blendr
accessory mount (PN 516635)
• A Blendr mount that integrates into the
Bontrager Lithos helmet.
Bontrager Ion handlebar mount
(PN W530421 fits 22.2-31.8mm)
(PN 552375 fits
31.8-35mm)
• A hinged clamp that
securely attaches
an Ion light to the
handlebar.
Bontrager Sync handlebar bracket
(PN 418921)
• An adjustable rubber
mount that fits
22.2–35mm
handlebars or
seatpost.
Bontrager Blendr accessories
• An attachment system designed as a feature
of Bontrager Blendr stems that fits a variety of
accessories. Please see your Bontrager retailer
for details.
Installing the light
Before first use, charge the battery.
1. Place the Quick connect on the handlebar
with the strap in front.
If desired, the bracket can be placed on the
stem. Rotate the mount 90 degrees.
2. Stretch the strap
under the bar and
connect to the
hook.
NOTE: Use the second
hook to latch excess
strap.
3. From the front, slide
the light onto the
bracket until the light
engages.
Removing the light
To remove the light,
press down on the
tab and slide the light
forward.
BT17_ION450R_RT_V1
Status indicator while charging
While charging, the status indicator will flash:
• Red: Actively charging
• Green: Charging complete
NOTE: As the battery progresses from zero
charge to full charge, the duration of the flashes
will get progressively longer.
The power button LED indicates the battery
charging status.
Power button color Battery power status
Flashing red Charging: flash rate
slows as charge nears
completion
Green Charge complete
For best results, charge at room temperature in
a dry place. Avoid extreme conditions including
wet, cold, or extremely hot.
NOTE: Use with a quality CE or UL approved
USB charger rated for 500 mA or greater.
Pairing to the Transmitr
Remote or select Garmin Edge
computers (Ion 450RT only)
The Transmitr Remote or select Garmin Edge
computers, sold separately, allows remote
control of the light. This feature is only available
on the Ion 450RTor other compatible
Transmitr lights.
For more complete instructions, refer to
the Transmitr manual at bontrager.com or
visit support.garmin.com for Garmin related
instruction and a complete listing of compatible
Edge devices.
All pairings must be done in a single session.
Before starting, place the remote and all lights
within a small area.
NOTE: Move 15 feet from other Transmitr / ANT+
compatible lights to prevent accidental pairing.
If a light is accidentally paired, start the pairing
process over.
1. Place the light close to the Transmitr Remote
(within 15cm / 6in).
2. Quick-press the power button on the light to
turn it on, then quick-press to turn it off again.
NOTE: After completing this step, do not press
the power button on the light again until pairing
is complete.
3. Press-and-hold the center button on the
Transmitr Remote for at least 8 seconds.
When the corner buttons flash, release the
center button.
4. While the remote searches for a light, its
center button flashes red. When the Transmitr
Remote finds a light, the center button on the
remote will change from red to green, and the
found light will flash.
5. While the found light is still flashing, quick-
press the button on the Transmitr Remote
to which you would like to pair the light. The
selected button will glow, and the found
(paired) light will stop flashing and turn off.
NOTE: After the pairing, the center button on
the remote will flash red until the Transmitr
Remote finds another available light.
6. Repeat Step 4 and Step 5 for each additional
light to be paired.
NOTE: After pairing is finished, pairing any
additional lights will require that you repeat
the entire pairing procedure.
To exit pairing
1. When all lights are paired, quick-press the
center button on the remote. The button will
stop flashing and turn off.
To verify pairing
1. Quick-press the center button on the remote
to turn on all paired lights.
2. Press-and-hold the center button to turn off
all of them.
3. Turn on each light individually. Quick-press
each paired button on the remote to turn on
the individual light(s).
4. Press-and-hold the same button to turn off
the light.
Front of bike