2
SLD 3860
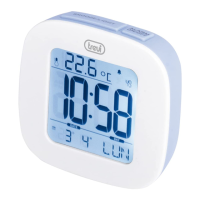
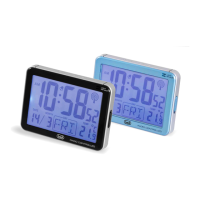
DESCRIZIONE COMANDI
1. Tasto Snooze/Light, disattivazione temporanea allarme/attivazione
retroilluminazione.
2. Tasto Alarm ON/OFF, attivazione/disattivazione/impostazione allarme.
3. Simbolo allarme.
4. Indicazione giorno della settimana.
5. Datario.
6. Orologio.
7. Temperatura.
Sul retro:
8. Tasto Mode, impostazione formato orario/ora/anno/data/lingua giorni
della settimana.
9. Tasto , tasto incremento cifre in impostazione.
10. Vano batterie 2xAAA (non incluse).
11. Tasto , tasto diminuzione cifre in impostazione.
12. Tasto C/F, selezione unità di misura della temperatura °C/°F.
ALIMENTAZIONE
Aprire il vano batterie(10) posto sul retro dell’apparecchio ed inserire due pile
formato “AAA” rispettando le polarità indicate. All’inserimento delle batterie,
la sveglia si accende e riproduce un breve suono.
REGOLAZIONE DELL’OROLOGIO E DATA
1. Tenere premuto il tasto Mode(8) per avviare la regolazione dell’orologio.
2. Premere il tasto (9) o (11) per selezionare il formato dell’ora
(12/24H).
3. Premere il tasto Mode(8).
4. Impostare l’ora tramite i tasti (9) o (11).
5. Premere il tasto Mode(8), sul display cominceranno a lampeggiare i
minuti.
6. Impostare i minuti tramite i tasti (9) o (11).
7. Premere il tasto Mode(8), sul display comincerà a lampeggiare l’anno.
8. Impostare l’anno tramite i tasti (9) o (11).
9. Premere il tasto Mode(8), sul display comincerà a lampeggiare il mese
(Month).
10. Impostare il mese tramite i tasti (9) o (11).
11. Premere il tasto Mode(8), sul display comincerà a lampeggiare il giorno
(Date).
12. Impostare la lingua per i giorni della settimana tramite i tasti (9) o
(11).
13.PremereiltastoMode(8)noatornareallavisualizzazionedell’ora.
REGOLAZIONE E ATTIVAZIONE ALLARME
1. Tenere premuto il tasto Alarm ON/OFF(2) per impostare l’allarme.
2. Impostare l’ora tramite i tasti (9) o (11).
3. Premere il tasto Alarm ON/OFF(2), sul display cominceranno a lampeg-
giare i minuti.
4. Impostare i minuti tramite i tasti (9) o (11).
5. Premere il tasto Alarm ON/OFF(2) per confermare.
6. In modalità visualizzazione ora, premere il tasto Alarm ON/OFF(2) per
attivare l’allarme. Ad allarme attivo sul display comparirà il simbolo(3).
DISATTIVAZIONE ALLARME
In modalità visualizzazione ora, premere il tasto Alarm ON/OFF(2) per disat-
tivare l’allarme. Ad allarme disattivato il simbolo(3) sul display scomparirà.
FUNZIONE SNOOZE
La funzione snooze permette la ripetizione della suoneria più volte dopo
averla sospesa con il tasto Snooze(1) (simbolo(3) sul display lampeggerà).
La suoneria verrà ripetuta più volte ad intervalli di 5 minuti.
TEMPERATURA °C/°F
Premere il tasto C/F(12) per selezionare l’unità di misura della temperatura
in °C o °F.
DATI TECNICI
Alimentazione: .................... 2xAAA, 1,5V
Italiano English
FUNCTIONS DESCRIPTION
1. SNOOZE/LIGHT, deactivate temporarily alarm/backlight command.
2. Alarm ON/OFF, on/off/alarm setting.
3. ALARM Icon.
4. Day indication.
5. Date.
6. Clock.
7. Temperature.
On the back:
8. Key Mode, setting time format/hour/year/date/language days of the week.
9. button, button Up.
10. Battery compartment 2xAAA batteries (not included).
11. button, button Down.
12. C/F key, select unit of temperature °C/°F.
POWER SUPPLY
Open the battery compartment (10) on the back of the unit and insert two
batteries “AAA” according to polarity.
When inserting the batteries, the clock turns on and plays a short sound.
SETTING THE CLOCK AND DATE
1. Press the Mode button(8) to start the clock adjustment.
2. Press (9) o (11) buttons to select the format (12 / 24H).
3. Press the Mode button(8).
4. Set the hour with the (9) o (11) buttons.
5. PresstheModebutton(8),thedisplaywillbegintoashtheminutes.
6. Set the minutes with the (9) o (11) buttons.
7. PresstheModebutton(8),thedisplaywillbegintoashtheyear.
8. Set the year using the (9) o (11) buttons.
9. Pressthe Modebutton(8), thedisplay willbeginto ash the month
(Month).
10. Set the month using the (9) o (11) buttons.
11. PresstheModebutton(8),thedisplaywillbegintoashtheday(Date).
12. Set your language for the day by using the (9) o (11) buttons.
13. Press the Mode button (8) more times until you return to the time display
(TIME).
SETTING AND ACTIVATING ALARM
1. Press and hold Alarm ON/OFF button(2) to setting the alarm.
2. Set the hour with (9) o (11) buttons.
3. PressAlarmON/OFFbutton(2),thedisplaywillbegintoashtheminutes.
4. Set the minutes with (9) o (11) buttons.
5. PressAlarmON/OFFbutton(2)toconrm.
6. When you return to the time display (TIME), for active alarm, press Alarm
ON/OFF button(2), will appear icon ALARM(3).
DEACTIVATING ALARM
When the time display, press Alarm ON/OFF button(2) to deactivating alarm.
For alarm off icon ALARM(3) is off.
SNOOZE FUNCTION
With activat alarm, snooze function allows repetition of ringer more times after
it suspended with the snooze button(1) (icon alarm(3) will blink).
The ringtone will be repeated several times at 5 minutes intervals.
TEMPERATURE °C/°F
Press the Set button (12) to select the unit of measurement of the tempe-
rature in °C or °F.
TECHNICAL DATA
Power Supply: ....................2xAAA, 1,5V
 Loading...