The document describes the assembly, usage, and maintenance of the Triton Ladoga 2 Advanced touring and sea kayak.
Function Description:
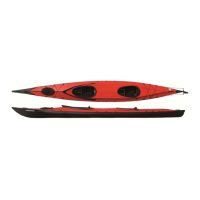
The Triton Ladoga 2 Advanced is a high-performance folding touring and sea kayak designed for stability and stiffness. It is assembled from a frame and a hull, with various components contributing to its structural integrity and functionality. The kayak is suitable for touring and sea use, offering excellent handling and a strong hull. It can be paddled "open" or with a deck attached. The design emphasizes a stiff connection between frame elements, which contributes significantly to the kayak's overall performance on the water.
Important Technical Specifications:
The kayak consists of numerous parts, including:
- Frame Elements:
- 8x Stringer elements with lock
- 13x Stringer elements without lock
- 4x Sleeves, small
- 2x Sleeves, big
- Keel ladder with riveted half tube
- Keel rod (with 2x clips)
- Keel fork (one with open end, one with hemispherical end)
- Bow segment
- Stern segment
- 6x Cross ribs (#1, #2 with steel hooks, #3 with steel pickup element, #4 with clip on top, #5, #6 with steel hooks)
- Half cross ribs (supporting seats)
- 2x Bent coaming rod (wider diameter)
- 4x Coaming rod (2x with D-rings; wider diameter)
- 2x Ridge bar (identical)
- Deck rod (supports the deck between cockpits)
- Hull and Accessories:
- Hull
- Deck
- 2x Seat, 2x back rest
- Cover for loading hatch
- Rudder system
- Repair kit
- Backpack and waist belt (not pictured)
The kayak features sponsons that are inflated to provide pressure equalization and ensure a symmetrical underwater hull. The frame's stiffness is achieved through precise alignment and connection of stringer elements, which are designed to withstand both pressure and tension. The coaming rods also connect to pickup elements in the bow and stern, contributing to the overall structure.
Usage Features:
- Assembly: The assembly process is detailed, with a strong recommendation to follow instructions carefully, especially for the first few times. Practice makes the assembly easier and quicker (approximately 30 minutes after some experience). Key steps include assembling the bow and stern segments, inserting them into the hull, tensioning the hull, inserting seats, connecting stringer elements, installing and closing the coaming, installing cockpit cross ribs, mounting the rudder system, and inflating sponsons.
- Stringer Connection: Stringer elements are connected by aligning "locks" and pushing or pulling them into place. Sleeves are then slid over the connections. This method ensures a stiff and strong connection.
- Coaming Installation: Coaming rods are inserted into a channel, with bent rods and straight rods connected and then secured to pickup elements in the bow and stern. It is often easier to push the coaming rod from the inside of the boat to create a straight line and prevent jamming.
- Seat Installation: Seats are hung from lower stringer elements and pushed towards the bow and stern. The filling tubes for inflating the seats should always point forwards. Half cross ribs are installed in front of the seats to support paddler weight and prevent pressure on stringer elements. Backrests are installed with upper straps through D-rings on the coaming and lower straps fixed to the cross rib behind the seat.
- Sponson Inflation: Sponsons are inflated using filling tubes connected by a pipe, ensuring pressure equalization and a symmetrical hull. Inflation by mouth is recommended, stopping when it becomes harder to inflate.
- Deck and Hatch: The deck is attached via Velcros, starting from the top of the cockpit. A deck rod (10a) can be clipped in to support the deck between cockpits. The loading hatch cover is secured to the deck lining, with an elastic strap that stretches over time for easier use.
- Disassembly: Disassembly proceeds in reverse order of assembly. If the frame is tight in the hull, removing the first cross rib through the hatch can reduce tension. Tapping the lower part of the bow can also help loosen a tight bow frame.
- Folding the Hull: The hull is spread flat, folded lengthwise, then folded from the top (about 25cm), and then the bow and stern are folded to the middle (approximately one packing bag length), followed by another fold from the stern to the middle, and finally from the bow over the folded stern side.
- Multifunctional Attachment: The kayak includes a multifunctional attachment on the bow, ready for sailing systems (e.g., "flat earth" sails) or lighting systems (e.g., "Navisafe").
Maintenance Features:
- Salt Water Use: For use in brackish or salt water, treatment of the rods with "CorroFilm" is highly recommended. CorroFilm creates a transparent, dry protective film against salt water corrosion. After exposure to salt water, rods and boat skin should be cleaned with fresh water.
- Storage: If storing for a longer time, sponsons should be deflated. The boat skin and rods must be dry before packing and storing. A folding boat should ideally be built up and removed several times a year.
- Carrying: When carrying the boat, support it from the bottom in addition to using the handles to relieve tension on the handles.
- Safety: Always wear a life jacket and be aware of rapid weather changes.
- Repairing: The PVC/PU skin can be repaired using the included repair kit. This involves cutting a strip of material, ensuring it generously covers the damaged area, rounding corners, cleaning both surfaces (roughening with sandpaper is optional but recommended), applying a thin layer of glue to both surfaces, waiting for the glue to dry slightly, and then pressing the patch firmly. For home repairs, a hot air dryer can be used to warm the patch and hull for a firmer bond.
- On Tour Repairs: Repairs can be reused shortly, but the adhesive and protective effect improve over 12 hours. Sponsons can be repaired similarly. Ensure a clean, grease-free surface.
- Keel Strip and Reinforcements: The kayak is equipped with a keel strip. Additional reinforcements can be applied at stressed points, and other keel strips or partial skin reinforcements may be recommended depending on usage.